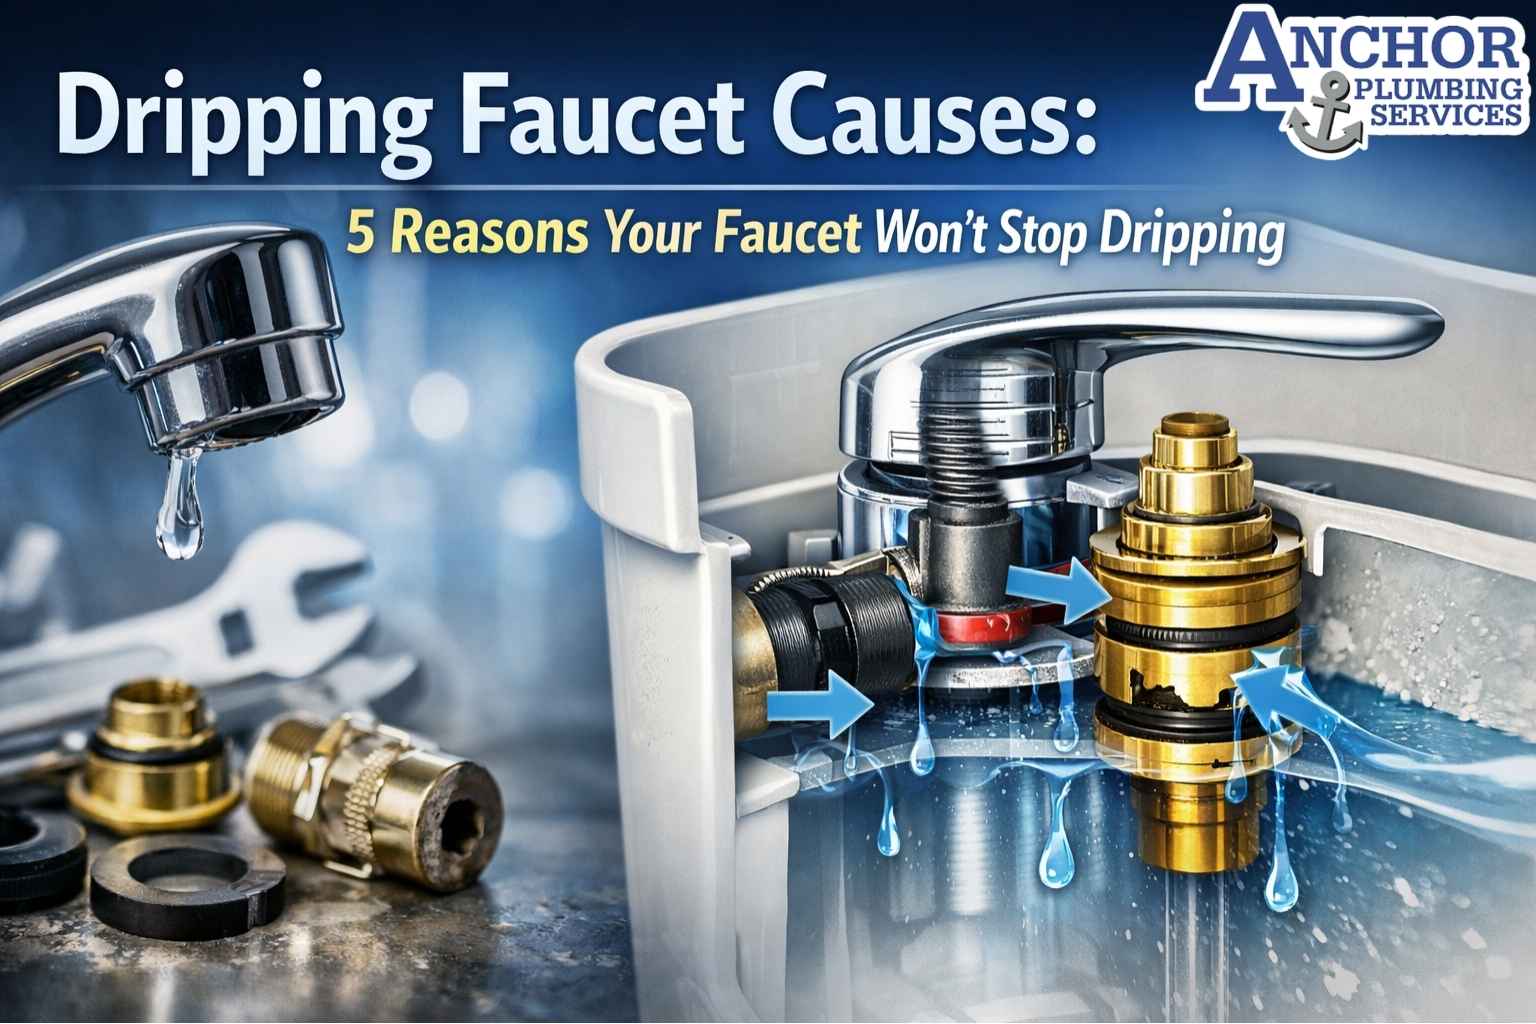
Frozen Plumbing in San Antonio, TX

How to Protect Plumbing from Freezing During Winter Weather?

Protect plumbing from freezing by insulating exposed pipes, sealing air leaks, and keeping indoor temperatures above 55°F. Let faucets trickle during hard freezes and open cabinets to circulate warm air. Disconnect garden hoses, cover outdoor spigots, and locate your main shut-off valve to respond quickly during a burst pipe emergency.

This guide explains simple steps that protect indoor, outdoor, and hidden pipes during winter cold fronts. Homeowners reduce freeze risk when overnight temperatures approach 32°F.

How Freezing Temperatures Damage Plumbing in Your Home?

Freezing temperatures cause pipes to freeze, expand, and burst. Ice forms from standing water, increases internal pressure, and breaks weak pipe sections. Frozen pipes leak inside walls, ceilings, and around water heaters. These leaks saturate materials and cause mold. Copper splits, PVC cracks, and PEX fails under pressure. Damage includes flooding and structural decay.

Frozen plumbing creates several problems. Water leaks inside walls saturate insulation and drywall. Burst elbows in ceilings cause visible stains and dripping. Frozen supply lines near water heaters or washing machines release sudden flooding when thawed. Persistent moisture creates mold growth. Structural materials weaken when exposed to repeated wetting and drying cycles.

Copper, PEX, and PVC respond differently to freezing. Copper splits along its length under high pressure. PVC cracks at elbows. PEX has some flexibility but still fails when pressure rises for several hours. Risk increases when temperatures stay below 32°F overnight. Pressure buildup rises as the ice plug expands and traps water. These failures create expensive water damage across floors, cabinets, and subfloors.

Which steps reduce risk of indoor frozen pipes?

Simple actions like running a trickle, keeping heat on, and opening cabinets reduce freeze risk for indoor pipes during a cold night.

  1. Let vulnerable faucets run at a slow trickle: Exterior wall sinks and fixtures far from the main line freeze first. A pencil thin stream keeps water moving and reduces ice formation.
  2. Keep the thermostat set to at least 55°F: Maintain this temperature throughout the home at night or when away. Stable indoor warmth prevents pipe temperatures from dropping below freezing.
  3. Open bathroom and kitchen sink cabinets: Warm air circulates around supply lines under sinks. This reduces cold spots near exterior walls.
  4. Use a space heater cautiously in rooms with exposed pipes: Maintain clear distance from combustibles. Keep at least 3 feet of space around the heater. Never leave a heater operating unattended.
  5. Improve airflow in cold rooms: Open interior doors so warm air reaches all areas of the plumbing system.
  6. Check smart thermostat settings: Use freeze alerts or away mode adjustments to prevent indoor temperature drops during a cold front.

Warm air circulation, active flow, and steady temperature reduce the chance of freeze formation inside copper, PEX, or PVC lines.

Why does letting faucets trickle help prevent frozen pipes?

A trickle keeps water moving. Moving water freezes slower than standing water. Flow prevents pressure buildup that causes pipe bursts.
A small stream maintains circulation inside supply lines. This circulation reduces ice plugs in long plumbing runs. Exterior wall pipes benefit most because these areas cool fastest during a hard freeze.

What temperature should you keep in your home to protect pipes?

Keep the home at 55°F or warmer. Temperatures below this level allow interior wall cavities to cool enough for pipes to freeze.
A stable thermostat prevents rapid drops during the night. Homes with drafty walls or older insulation need warmer settings because cold spots develop behind cabinets and near exterior plumbing lines.

How do you protect pipes in unheated spaces like attics, garages, and crawl spaces?

Pipes in unheated attics, garages, and crawl spaces face the highest freeze risk because these areas drop below 32°F faster than the rest of the home. These pipes need insulation, blocked drafts, and controlled airflow to retain heat during cold fronts.

Insulate exposed lines in attics with foam sleeves or pipe wrap. Heat cables provide added protection for long runs near exterior walls or roof vents. Place insulation around bends, tees, and valves because these spots freeze first. Maintain consistent coverage along the pipe and avoid leaving gaps where cold air can enter.

Crawl spaces need physical barriers to block cold airflow. Rigid foam board on exterior walls shields plumbing from wind and temperature swings. Close crawl space vents during a hard freeze, then reopen after temperatures warm again to avoid moisture buildup. Apply insulation to pipes running along joists or rim beams because these surfaces transmit cold quickly.

Garage plumbing requires temperature control and draft protection. Keep the garage door closed to prevent cold air from radiating across exposed pipes. Add insulation sleeves to lines along the ceiling or near the water heater. Use a garage heater safely during severe cold while maintaining clear distances from storage and flammable materials.

Together these steps insulate vulnerable pipes, shield them from wind, and retain warmth inside unheated spaces.

Which pipes in your home should be insulated first?

Insulate pipes located in attics, crawl spaces, and garages first. These lines experience the largest temperature drops during a freeze.

Pipes on exterior walls or near ventilation openings freeze fastest. Focus on long horizontal runs, elbows, and valves because these components lose heat quickly.

How does keeping your garage door closed protect your plumbing?

Closing the garage door traps warmer indoor air and blocks freezing outdoor air from circulating around exposed pipes.

Garage temperatures remain several degrees higher when sealed, which slows heat loss in pipes running along ceilings, water heaters, or utility walls.

Why should you disconnect garden hoses and protect outdoor faucets before a freeze?

Leaving hoses connected traps water inside outdoor faucets and short pipe runs. This trapped water freezes quickly during a cold snap and can burst interior piping behind the wall.

Detach all hoses from hose bibs. Drain each hose and store it in a dry area. Install insulated faucet covers or foam caps on exposed spigots to reduce heat loss. These covers shield the metal faucet from cold air and help prevent ice formation inside the valve.

Older homes often benefit from frost free hose bib upgrades. These faucets move the shutoff point farther inside the wall where temperatures remain warmer. Upgrading reduces freeze related failures in frequently used outdoor spigots.

Protecting outdoor faucets prevents freeze expansion from backing up into the home’s plumbing system and reduces the risk of costly repairs during winter weather.

How does sealing cold air leaks protect plumbing?

Sealing gaps that let freezing air enter reduces cold spots around pipes, especially near windows, doors, and sill plates. Cold drafts lower the temperature inside wall cavities and expose plumbing to sub freezing air during a winter front.

Check common leak points such as window frames, door thresholds, attic access panels, and the sill plate along the foundation. These areas develop gaps that allow outside air to flow directly toward pipes routed through exterior walls. Use caulk around window trim, apply weatherstripping to doors, and seal penetrations with foam insulation to block airflow. Insulate the attic hatch to prevent cold air from dropping into nearby wall cavities.

Pipes beneath windows or behind drafty doors benefit immediately from reduced air leakage. Eliminating drafts raises local temperatures around copper, PEX, or PVC lines and lowers freeze risk during overnight lows. These sealing steps also improve energy efficiency because conditioned indoor air stays inside the home. A tighter building envelope preserves heat, insulates plumbing, and reduces the likelihood of ice formation.

When is it safe to use a space heater to protect vulnerable pipes?

A space heater can protect pipes in a cold room if used on a stable surface, away from combustibles, and never left unattended. Safe operation prevents fire hazards while warming plumbing located on exterior walls.

Use a heater only in dry areas where you can watch it. Maintain several feet of clearance around the heater so nothing touches the unit. Plug the heater directly into an outlet because extension cords increase fire risk. Turn the heater off before sleeping or leaving the home to avoid overheating or accidental contact with surrounding materials.

Space heaters help when central heat cannot warm a cold bathroom, laundry room, or garage where pipes run near exterior surfaces. Direct warmth raises the local temperature around vulnerable lines and prevents freezing during a hard freeze. Supervised use protects plumbing without increasing fire risk.

How do you find and use your main water shut off valve in a plumbing emergency?

Your main water shut off valve stops water flow and limits damage if a pipe bursts. Knowing its location and how to close it quickly prevents flooding during a plumbing emergency.

Look for the valve where the main water line enters the home. In many houses it sits along an exterior wall in the basement or near the front foundation. Homes without basements may have the valve in a crawl space, utility room, or garage. Some homes place the shut off in an outdoor meter box or curb stop near the property line.

Two valve types are common. A ball valve has a lever handle. When the lever is parallel to the pipe, the valve is open. When the lever is perpendicular to the pipe, the valve is closed. A gate valve uses a round wheel. Turning the wheel clockwise closes the valve, while counter clockwise opens it.

Locate the valve before you face an emergency. Practice turning it gently once to ensure it moves freely. During a burst pipe event, close the valve immediately, move people away from flooded areas, and call a plumber. Quick action stops water, limits damage, and prevents further flooding.

How can you winterize your plumbing before the next cold front?

Winterizing your plumbing means preparing vulnerable pipes, sealing drafts, and testing shut off valves before freezing temperatures arrive. A simple checklist reduces freeze risk across the home.

Insulate exposed pipes in attics, crawl spaces, and garages to retain heat. Disconnect hoses and cover outdoor faucets to stop trapped water from freezing. Seal major air leaks around windows, doors, and wall penetrations to block cold drafts. Verify thermostat settings and review smart thermostat schedules so temperatures never drop below safe levels during a cold night.

Locate and test the main shut off valve so you can respond quickly during an emergency. Schedule a professional inspection if you have a history of frozen or burst pipes because recurring cold spots often require targeted repairs or insulation upgrades.

These steps prepare the plumbing system ahead of the first freeze and prevent costly winter damage.

How does Anchor Plumbing Services help homeowners to protect their plumbing in winter?

Anchor Plumbing Services helps San Antonio, Helotes, New Braunfels, Stone Oak, and West or Northwest San Antonio homeowners protect their plumbing when winter temperatures drop. The team inspects exposed pipes, reinforces vulnerable areas, and recommends insulation for attics, garages, and crawl spaces. Technicians upgrade hose bibs, apply outdoor faucet protection, and locate or label the main shut off valve so homeowners can act quickly during emergencies.

Licensed plumbers repair leaks, handle full burst pipe repair, and resolve water heater issues that commonly occur after hard freezes. The company provides year-round water heater, drain, and leak detection services to prevent recurring winter damage. Every visit includes Master Plumber oversight, flat-rate pricing, and service from a licensed, insured, and background-checked technician. With thousands of satisfied customers and a 4.9-star rating, Anchor Plumbing Services is a trusted leader in cold-weather plumbing protection.

Banner showing a leaking water heater with pooling water and a homeowner taking emergency action.

Water Heater Leaking? What to Do Right Now and When to Shut Off Water and Power

A leaking water heater needs fast action because escaping water spreads quickly and can damage floors, walls, and nearby electrical components. This guide explains simple steps you can take right now to protect your home, limit damage, and stay safe. It covers both electric and gas water heaters and explains when to shut off water and power. Local pros in San Antonio can assist if the leak is severe or sudden.

What does it mean when your water heater is leaking?

A leaking water heater indicates that water from the tank or connected fittings is escaping and forming puddles on the floor. This is different from normal condensation or a brief drip from a temperature and pressure discharge pipe. Condensation dries quickly, but a true leak leaves steady moisture around the base or behind the unit.

Any ongoing pooling suggests that pressurized water is leaving the system. This water can saturate drywall, damage flooring, weaken the surrounding structure, and increase the risk of mold. A consistent leak also accelerates rust on metal surfaces and can push a weakened tank toward failure.

The leak source can sit at the top fittings, the side valves, or the bottom of the tank. A steady stream or repeated puddle that returns after drying indicates an active problem. The following sections give immediate steps to stay safe, control water, and prepare for a safe shutdown. These steps help until a professional can diagnose the issue without requiring deep technical repair skills from the homeowner.

What should you do first when you notice a water heater leak?

Clear the area, protect yourself, and confirm where the water is coming from before taking any shutdown steps.

  1. Keep family members, children, and pets away from the wet area.
  2. Avoid stepping in water near electrical outlets, cords, or the base of an electric water heater.
  3. Take quick photos or a short video with a smartphone to document what you see.
  4. Place towels, a pan, or a shallow container to slow the spread of a small leak if it is safe to do so.
  5. Look around the heater for visible moisture at the top fittings, side valves, or bottom seam without touching wires or gas controls.

If water begins to spread quickly or you see a steady stream coming from the tank, move to the shutdown steps in the next section. This early check helps you understand the severity of the leak and protects the home during the first few minutes of the emergency.

When should you shut off water to a leaking water heater?

You shut off water when the leak is more than a minor drip or when you cannot control the spread with towels or a container.

A water heater has a dedicated cold water shutoff valve on the supply pipe at the top of the tank. Closing this valve isolates the heater from the rest of the plumbing system. The valve may be a round gate valve that turns clockwise to close or a lever style ball valve that moves to a perpendicular position to stop flow. This step reduces water entering the tank and slows the leak.

If the cold shutoff valve is corroded, stuck, or hard to reach, switch to the main house shutoff. The main valve sits at the perimeter of the home or near the street connection and stops water for the entire property. Use this option when you cannot isolate the heater directly or when the leak is spreading faster than you can contain.

Never force a stubborn valve. Forcing a handle can snap the stem and worsen the situation. If the valve will not move with gentle pressure, call a plumber. The goal is to isolate the water heater safely without damaging the supply line or valve body.

When should you shut off power or gas to a leaking water heater?

Infographic on shutting off water and power for leaking water heater.

You shut off power or gas when the leak is significant, when water collects near electrical or gas connections, or when the tank may drain to a low level that exposes heating components.

For an electric water heater, locate the dedicated breaker in the electrical panel. Switch the breaker to the off position to de-energize the heater. Electricity and standing water create serious shock risk, so do not touch the panel or heater if you must stand in water to reach them. In that situation, step away and call an electrician or plumber to shut the system down safely.

For a gas water heater, turn the gas control knob on the front of the unit to the off or pilot setting. Some homes also have a nearby gas shutoff valve on the supply line that closes with a quarter turn. Use this valve only if you can reach it without stepping in water. A safe shutdown reduces fuel flow and prevents the burner from operating while the tank is compromised.

A leaking tank can drain enough water to expose electric elements or leave the bottom of a gas heater overheated. Heating components must stay fully submerged or correctly supplied with water to avoid damage. Turning off power or gas protects the heater from running dry and prevents overheating or combustion issues.

A recognized safety guideline notes that any appliance exposed to water near electrical or gas components should be disconnected until inspected by a qualified professional. This principle applies directly to leaking water heaters and supports careful, hazard aware shutdown steps.

Where is the water heater leak coming from?

Many water heater leaks originate at the top fittings, side valves, or the bottom of the tank where corrosion can open small cracks or pinholes.

Finding the leak location helps you understand whether the issue is repairable or whether the tank is failing internally. A loose connection or faulty valve often allows a controlled repair. A rusted tank base usually signals that the tank shell has weakened and may require replacement. A simple visual check gives useful clues without the need for tools.

Check the top of the water heater first. Look at the cold inlet, hot outlet, and any flex connectors for signs of moisture. Small drips often travel down the side of the tank, so trace the path of the water if you can reach it safely.

Move to the side of the tank next. Inspect the temperature and pressure relief valve and the discharge pipe. These parts can release water when pressure rises or when the valve seal wears out. A slow drip from the discharge pipe often points to a valve issue rather than a tank problem.

Check the bottom of the heater last. Water in the pan or moisture emerging from under the tank shell can indicate internal corrosion. When the tank rusts through, water seeps out slowly at first and then escalates. This pattern often marks the final stage of tank life.

A clear view of the top, side, and base helps you understand where the leak originates and how serious it may be before a plumber arrives.

How do you check for a leak at the top of the water heater?

To check for a top leak, inspect the cold inlet and hot outlet connections, the metal nipples, and any flex lines attached to the top of the tank.

Look for water on or around the top insulation. Damp or darkened pipe insulation also signals a slow drip. Moisture may trace down the tank shell, so follow any streaks that travel downward. These streaks often reveal where water started before running along the surface.

Top leaks often involve loose fittings, failed nipples, or corroded pipe threads. Many of these issues are repairable with proper tightening or replacement of worn parts. A plumber can restore seals if the leak source sits at a connection rather than inside the tank.

A small drip from a top fitting behaves differently from a steady flow. A slow drip might pool at the top rim, while a faster drip runs down the side immediately. Identifying this pattern helps distinguish a simple connection issue from a more serious internal problem.

How do you check for a leak at the bottom of the water heater?

To check for a bottom leak, examine the drain valve, the temperature and pressure discharge outlet, the tank base, and the pan beneath the heater.

Start with the drain valve. Look for drops forming at the spout or around the valve body. A worn washer or loose valve can allow intermittent moisture. Next, inspect the discharge pipe from the temperature and pressure relief valve. Water near this pipe may indicate that the valve is releasing water rather than the tank shell leaking.

Then look directly at the bottom of the tank. Water emerging from under the tank shell or collecting in the pan suggests internal corrosion. The shell can weaken as sediment and rust accumulate. When the metal fails, water seeps from the base and saturates the pan.

A drip from a drain valve or a relief pipe often points to a repairable valve issue. A continuous leak from under the tank usually indicates a rusted or split tank that needs replacement rather than repair. Checking these areas helps you understand whether the leak source is a valve, a fitting, or the tank itself.

Is a leaking water heater dangerous?

A leaking water heater can be dangerous because it combines hot water, electricity or gas, and structural damage that can escalate quickly if the leak spreads.

Water near electrical elements, thermostats, or wiring creates a shock risk. If water reaches an electrical panel or the base of an electric heater, touching equipment or stepping in the pooled water can expose you to electrical current. Gas heaters carry different risks. Water around the burner area or gas components can interfere with combustion and create unsafe operating conditions.

A sudden release of hot water can also cause burns. A failing tank may discharge very hot water without warning as internal pressure changes. This temperature change can injure anyone standing close to the heater or walking through the utility area.

Leaking water soaks drywall, subfloor, and framing. Prolonged moisture weakens structural materials and increases the likelihood of mold. Mold forms when damp surfaces remain wet long enough for spores to grow. These conditions become more severe when water continues to pool for hours or days.

Standing in water near electrical equipment is unsafe. If you are unsure whether electrical or gas components are wet or compromised, step back and contact a qualified professional. A recognized safety guideline states that any appliance exposed to water near electrical or fuel connections should be disconnected and inspected before further use.

Can a leaking water heater be repaired, or do you need a replacement?

Many valve and connection leaks on a water heater are repairable, but leaks coming from the tank body almost always require full replacement.

Some leaks originate from components that a plumber can repair. Loose fittings at the cold or hot nipples, flex line leaks, or worn seals at the temperature and pressure relief valve often respond to tightening or part replacement. A dripping drain valve at the base can also be repaired or replaced when the internal washer or body fails. These issues usually involve moderate cost and can restore normal operation.

Other leaks signal that the tank has reached the end of its service life. Water emerging from the bottom of the heater, rust staining around the seam, or moisture seeping through the insulation indicates tank shell damage. A split shell or rusted base cannot be sealed because the metal has weakened. Replacement becomes the appropriate solution.

Age influences this decision. A water heater near the end of its typical lifespan may not justify repair even if the leak is small. Warranty coverage can reduce replacement cost if the unit is still under protection. In hard water areas such as San Antonio, mineral buildup accelerates corrosion and shortens tank life. Sediment collects at the bottom, traps heat, and increases stress on the shell, which leads to earlier failure.

A plumber evaluates the leak type, the age of the heater, and the cost of repair versus replacement. This assessment helps determine whether repairing a valve or replacing the entire tank offers a better long term solution.

How do you prevent future water heater leaks, especially in hard water areas?

Infographic showing how to prevent water heater leaks.

Preventing future water heater leaks requires a combination of regular maintenance, water quality management, and proper installation practices that protect the system over time.

Annual flushing removes sediment from the bottom of a tank. Sediment collects faster in hard water areas and traps heat at the base, which stresses the tank shell. Flushing slows this process and helps maintain stable temperature and efficiency.

Periodic anode rod inspections also protect the tank. The anode rod attracts corrosive minerals and slows rust inside the tank. Replacing a worn rod before it is fully consumed extends tank life and reduces the chance of internal corrosion that leads to leaks.

Checking valves and fittings for small drips prevents minor issues from becoming larger failures. The temperature and pressure relief valve, drain valve, and top connections should stay dry between uses. Early detection reduces water damage around the heater.

A water softener helps in very hard water regions because it slows scale buildup and reduces corrosion. Softer water protects both tank and tankless systems and lowers maintenance frequency. Correct pressure in the plumbing system also matters. A pressure regulator or thermal expansion tank can stabilize pressure and protect fittings.

Proper installation supports long term reliability. A secure stand, a drain pan, and correct drain routing limit damage even if a leak occurs. These steps together reduce corrosion, stabilize operating conditions, and extend the service life of the water heater.

What should you do before the plumber arrives for a leaking water heater?

Before the plumber arrives, prepare the area to reduce damage and give the technician clear access to the water heater.

Confirm that the water supply and power or gas are off if the leak is moderate or significant. This step protects the heater from running dry and reduces the spread of water. Move belongings, boxes, or stored items away from the wet area to prevent further damage.

Use fans or allow air to circulate around the damp floor if it is safe to do so. Circulation slows moisture buildup on walls and flooring. Keep photos or videos ready for records. Collect the model number and serial number from the label on the heater. This information helps the plumber identify replacement parts or estimate repair options more quickly.

Clear a safe path to the heater. Remove obstacles so the technician can reach the tank, valves, and pan without stepping over items. Avoid touching wiring, gas lines, or internal components. Gas line and electrical repairs require a licensed professional and should not be attempted by the homeowner.

Preparing the space and documentation helps the plumber work efficiently and reduces the time needed to diagnose the leak.

How does Anchor Plumbing Services handle emergency water heater leaks in San Antonio?

Anchor Plumbing Services responds to emergency water heater repair leaks with same day and twenty four hour service led by a Master Plumber and supported by licensed, insured technicians across San Antonio and nearby communities.

The process begins with a full inspection. The technician checks the heater, valves, discharge pipe, drain pan, and surrounding plumbing. The goal is to identify whether the leak originates from a fitting, a relief valve, or the tank itself. After inspecting, the plumber diagnoses the problem and explains whether a repair or replacement is the safest and most cost effective option.

Anchor provides flat rate pricing before work begins. The technician repairs valves or fittings when possible or replaces the heater when the tank has failed. After completing the work, the plumber tests the system to verify stable pressure, safe heating, and correct operation of all controls.

Anchor serves San Antonio, Helotes, New Braunfels, Stone Oak, and West and Northwest San Antonio with emergency support, clear diagnostics, and a satisfaction guarantee. Water heater leaks in hard water areas often connect to sediment and corrosion, so recommendations may include water softener or water quality improvements as part of long term protection.

Side-by-side comparison of tank and tankless water heaters with cost and feature icons

Tank vs Tankless Water Heaters: Costs, Lifespan, and Hard Water

Tank and tankless water heaters differ in upfront cost, energy use, lifespan, and how they handle hard water; the right choice depends on home, budget, and maintenance rather than one type always being better.

Many homeowners compare tank and tankless heaters when an older unit starts leaking or during a remodel. The decision usually centers on how much the new system costs today, how long it lasts, and how expensive it is to run every month. If the existing heater is still working, many families also compare water heater repair vs replacement costs over the long term before they choose a new tank or tankless system.

In hard water areas such as San Antonio, New Braunfels, Midland, Odessa, minerals in the water form scale inside water heaters. This scale builds faster on some components than others. It changes how efficiently each type heats water and how long critical parts keep working.

This guide explains the main differences between tank and tankless systems for a residential home. It compares upfront purchase and installation cost, long term energy bills, expected lifespan, maintenance needs, and performance in hard water. It also explains how a water softener changes that picture.

What is the difference between a tank and a tankless water heater?

A tank water heater stores and reheats a set volume of hot water, while a tankless water heater heats water as it flows through the unit.

A tank or storage water heater keeps dozens of gallons of water in an insulated cylinder. A gas burner or electric element cycles on and off under the control of a thermostat. The system reheats water repeatedly so that hot water is ready in the tank for the next shower or load of laundry.

A tankless or on-demand heater does not store a large volume of hot water. Cold water moves through a compact heat exchanger whenever a tap opens. Gas burners or electric elements fire only while water flows, so the heater focuses on meeting a target flow rate rather than maintaining a full tank.

Tank heaters usually need more installation space and create standby heat loss because stored water cools between uses. They often suit simple replacements in small condos or large family homes where the existing gas or electric setup already matches the tank capacity. Tankless heaters mount on a wall, conserve space, and avoid standby loss, yet they must be sized carefully so that flow matches the needs of a one bath or two bath home.

Both designs are exposed to hard water. Tank heaters tend to accumulate sediment at the bottom of the cylinder. Tankless heaters see scale build up inside the narrow passages of the heat exchanger. In both cases, mineral deposits change efficiency and energy use over time, which connects the water heater decision to water quality and maintenance.

How does a tank water heater behave in a hard water home?

In a hard water home, a tank water heater gradually fills with mineral sediment on the bottom of the tank, which reduces heating efficiency, increases noise, and makes hot water run out faster over time.

Hard water carries dissolved calcium and magnesium into the storage tank. When the burner or electric element heats the water, minerals fall out of solution and settle at the bottom. This sediment layer grows over the years and covers the base of the tank in older units.

As sediment accumulates, the burner must heat through a layer of mineral deposits before warming the water above. This layer acts like insulation. The heater runs longer, wastes more fuel, and cycles more to keep the thermostat setting. Many homeowners start to hear rumbling or popping sounds as trapped bubbles push through the sediment.

The effective hot water capacity also drops. Sediment takes up space inside the tank, so less usable hot water remains above the mineral layer. Showers become shorter, and hot water can run out more quickly during back to back use, even when the thermostat setting stays the same.

How does a tankless water heater behave in a hard water home?

In a hard water home, a tankless water heater sees mineral scale coat the heat exchanger, which restricts flow, triggers error codes, produces lukewarm water at taps, and can cause early exchanger failure if maintenance is ignored.

Hard water carries dissolved calcium and magnesium into the tankless heat exchanger. When burners or electric elements heat the water, minerals fall out of solution. They form a hard scale that coats the narrow passages inside the exchanger and nearby components.

As scale coats these passages, water flow drops. Sensors detect reduced flow and temperature changes. The unit can start to cycle more often, struggle to reach set temperature, or shut down with error codes. Homeowners notice lukewarm water instead of steady hot water, especially during higher demand.

Heavy scale also creates hot spots on metal surfaces. These hot spots stress the exchanger and seals. Over time, this stress can cause leaks or cracks that force early replacement of the exchanger or the entire heater.

Regular descaling reduces this risk. A plumber connects hoses, circulates a descaling solution through the tankless heater, and rinses the system until water runs clear. A unit that is descaled every year in hard water behaves very differently from one that is never treated. A water softener helps further by reducing mineral content before water reaches the heater, which lowers the rate at which scale forms and extends stable flow and temperature performance.

Which is better, a tank or tankless water heater?

Neither tank nor tankless water heaters are always better; the better fit for a home depends on family size, hot water usage pattern, available gas or electric capacity, hard water conditions, upfront budget, and willingness to maintain the system.

A tank water heater suits homeowners who want a lower upfront cost and a simpler installation. Tanks replace older units with fewer changes to gas lines or electrical panels. They handle moderate hot water needs well when the capacity matches the number of people and bathrooms in the home.

A tankless water heater suits homes that use a lot of hot water over the course of the day. It favors families that want higher efficiency, steady hot water for many years, and more floor space in mechanical rooms. It can also benefit smaller homes that have high peak usage at certain times.

To make the comparison easier, think about common situations:

  • A standard tank heater suits smaller or medium homes, tight budgets, basic gas lines, and owners who do not plan to add a water softener or follow strict maintenance.
  • A tankless heater suits larger families, higher daily usage, limited space, homes with strong gas or electric capacity, and owners with a water softener and a plan for regular maintenance.

Why do plumbers not recommend tankless water heaters in some homes?

Plumbers usually avoid recommending tankless water heaters when the gas line or electrical panel cannot support the equipment, the water is very hard with no softener, or the budget cannot cover necessary upgrades and maintenance.

Licensed plumbers install both tank and tankless systems every year. They evaluate the home before giving a recommendation. When they decide against tankless, the reason usually sits in the infrastructure or the way the household uses hot water, not in a belief that the technology is always unreliable.

One common barrier is gas line size. Many existing homes have gas lines sized for a standard tank burner. A tankless unit often needs a higher input rate. If the gas meter or line cannot safely supply that rate, the plumber must quote upgrades. When the homeowner budget cannot support those upgrades, the plumber avoids the tankless option.

Another barrier is electrical capacity for electric tankless units. These heaters can draw large amounts of current when they run. If the breaker panel is already near its limit, an upgrade may be necessary. Again, if the budget cannot handle that work, a standard tank system becomes the practical choice.

Water quality also shapes recommendations. In very hard water homes without a softener or maintenance plan, a tankless heater faces a high scale risk. If the homeowner is unlikely to schedule regular descaling or invest in water quality improvements, some plumbers prefer a tank that tolerates more sediment before failure.

In each case, the plumber evaluates infrastructure readiness, hardness risk, budget, and maintenance commitment. They recommend or avoid tankless systems based on how well the home supports them, rather than viewing tankless water heaters as a bad technology in every situation.

What are the advantages of a tank water heater?

A tank water heater offers a simple and familiar design with lower upfront cost than most tankless systems. It often suits homes with limited budgets or older gas and electric infrastructure that are not ready for major upgrades.

A tank heater relies on a storage cylinder and a basic thermostat. Installers can often reuse the existing gas line, vent, or electric circuit. This lowers material cost and reduces labor time compared with many tankless conversions.

Tank models use standard parts. Many plumbers keep common thermostats, valves, and heating elements on their trucks. Routine maintenance such as flushing the tank is straightforward and does not require special tools beyond hoses and basic valves.

Tank heaters also handle short demand spikes well. When the tank is full and heated, several fixtures can draw hot water at once until the stored volume is used. The system is less sensitive to very brief peaks in flow compared with some on demand units.

In hard water homes, tanks still face sediment buildup, yet they tend to be less finicky than tankless heaters about small changes in flow or scale. The system can often keep working with some sediment in the bottom, especially when flushed on a regular schedule.

Common advantages include the following points:

  • Lower upfront purchase price for many standard sizes such as 40 to 50 gallon models
  • Lower installation cost in most existing homes with standard venting and gas or electric service
  • Simpler installation with fewer gas line or electrical panel changes
  • Straightforward maintenance, with flushing and part replacement that many plumbers perform quickly
  • Reliable performance with less sensitivity to momentary demand spikes
  • Greater tolerance to hard water conditions when combined with periodic flushing

These traits mean that tank water heaters often suit residential homes with older infrastructure, homeowners who want minimal upfront investment, and households with predictable daily hot water usage rather than constant high demand.

What are the advantages of a tankless water heater?

A tankless water heater saves space and reduces standby energy loss compared with a standard tank. It can provide long term hot water more efficiently when it is sized correctly, maintained well, and protected from scale in hard water homes.

Tankless units heat water only when a tap opens. This removes the need to keep a large storage tank at temperature all day. The result is less wasted energy when the household uses hot water at scattered times.

The compact footprint is a clear benefit. A wall mounted tankless heater frees floor space in closets, garages, or utility rooms. In some climates, approved models can even mount on an exterior wall, which opens more layout options for the interior.

When sized for the expected flow, a tankless heater can supply continuous hot water within its design limits. The system does not run out of a fixed tank volume during back to back showers or long baths. Instead, it maintains output temperature as long as flow and fuel stay within the rated range.

Tankless systems also offer strong lifespan potential. The heat exchanger and controls can operate for many years when descaled regularly and shielded from heavy mineral deposits. Many units outlast standard tanks when a water softener and maintenance plan are in place.

Key advantages include the following points:

  • Higher efficiency and lower standby losses than most conventional storage tanks
  • Reduced footprint and more usable floor space in tight mechanical areas
  • Continuous hot water within the rated flow for correctly sized systems
  • Longer potential service life than a standard tank under proper maintenance
  • Flexible placement options, including wall mounting and in some cases exterior installation

In hard water regions, these benefits are strongest when scale is controlled. Regular flushing and descaling keep passages clear inside the heat exchanger. A water softener or filtration system lowers mineral content before water reaches the tankless unit. When paired with suitable gas line or electrical panel capacity, a tankless heater can optimize energy use and space while supporting steady hot water for many years.

What are the disadvantages of a tank water heater?

A tank water heater loses energy through standby heating, occupies more floor space, has a shorter typical lifespan than many tankless models, can run out of hot water, and often fails by leaking when the tank corrodes.

A storage tank keeps dozens of gallons of water hot at all times. Even with insulation, the water slowly cools between uses. The burner or electric element cycles to replace that lost heat. This standby loss increases total energy use over the year.

The tank also needs floor space and clearance. In small utility rooms, closets, or garages, the footprint limits how the homeowner can use the area. Larger capacity tanks occupy even more room.

Every tank has a fixed volume. During heavy use, such as several showers and laundry in a short period, the stored hot water can run out. The heater then needs time to recover. Until that recovery is complete, taps may deliver lukewarm water.

In hard water homes, minerals settle at the bottom of the tank. Sediment buildup forces the heater to work harder, creates rumbling noises, and reduces usable capacity. If the tank is never flushed, sediment can speed corrosion at the base and shorten lifespan.

When a tank water heater reaches the end of its life, it often fails by leaking. A corroded shell or failed weld lets water escape around the base or relief valve area. This leak risk is part of the normal failure mode for many older tanks.

Common disadvantages include the following points.

  • Standby energy loss as the tank reheats water that cools between uses
  • Shorter typical lifespan than many tankless systems under similar conditions
  • Larger footprint that occupies valuable floor space and needs clearance
  • Limited stored volume that can run out during heavy or clustered hot water use
  • Sediment accumulation in hard water that increases noise and reduces efficiency when flushing is neglected
  • Higher likelihood of leaks at the end of life due to tank corrosion and failure of the shell

What are the disadvantages of a tankless water heater?

A tankless water heater usually has higher upfront cost, more complex installation, strict flow limits, and greater sensitivity to hard water scale that requires regular descaling and may degrade performance during heavy demand.

Tankless units often cost more to purchase than standard tanks. Many homes also need gas line upgrades, new venting, or additional electrical capacity. These changes increase materials and labor cost at installation.

The installation process itself is more complex. Installers must size the unit for expected flow, confirm gas or electric input, and route venting according to strict manufacturer rules. This added complexity can raise the total project cost compared with a like for like tank replacement.

Tankless heaters have clear flow limits. If several showers, faucets, and appliances run at once, the unit may reduce temperature or fail to keep up. This is a capacity limit rather than a defect. It becomes more visible in large households that use many fixtures at the same time.

Hard water creates another disadvantage. Scale coats the heat exchanger and narrow passages inside the tankless unit. This coating restricts flow, triggers error codes, and can cause temperature swings. Regular descaling is required to keep performance stable.

Some homes also see temperature variation when demand changes quickly. Short bursts of water at different fixtures can cause noticeable shifts at taps, especially if the system is not matched carefully to the plumbing layout. In some layouts, a separate recirculation system is needed to reduce wait times for hot water at distant fixtures.

Key disadvantages include the following points:

  • Higher upfront equipment cost and possible expenses for gas line, venting, or electrical upgrades
  • More complex installation that demands careful sizing and skilled labor
  • Finite flow capacity that can limit use when many fixtures run at once
  • Greater sensitivity to hard water scale, with a need for regular descaling to protect the heat exchanger
  • Potential temperature fluctuations when demand spikes or fixtures open and close in rapid sequence
  • Possible need for a recirculation system to address long wait times for hot water in some plumbing layouts

How do tank and tankless water heater costs compare from installation to long term bills?

There is no single cost pattern for every home because tank and tankless water heaters differ in installation cost, monthly energy use, maintenance needs, and replacement timing. The better financial choice depends on how long the homeowner plans to stay in the home and how much hot water the family uses.

A cost comparison works best when broken into three parts.

Upfront purchase and installation: A tank water heater usually costs less to buy and install. Installers often reuse existing venting, gas lines, or electric circuits. A tankless system usually costs more upfront because it may need upgraded venting, larger gas lines, or a stronger electrical panel. These upgrades change the total project cost more than the unit price alone.

Monthly energy bills: A tank reheats stored water throughout the day. This standby loss increases total energy use. A tankless heater avoids this loss because it heats only when water flows. According to the U S Department of Energy, tankless systems can use less energy over a year because they eliminate standby heat loss. The exact savings depend on household usage, fuel rates, and water quality.

Ongoing maintenance and replacement: A tank has simpler maintenance and cheaper parts, but it usually reaches the end of life sooner. Many tanks need replacement after a shorter service span because they fail by leaking. A tankless heater can last longer, yet it often needs descaling and cleaning on a regular schedule in hard water regions. This adds maintenance tasks but can extend long term performance and delay replacement.

Overall, tanks tend to favor a low upfront budget with predictable replacement cycles. Tankless systems tend to favor longer horizons where energy savings, lower standby losses, and longer lifespan can offset higher initial cost. Each home balances these costs differently based on age of infrastructure, hot water demand, and available fuel type.

How much will my electric bill go up with a tankless water heater?

There is no fixed amount that applies to every home because the electric bill change depends on fuel type, usage pattern, efficiency, and whether the homeowner is switching from a gas tank to an electric tankless system.

An electric tankless heater draws a large amount of power at the moment hot water flows. This high instantaneous load can raise the monthly electric bill if the home shifts from gas to electric heating. Even with efficiency gains, a change in fuel type often moves more of the total heating cost onto the electric meter.

If the home already uses an electric tank, the change can differ. Electric tankless systems avoid standby losses, so the total monthly energy use depends on how often the family uses hot water. Less frequent use can reduce monthly kWh even when instantaneous power draw is high. Heavy daily usage can increase the electric bill because the unit heats water many times each day.

Gas tankless heaters affect the electric bill differently. They use electricity for controls and ignition, but they heat the water with gas. In those homes, the gas bill changes more than the electric bill. The overall impact depends on how efficiently the new unit operates and how much hot water the home uses.

Panel upgrades also influence cost. If an electric tankless system requires a stronger electrical panel, the installation cost rises, but the upgrade does not directly change the monthly bill. The monthly bill reflects usage, flow duration, and the rate charged per kWh.

In every scenario, the final bill varies with daily habits, fuel rates, and system sizing. A personalized estimate during a water heater installation provides the most accurate expectation for a specific home.

How long do tank and tankless water heaters last in hard water areas?

A tankless water heater generally lasts longer than a tank water heater, especially when both systems receive regular maintenance and protection from scale in hard water conditions.

A tank water heater often reaches a shorter service life because the metal tank corrodes over time. Hard water accelerates this process by leaving sediment on the bottom of the tank. The sediment traps heat, increases stress on the metal, and reduces the effectiveness of the anode rod. When corrosion advances, the tank eventually leaks. Leaks, reduced capacity, and slower recovery are common failure patterns.

A tankless water heater does not store water, but hard water can shorten its life by coating the heat exchanger with scale. The narrow passages inside the exchanger are sensitive to mineral buildup. Scale triggers error codes, reduces flow, and forces the unit to work harder to maintain temperature. If scale is not removed, the exchanger can overheat or fail.

Maintenance changes these outcomes. Annual flushing protects a tank by removing sediment and giving the anode rod a longer opportunity to control corrosion. Annual descaling protects a tankless unit by clearing scale from the heat exchanger and restoring stable flow. A water softener reduces hardness before water enters the heater, which further extends service life for both systems.

Typical lifespan patterns work as general ranges rather than guarantees. A tank often has a shorter range, while a tankless system often reaches a longer range when scale is controlled and errors are addressed early.

How does hard water change the decision between tank and tankless water heaters?

Hard water does not automatically rule out tankless water heaters, but it makes maintenance discipline and water treatment more important for either type of system.

Hard water increases mineral deposits inside both heaters. In a tank, sediment settles at the bottom and reduces efficiency. In a tankless system, scale forms on the heat exchanger and restricts flow. These problems happen for different reasons, but both require homeowners to follow more frequent maintenance intervals.

If a home has hard water, no water softener, and irregular maintenance habits, a tank often carries less risk. A tank can tolerate more sediment before failing and usually continues to supply hot water with fewer interruptions. The heater still loses efficiency, yet the failure pattern is predictable and easier to manage.

If the home has hard water with a water softener and consistent annual service, a tankless heater becomes more appealing. The softener reduces scale formation, and regular descaling keeps the exchanger clear. In these conditions, the tankless system benefits from better efficiency and the possibility of a longer service life.

Hard water shifts the choice from a simple technology comparison to a combined evaluation of heater type, water treatment, and homeowner habits. The best option balances hardness level, maintenance discipline, and long term goals for efficiency and replacement cycles.

How do local plumbers help you choose the best water heater for your hard water home?

A local plumber can evaluate your home’s hard water conditions, infrastructure, and usage patterns to recommend the water heater type that fits your needs with the least risk and the best long term performance. They also give a quote so you see how much water heater installation costs in a home like yours before you approve any work.

A plumber begins by checking the existing gas or electric capacity. This step confirms whether the current gas line, venting path, or electrical panel can support a tank or a tankless system. The plumber then measures water hardness and determines whether a water softener or filtration system is already in place. This hardness level influences maintenance frequency and long term reliability for both heater types.

Household usage is another essential factor. The plumber reviews how many people live in the home, how many bathrooms and fixtures draw hot water, and whether the family uses hot water in short bursts or in long stretches throughout the day. This demand pattern helps the plumber size the heater correctly. Space also matters. The plumber checks the mechanical area, closet, garage, or exterior wall to see where the heater can fit and how the venting can be routed.

Anchor Plumbing Services follows a clear sequence when helping homeowners decide between tank and tankless water heaters. The process starts with an inspection. The plumber then diagnoses the home’s energy capacity, water hardness, fixture count, and available space. After the diagnosis, the plumber provides a written flat rate quote before any work begins. Installation follows the quote, and the final step is testing the system to confirm stable performance across all fixtures.

Visual comparison of water heater repair vs replacement costs and benefits.

Water Heater Repair vs Replacement Cost: Which Saves More Long Term?

Water heater repair costs between $150 and $800, while full water heater replacement ranges from $1,000 to $5,000. The best option depends on the age of the unit, the type of damage, and how much efficiency the system has lost over time.

Repairing a water heater usually costs less upfront, but recurring failures, rising utility bills, and age related wear can reduce long term value. Replacement costs are higher on day one, yet a new system can lower energy use, improve performance, and reduce repair frequency. The long term savings depend on how often the unit fails, how much energy it consumes, and whether the tank or internal components are still structurally sound.

What Factors Determine Whether Repair or Replacement Is Better?

Technicians evaluate unit age, condition, efficiency level, and warranty status to decide whether repair or replacement delivers better long term value. These factors reveal how useful life remains and how likely future failures.

Below is a simple diagnostic framework homeowners can use:

Decision Factor Repair is Better When Replacement is Better When
Age Less than eight years More than ten years
Condition Minor part failure Tank leaks or corrosion
Efficiency Energy use is stable Utility bills continue rising
Fuel Type Parts still available Outdated electric or low efficiency gas models
Warranty Coverage still active Warranty expired with frequent repairs

Older units lose efficiency and require more service calls. A single failing part, such as a thermostat or heating element, is usually worth repairing. Structural damage such as tank corrosion or a failing heat exchanger signals the need for replacement. Technicians evaluate these variables to decide which option prevents the highest cost over time.

How Much Does Water Heater Repair Cost?

Most minor repairs cost between $150 and $800, depending on the part that failed and the time required to complete the repair. Gas system repairs cost more because burners, gas valves, and ignition components require specialized testing and safety checks.

Repair prices vary based on the part involved, the age of the unit, and whether the system is gas, electric, or hybrid. Electric units usually cost less to repair because heating elements and thermostats are easier to replace. Gas units require additional diagnostic steps to inspect the burner assembly and verify safe operation. Technicians evaluate part condition, corrosion level, and replacement interval to confirm the total cost.

Typical Water Heater Repair Costs

Repair Type Average Cost Notes
Thermostat replacement $150 to $300 Common in electric units
Heating element replacement $200 to $400 Restores heat output
Anode rod replacement $150 to $350 Prevents internal corrosion
Gas control valve replacement $300 to $600 Required for gas safety and stable ignition
Igniter replacement $200 to $400 Common failure point in many gas models

A failing thermostat or heating element is usually the most affordable repair. Gas control valve repairs cost more because they require testing of the burner, flame sensor, and venting path. Replacing an anode rod extends tank life and prevents rust related damage inside the system.

How Much Does Water Heater Replacement Cost?

Water heater replacement typically costs between $1,000 to $5,000, depending on whether the system is a tank, tankless, or hybrid unit. Replacement cost increases when venting, gas lines, electrical circuits, or drain configurations must be upgraded to meet code.

The cost varies based on tank size, energy factor, fuel source, and installation complexity. Larger tanks require more labor and more material. Tankless systems require upgraded venting and higher BTU ratings. Hybrid heat pump systems need additional space and electrical capacity, which can increase installation time.

Typical Water Heater Replacement Costs

System Type Average Cost Range What Affects Price
Tank water heater $1,000 to $2,500 Size, power source, energy rating
Tankless water heater $2,500 to $5,000 Venting upgrades and BTU requirements
Hybrid heat pump heater $2,000 to $4,500 Electrical capacity and space for airflow

Tank replacement is the most affordable option and works well for basic hot water needs. Tankless units cost more upfront but provide long term efficiency and endless hot water. Hybrid heat pump units offer the best efficiency but require proper space for airflow and a stable electrical supply.

Repair vs Replacement: Cost Comparison by Water Heater Type

Tank units are affordable to repair but costly when they leak. Replacement becomes the better long term choice when the tank corrodes or reaches the end of its lifespan. Tankless and hybrid systems cost more upfront but deliver higher energy efficiency and lower operating cost. The best option depends on the part that failed and the age of the system.

Cost Comparison by Water Heater Type

System Type Repair Cost Replacement Cost Replace When
Tank water heater $150 to $600 $1,000 to $2,500 Leaks, rust, or age greater than ten years
Tankless water heater $200 to $900 $2,500 to $5,000 Heat exchanger failure
Hybrid heat pump water heater $300 to $1,000 $2,000 to $4,500 Compressor failure

Tank systems are simple to service and often remain repairable for many years. Tankless systems cost more to diagnose and repair because the heat exchanger and electronic components are complex. Hybrid heat pump units require specialized parts and longer diagnostic periods due to their compressor driven operation.

Replacement is usually recommended when major components fail because heat exchangers and compressors are expensive to replace. Installing a new system often provides better energy efficiency, lower future operating cost, and improved hot water performance.

Decision checklist comparing when to repair or replace a water heater.

When Is Repair the Best Option?

Repair is cost effective when the issue involves a single failed part and the system is still within its expected lifespan. Technicians evaluate warranty status, part availability, and corrosion level to confirm if repairing the unit makes financial sense.

Repair makes sense when:

  • The unit is younger than eight years
  • The problem involves one component such as a thermostat or heating element
  • There is no visible rust or tank corrosion
  • Manufacturer parts are still available

A stable tank with mild wear can operate reliably after a simple repair. Thermostats, sensors, igniters, and heating elements are inexpensive and quick to replace. Repairing an early failure prevents unnecessary replacement cost and preserves the remaining life of the water heater.

When Is Replacement the Better Long Term Investment?

Replacement becomes the best option when the system is old, inefficient, or showing signs of structural failure. A new unit provides higher efficiency, lower monthly costs, and more reliable performance than an aging or repeatedly repaired water heater.

Replacement is the better long term choice when:

  • The unit is older than ten to twelve years
  • The tank shows signs of leaking or corrosion
  • Utility bills rise due to declining efficiency
  • Repairs occur frequently
  • The efficiency rating no longer meets current standards

A corroded tank cannot be repaired. Declining recovery rate and slow heating also signal that the internal components are failing. Installing a new system restores performance and prevents costly emergency leaks.

How Much Can You Save Long Term with a New Water Heater?

Upgrading reduces energy consumption by improving efficiency, lowering heating time, and reducing maintenance needs. Modern systems use advanced controls and higher energy factor ratings to cut monthly operating cost.

Estimated savings include:

  • Tankless systems save ten to thirty percent annually due to on demand heating
  • Hybrid heat pump units save up to three hundred fifty dollars per year through heat pump efficiency
  • Modern tanks reduce standby heat loss and require fewer service visits

ENERGY STAR models use less fuel or electricity per gallon heated. A higher energy factor rating directly reduces operating cost over the lifespan of the unit.

Are There Any Additional Costs to Consider?

Several extra charges can influence the total cost of repair or replacement. These fees depend on local code requirements and the condition of the existing plumbing connections.

Common additional costs include:

  • Permit fees that range from fifty to three hundred dollars
  • Disposal fees that range from fifty to one hundred fifty dollars
  • Gas line upgrades that range from three hundred to nine hundred dollars
  • Vent pipe or electrical upgrades required for modern systems

Technicians evaluate existing connections to determine whether code updates are required. These extra costs help ensure safe installation and long term system performance.

How to Decide: Should You Repair or Replace Your Water Heater?

The decision depends on the unit’s age, condition, and performance. A simple checklist helps determine whether repair or replacement offers the best long term value.

Decision checklist:

  • Is the unit older than ten years
  • Is there visible tank corrosion
  • Are utility bills rising due to declining efficiency
  • Does the heater run out of hot water faster than before
  • Does the unit make unusual sounds or show slow recovery

A water heater with reduced capacity or inconsistent flow rate often indicates internal deterioration. If multiple issues appear at once, replacement usually provides the most reliable and cost effective solution.

Frequently Asked Questions About Water Heater Repair vs Replacement

Is it worth repairing a ten year old water heater?
Repair is rarely cost effective at ten years because tanks approach the end of their lifespan. Replacement provides better efficiency and reduces future repair costs.

What is the most expensive part to fix?
The gas control valve or heat exchanger is the most expensive component to replace due to high part cost and labor requirements.

How long does a water heater last?
Most water heaters last eight to twelve years depending on maintenance, water quality, and usage.

Does replacing a water heater increase home value?
Yes. A new system improves efficiency, reduces energy use, and adds value during home inspections or resale.

How long do repairs usually last?
Repairs may last one to five years depending on part quality and unit age. Older tanks deteriorate faster, which limits repair lifespan.

Conclusion

Repair is cost effective when a single component fails on a younger unit. Replacement becomes the smarter long term investment when the system is older, inefficient, or showing signs of corrosion. A modern heater lowers utility bills, improves recovery time, and provides reliable performance.

A leading San Antonio plumbing company Anchor Plumbing Services provides expert diagnostics, honest recommendations, and licensed water heater repair and replacement across San Antonio with clear and upfront pricing. Our team helps you choose the safest and most cost effective option for your home.

Banner image showing plumber restoring water pressure in a residential home.

Why Is Water Pressure Low in My House?

Low water pressure in your home usually means something is restricting water flow within the plumbing system. The most common reasons include a partially closed main shut-off valve, a hidden leak, or a failing pressure regulator. Normal residential water pressure ranges between 40 and 60 psi, and anything below this level can signal a plumbing imbalance or supply issue.

Water pressure drops when water cannot travel freely through the main supply lines or fixtures. The first step to identify the cause is to check whether the pressure loss affects one fixture or the entire house. If all faucets and showers have weak flow, the issue likely lies in the main supply, regulator, or underground piping. A licensed plumber uses diagnostic tools to measure system psi, locate restrictions, and restore balanced flow across your home.

What Does Low Water Pressure Mean for Your Plumbing System?

Low water pressure indicates reduced flow or increased resistance within your plumbing system. It means the water moving through pipes, valves, or fixtures meets friction or obstruction that prevents it from reaching normal velocity. Typical household pressure should stay steady between 40 and 60 psi to ensure consistent delivery to showers, faucets, and appliances.

When pressure falls below this range, fixtures release weaker streams, water heaters fill more slowly, and appliances like dishwashers or washing machines take longer to complete cycles. Over time, constant low pressure can strain pumps, cause inconsistent temperatures in mixed-valve showers, and highlight underlying corrosion or leaks inside the water lines.

Maintaining proper pressure ensures that every part of your plumbing system—from the main valve to the smallest faucet—functions efficiently and safely, preventing both water waste and long-term mechanical wear.

What Causes Sudden Low Water Pressure in a House?

Diagram showing common causes of low water pressure in a home.

Most low water pressure problems occur because water cannot flow freely through part of the plumbing system. This restriction can come from mechanical failure, buildup, or an external supply issue. Identifying the right cause helps restore balanced pressure quickly and safely.

  • Partially Closed Shut-Off Valve: The main shut-off valve controls water entering the home. When it is only partially open, flow is restricted throughout the system. Always verify that the valve handle is fully turned to the open position.
  • Failing Pressure Regulator: A pressure regulator controls and stabilizes water entering your plumbing lines. When it malfunctions or wears out, it may cause inconsistent or weak pressure at all fixtures.
  • Leaking Water Supply Line: Hidden leaks under the slab, behind walls, or near the meter divert water before it reaches your fixtures. Even small leaks reduce system psi and cause pressure to drop suddenly.
  • Corroded or Clogged Pipes: Older galvanized or steel pipes narrow as mineral deposits build inside. This restricts flow, creating uneven pressure across different areas of the home.
  • Clogged Aerators or Showerheads: Mineral buildup in faucet aerators or showerheads blocks openings and limits water release. Cleaning or replacing the fixture restores full flow.
  • Sediment Buildup in Water Heater: When sediment settles at the bottom of the water heater, it can block outlets or reduce hot water flow. Flushing the tank once a year helps maintain normal pressure.
  • Municipal Supply Issues: City maintenance, hydrant testing, or main line repairs can temporarily lower water pressure for entire neighborhoods. These drops usually resolve within a few hours.
  • Peak Demand Hours: Pressure often dips when many homes use water simultaneously, such as early mornings or evenings. Installing a pressure booster system can help maintain consistent flow.
  • Water Filter or Softener Blockage: Clogged filters or malfunctioning softeners restrict incoming flow. Regular cartridge changes and resin checks prevent sudden pressure loss.
  • Loose Fittings or Deteriorated Connectors: Worn joints or damaged connectors can leak small amounts of water and gradually lower system pressure. Professional inspection ensures fittings stay sealed and watertight.

Aging pipes or hidden leaks often reduce overall flow. Recognizing the pattern of pressure loss—whether it affects one fixture or the entire home—helps pinpoint the true cause efficiently.

How to Diagnose the Source of Low Water Pressure?

Step-by-step diagnostic infographic for water pressure problems.

You can locate the issue by testing key areas of your plumbing system safely and systematically. A simple process helps identify whether the problem lies in a single fixture, a specific pipe, or the main supply line.

  • Check the Main Shut-Off Valve: Ensure the valve near your water meter or entry point is completely open. A half-closed valve is one of the most common and easiest problems to fix.
  • Measure Pressure with a Gauge: Attach a pressure gauge to an outdoor spigot or laundry faucet. Readings below 40 psi confirm a system-wide issue requiring further inspection.
  • Compare Cold and Hot Water Pressure: If only the hot water line has weak flow, sediment buildup inside the water heater may be the cause. Equal pressure loss in both lines suggests a regulator or supply issue.
  • Inspect Faucets for Sediment: Remove and clean aerators to check for calcium buildup. Restored pressure at one fixture means the issue is local, not whole-home.
  • Listen for Leaks or Running Water Sounds: Audible dripping or running water when all fixtures are off signals a hidden leak. Professional leak detection tools can identify its location without wall damage.

Systematic testing narrows the source and helps determine whether a simple cleaning or professional water line repair is required to restore steady pressure.

How to Fix Low Water Pressure in Your Home

Fixing low water pressure starts with identifying whether the problem affects a single fixture or the entire plumbing system. Once the cause is known, homeowners can apply simple maintenance solutions or contact a licensed plumber for more complex repairs.

  • Clean Aerators and Showerheads: Cleaning aerators restores normal flow when mineral deposits block water outlets. Unscrew the fixture tip, rinse out debris, and reattach to check for improved pressure.
  • Adjust or Replace the Pressure Regulator: A malfunctioning pressure regulator can limit the water supply throughout the home. Plumbers replace faulty regulators to stabilize pressure and ensure balanced flow at all fixtures.
  • Flush Sediment from the Water Heater: Sediment buildup in the water heater reduces hot water flow and affects household pressure balance. Flushing the tank once a year helps maintain steady output and extends equipment life.
  • Repair Leaks or Repipe Corroded Lines: Leaks or corroded pipes reduce water delivery and pressure consistency. Repairing damaged sections or replacing older lines with PEX or copper restores full capacity and prevents future pressure loss.
  • Contact a Licensed Plumber for Complex Repairs: Professional plumbers have diagnostic tools to detect leaks, adjust regulators, and clear obstructions without damaging your plumbing system. Timely service prevents recurring pressure issues and safeguards your home’s water infrastructure.

Consistent water pressure depends on a clear flow path and properly functioning components. Addressing minor issues early helps avoid major repairs later.

How Much Does It Cost to Fix Low Water Pressure?

The cost to fix low water pressure varies depending on the cause, repair complexity, and accessibility. Most minor fixes cost between $100 to $600, while larger repairs such as leak restoration or repiping can reach several thousand dollars.

Cause Typical Cost Notes
Clogged aerator $100–$150 Simple cleaning or quick service visit
Pressure regulator replacement $300–$600 Includes parts and labor
Leak repair $800–$2,000+ Depends on location, wall access, and material
Full repipe $4,000–$10,000 Long-term upgrade for aging or corroded pipes

Most minor repairs take less than two hours to complete, while repiping projects or underground leak repairs require multiple days. Major line repairs may reach higher costs, but they restore long-term stability, prevent water waste, and increase home value.

Professional plumbers evaluate your system’s condition, test pressure levels, and recommend the most efficient fix to restore normal flow safely and cost-effectively.

How to Prevent Future Water Pressure Problems

You can maintain steady water pressure by following a consistent plumbing maintenance routine and monitoring your system for early warning signs. Preventive care helps avoid costly repairs and keeps your home’s water flow stable.

  • Schedule Annual Plumbing Inspections: Regular inspection prevents hidden leaks and detects pressure irregularities before they worsen. A licensed plumber can check valves, regulators, and connections to ensure optimal flow.
  • Replace Aging Pipes Proactively: Older metal pipes corrode internally, reducing water flow. Replacing them with modern materials such as PEX or copper increases durability and prevents pressure fluctuations.
  • Install a Booster System or Regulator: A booster pump or new pressure regulator maintains steady psi when municipal supply levels drop, ensuring consistent pressure at all fixtures.
  • Maintain Clean Aerators and Filters: Cleaning faucet aerators and water filters every few months removes mineral buildup and debris, allowing smooth, unrestricted water flow throughout the system.

Consistent maintenance and professional inspections safeguard your plumbing system, ensuring reliable performance and balanced water pressure year-round.

Frequently Asked Questions About Low Water Pressure

What is normal household water pressure?
Normal residential water pressure typically ranges between 40 and 60 psi for balanced performance.

Why is my water pressure suddenly low?
It usually happens because of a leak, clogged pipe, or malfunctioning pressure regulator that restricts water flow.

Does low pressure mean a leak?
Often yes. A consistent drop across multiple fixtures commonly indicates a hidden plumbing leak or underground supply line issue.

How do I increase water pressure?
Adjust the pressure regulator, clean aerators, or contact a plumber to inspect the main water line for restrictions.

When should I call a plumber?
If pressure remains low after checking valves and cleaning fixtures, professional diagnostics are necessary to locate leaks or equipment failures.

Conclusion: Restoring Reliable Water Pressure

Consistent water pressure ensures comfort, efficiency, and the long-term health of your plumbing system. Most low-pressure problems stem from valve restrictions, sediment buildup, or leaks that reduce flow through household pipes.

Preventing future issues begins with regular maintenance, inspections, and timely repairs. Professional service ensures accurate diagnosis, safe repair, and steady psi restoration.

Anchor Plumbing Services restores strong and consistent water pressure through expert diagnostics, leak repair, and pressure regulator replacement. Our licensed San Antonio plumbers deliver precise, code-compliant solutions with transparent pricing and reliable workmanship you can trust.

Common Causes of Toilet Base Leaks

Why Is the Base of My Toilet Leaking?

A toilet leaking at the base means water is escaping where the toilet meets the floor. This happens when the wax ring seal between the toilet and the drain connection fails, allowing water to leak out during or after flushing. In some cases, loose bolts or a damaged toilet flange can break the watertight seal, leading to visible puddles around the base.

Water escaping from this area is not just a minor nuisance. It indicates a loss of proper sealing within your plumbing fixture connection. If ignored, the leak can damage flooring, subfloors, and even the ceiling below in multi-story homes. Identifying the issue quickly prevents more extensive plumbing repairs and protects your home from structural water damage.

What Does It Mean When Your Toilet Is Leaking at the Base?

A toilet base leak means the sealing ring or gasket beneath your toilet has deteriorated or shifted, breaking the seal that keeps wastewater inside the drain. Each flush forces pressurized water through this connection, so even a small crack in the seal allows water to escape onto the floor.

It is important to distinguish a true plumbing leak from simple condensation. Condensation, or “toilet sweating,” happens when warm, humid air meets a cold toilet tank or bowl, creating moisture on the exterior. In contrast, a real leak produces water that reappears after every flush and often carries a musty odor or visible discoloration near the floor.

Persistent moisture around the toilet base signals that water is entering from below, not forming on the surface. This type of leak can soak into subflooring, weaken structural materials, and promote mold growth over time. Early inspection and repair by a licensed plumber help ensure the leak is corrected before it causes major damage.

Common Causes — Why Is Your Toilet Leaking from the Base?

Warning Signs of Wax Ring Failure

Most toilet base leaks occur because the seal between the toilet and the drain has failed or loosened over time. Each cause relates to how water travels during flushing or from nearby connections. Understanding the source helps prevent unnecessary repairs and protects your bathroom floor from long-term moisture damage.

  • Worn or cracked wax ring: The most common cause of leaks is a deteriorated wax ring. Over time, wax rings compress and lose integrity, allowing water to escape during flushing. When this happens, you may notice small puddles around the toilet base after every use.
  • Loose toilet bolts or flange misalignment: If the toilet moves slightly when touched, the floor bolts or the flange that holds the toilet may be loose or misaligned. Even minor movement can break the seal between the toilet and the drain pipe, letting water seep through the base.
  • Condensation forming around the bowl: Condensation occurs when humid air meets a cool porcelain surface. The resulting water droplets can collect at the base and appear like a leak. However, condensation water does not reappear after each flush and feels cooler than typical leak water.
  • Damaged toilet flange: A cracked or corroded flange can cause the toilet to sit unevenly on the floor, disrupting the seal with the drain. This damage often requires flange replacement to restore stability and prevent recurring leaks.
  • Faulty water supply connection dripping toward the base: A loose or worn water supply line can drip down the tank and pool around the base. These leaks may appear similar to a wax ring failure but originate higher up near the tank’s inlet valve.
  • Clogged drain causing water backup under the toilet: A partial drain blockage can push water back under the toilet during flushing. This creates pressure that forces water through weak seals or gaps around the flange, leading to pooling near the base.

How to Diagnose a Toilet Leaking at the Base

How to Diagnose a Toilet Leak at the Base

You can diagnose the source of a toilet base leak by observing how and when water appears. The goal is to confirm whether the problem comes from the seal, the tank, or nearby connections—without attempting repair before confirming the cause.

  • Step 1: Dry the area completely: Use a towel to remove all visible moisture around the toilet base. This creates a clear baseline for identifying new water.
  • Step 2: Flush the toilet and observe for new moisture: After drying the area, flush once and watch for water emerging near the base. Continuous or bubbling moisture typically points to a failed wax seal.
  • Step 3: Check tank bolts and supply connections: Inspect the bolts connecting the tank to the bowl and the water supply line at the back of the toilet. Loose connections can cause leaks that drip downward and mimic base seal issues.
  • Step 4: Inspect for floor softness or odor: Press gently around the floor near the toilet. Soft flooring or a musty smell suggests long-term moisture exposure, often from an ongoing leak beneath the toilet.
  • Step 5: Use food coloring to trace the leak: Add a few drops of food coloring to the toilet tank and wait fifteen minutes without flushing. If colored water appears around the base, the wax seal has failed and needs replacement.

Accurate diagnosis ensures the correct repair method is chosen and prevents unnecessary part replacements or water damage to the subfloor.

How Can I Prevent Future Leaks from My Toilet Base?

Prevention Tips for Toilet Base Leaks

You can prevent leaks by keeping your toilet properly sealed, maintained, and inspected at regular intervals. Small maintenance steps reduce the risk of moisture damage and prevent long-term plumbing problems.

  • Replace the wax ring every 5 to 10 years: Wax rings compress over time and lose their ability to maintain a watertight seal. Replacing them every few years ensures continued protection against leaks during flushing.
  • Avoid overtightening toilet bolts: Bolts that are too tight can crack the porcelain base or warp the flange. Tighten them just enough to hold the toilet securely without movement.
  • Maintain stable water pressure: High water pressure can loosen fittings and weaken seals over time. Keep household pressure below 80 psi using a pressure regulator if necessary.
  • Inspect for moisture monthly: Check the area around the toilet base for signs of dampness or musty odors. Early detection helps catch minor leaks before they damage flooring or subflooring.
  • Schedule an annual plumber inspection: A licensed plumber can inspect the flange, bolts, and seal to ensure proper alignment and function. Annual maintenance helps prevent undetected leaks and prolongs the life of your toilet installation.

Regular inspection and tightening prevent base seal failure. Preventive care is the most effective way to avoid unexpected water damage and expensive repairs.

Frequently Asked Questions About Toilet Base Leaks

How to fix a toilet that is leaking at the base?
A plumber removes the toilet, replaces the worn wax ring, checks the flange, and reseals the base to stop water from escaping during flushing.

How often should I replace a toilet wax ring?
Replace the wax ring every 5 to 10 years or sooner if you notice leaks, movement, or a musty odor near the base.

Can a toilet leak from the base without flushing?
Yes. Continuous leaks can occur if water seeps from the tank or supply line and collects around the base even when not in use.

How to tell if a toilet flange needs replacement?
If the toilet rocks, bolts won’t stay tight, or water continues leaking after replacing the wax ring, the flange is likely cracked or misaligned.

Do I need a plumber for a leaking toilet?
Yes. A plumber ensures the leak source is correctly identified and that the new seal, flange, and fittings meet plumbing code requirements.

How long does it take to fix a leaking toilet base?
Most repairs take one to two hours depending on the extent of the damage and whether parts like the flange need replacement.

Is the toilet leaking from the bottom an emergency?
Yes. Water leaking near electrical outlets or flooring can cause structural damage and mold growth if not addressed quickly.

What’s the difference between a leaking toilet base and a leaking water supply line?
A base leak appears around the floor after flushing, while a supply line leak drips continuously from the tank connection above the base.

Can a leaking toilet base increase my water bill?
Yes. Even small leaks can waste significant water over time, leading to higher utility costs and potential subfloor damage.

What is the average cost to fix a leaking toilet base?
Repairs typically cost between 150 and 400 dollars depending on whether only the wax ring or the entire flange needs replacement.

What are the signs of a bad wax ring?
Persistent moisture, sewer odors, and water appearing after flushing usually mean the wax ring is cracked or compressed.

Can a loose toilet cause leaks at the base?
Yes. A shifting toilet breaks the wax seal, letting water escape through small gaps during flushing.

Is it safe to use a toilet that’s leaking from the base?
No. Using a leaking toilet can worsen water damage and promote mold growth. Turn off the water supply and call a plumber immediately.

Conclusion

A toilet leaking at the base is more than a minor plumbing issue. It indicates a failure in the seal that keeps wastewater contained and can quickly lead to subfloor rot, mold growth, and structural damage. Identifying early warning signs—such as damp floors, unpleasant odors, or loose fixtures—helps prevent costly repairs and keeps your bathroom safe.

Base leaks rarely fix themselves and often worsen with repeated use. Once water begins seeping beneath the toilet, it can compromise the wax ring, flange, and surrounding flooring. The longer moisture remains trapped under the fixture, the higher the risk of long-term water damage.

Water leaking from the base of your toilet requires professional attention. A leading top rated San Antonio plumbing company provides fast toilet leak repair, flange replacement, and sealing solutions across San Antonio. Anchor Plumbing Services licensed plumbers deliver dependable service, transparent pricing, and long-term results that restore your bathroom safely and efficiently.

water heater recovery rate

What Is Water Heater Recovery Rate and Why Does It Matter?

Water heater recovery rate is the amount of hot water a tank heats in 1 hour after the stored hot water is used, and hot water recovery time tells you how many minutes you wait for hot water to return. Recovery rate matters because it controls how quickly your water heater keeps up with real life use like back to back showers, laundry cycles, and dishwashing.

On a typical tank water heater, recovery rate is measured in gallons per hour. A gas water heater with a strong burner reheats more gallons per hour than a small electric model with a low kilowatt rating. Tank capacity matters too. A forty gallon tank with a high recovery rate may perform better for a busy family than a larger tank with slow recovery.

Hot water recovery time connects these numbers to daily comfort. It reflects how long you wait for the heater to bring the water from the incoming cold temperature up to your set temperature, often a rise of around ninety degrees. When recovery rate is too low for your household hot water demand, you run out of hot water quickly and wait longer between showers.

Water heater recovery rate is the key number that links fuel type, tank size, and burner or element power to how much usable hot water you actually have each hour.

What Is Water Heater Recovery Rate?

Water heater recovery rate is the number of gallons of water a heater raises from the incoming cold temperature to the set hot temperature in 1 hour after the tank has been drained. In practical terms, recovery rate shows how many gallons of hot water your heater produces each hour once you have used what is already stored in the tank.

Manufacturers list recovery rate as gallons per hour at a specific temperature rise. A typical label might show recovery at a 90 degree temperature rise so you can compare models fairly. Gas heaters use burner input in British thermal units and electric heaters use kilowatt rating to reach that recovery number. Higher BTU or kilowatt input usually means more gallons per hour and a shorter recovery time.

On spec sheets you may see terms such as GPH recovery, BTU input, kilowatt rating, and temperature rise side by side. These values work together. Recovery rate shows how many gallons the heater delivers, BTU or kilowatt input shows how much heating power the unit has, and temperature rise defines how much the heater needs to heat the water above the incoming supply temperature. Understanding these numbers helps you choose a water heater that matches your home’s hot water demand without constant shortages.

What Is Water Heater Recovery Time?

Water heater recovery time is the number of minutes a tank water heater needs to heat a full tank of cold water back to your set temperature. Hot water heater recovery time tells you how long you wait for hot water to return after the tank runs out.
Recovery time depends on tank size and recovery rate. Recovery rate measures gallons reheated per hour, so recovery time equals tank capacity divided by that hourly rate. A forty gallon tank with a strong burner recovers faster than an eighty gallon tank with a slow electric element.

Homeowners care about recovery time because it controls how long the water heater keeps up with real world use. A long shower drains most of the stored hot water and the heater must reheat the entire tank before the next person showers comfortably. Houses with multiple bathrooms or large families need shorter recovery times to avoid long waiting periods.

Recovery time is a practical number that connects tank size, recovery rate, and daily usage patterns. It shows how quickly your home returns to a stable hot water supply after a full draw.

What Are Typical Water Heater Recovery Rates by Fuel Type and Tank Size?

Most gas water heaters recover in 30 to 40 minutes because gas burners deliver more heating power. Electric water heater models usually take 1 to 2 hours because electric elements heat water more slowly. Recovery rate varies by tank size, burner strength, and energy input.

A 40 gallon gas model recovers in 30 minutes. A 50 gallon gas model takes 40 to 50 minutes. An 80 gallon gas model typically takes around 1 hour. Electric models take longer. A 40 gallon electric unit often needs 60 to 90 minutes, and larger tanks need 90 to 120 minutes.

These numbers help match a heater to household size. A 40 gallon gas tank supports 2 to 3 occupants comfortably. A 40 gallon electric tank supports smaller families when recovery time is acceptable. Larger tanks serve homes with multiple bathrooms and higher usage demand.

Typical Recovery Rates and Recovery Times

Tank Size Fuel Type Recovery Rate (GPH) Approx Recovery Time (minutes) Occupants Supported
40 gallon Gas 40 to 50 GPH 30 to 40 minutes 2 to 3 people
40 gallon Electric 20 to 25 GPH 60 to 90 minutes 1 to 2 people
50 gallon Gas 50 to 60 GPH 40 to 50 minutes 3 to 4 people
50 gallon Electric 20 to 30 GPH 70 to 100 minutes 2 to 3 people
80 gallon Gas 60 to 70 GPH 60 to 80 minutes 4 to 5 people
80 gallon Electric 25 to 35 GPH 90 to 120 minutes 3 to 4 people

These ranges give homeowners a clear comparison between gas and electric performance and help them estimate waiting times for hot water.

Recovery Rate vs First Hour Rating: What Is the Difference?

Visual comparison of recovery rate, recovery time, and first hour rating.

First hour rating measures how many gallons of hot water a tank water heater delivers during the first hour of use when starting with a full tank. Recovery rate measures how fast the heater reheats cold water back to the set temperature after hot water is used. Recovery time is the number of minutes needed for the tank to return to full temperature.

First hour rating reflects real usage conditions. It combines tank capacity and recovery speed to show how many showers or appliance cycles the heater supports within 1 hour. A tank with a 40 gallon capacity and a strong burner delivers 70 to 80 gallons during peak morning use because it reheats water while you draw from the tank.

Recovery rate only measures reheating speed. It does not reflect how much hot water you use at once. A heater with a high recovery rate supports multiple back to back showers because the burner or element replenishes hot water quickly.

Recovery time helps you understand how long you wait for the tank to refill with hot water after a full draw. These three measurements work together to show how a water heater performs during heavy household demand.

What Factors Affect Water Heater Recovery Rate and Recovery Time?

Infographic listing what affects water heater recovery speed.

The recovery rate changes when fuel type, burner strength, and tank size vary. These factors directly influence how many gallons the heater reheat each hour and how long it takes to return to full temperature.

  • Fuel type: Gas models recover faster because burners deliver higher BTU output. Electric units recover slower because heating elements produce less heat per hour.
  • Tank size and shape: Larger tanks store more water and need more time to reheat. Taller tanks have different heat distribution patterns that affect recovery.
  • BTU or kilowatt input: Higher input ratings increase recovery rate. A high BTU burner reheats water faster than a low input system.
  • Inlet water temperature: Cold winter water forces the heater to work harder. The larger the temperature rises, the longer the recovery time.
  • Thermostat setting: Higher set temperatures increase recovery time because the heater must raise the water to a higher final temperature.
  • Sediment buildup in the tank: Sediment buildup increases recovery time because it insulates the burner or lower heating element and slows heat transfer into the water.
  • Condition of heating elements or burner: Worn heating elements and partially blocked burner ports reduce heat output and lengthen recovery.
  • Age of the water heater: Older tanks often lose efficiency due to corrosion, scaling, or declining element performance.

Understanding the above variables helps homeowners evaluate whether their current water heater is performing correctly or showing signs of decline.

What Are the Signs Your Water Heater Recovery Time Is Too Long?

Short bursts of hot water followed by long cold periods mean the recovery time is too slow for the household. Long burner or heating element run times indicate reduced efficiency or declining heat transfer inside the tank.

Common signs include:

  • Back to back showers run cold quickly: Short hot water supply suggests a slow recovery rate or weakened heating components.
  • Long wait for hot water after a laundry or dishwashing cycle: High demand events drain the tank, and slow reheating indicates poor recovery performance.
  • Pilot light or electric heating elements operate longer than normal: Extended heating cycles point to sediment buildup, lower burner output, or failing elements.
  • Seasonal increases in heating time compared with previous years: A longer winter recovery time may signal sediment accumulation or age related decline rather than simply cold inlet water.
  • Frequent hot water shortages during peak usage periods: Multiple fixtures losing temperature indicates that the tank cannot replenish hot water at the required rate.

These symptoms show the system is struggling to maintain set temperature or deliver steady hot water volume for showers, dishwashers, or washing machines.

How Do You Test Your Water Heater Recovery Time at Home?

Estimate recovery time by running the tank to depletion and measuring how long it takes for hot water to return. A recovery test helps confirm whether the heater is performing within the expected range for its fuel type and tank size.

Follow these steps:

  1. Check the thermostat setting: Confirm the current temperature setting to establish a baseline for the test.
  2. Run hot water until the temperature drops significantly: Use a shower or faucet to draw hot water until the supply becomes noticeably cold.
  3. Shut off the hot water and start a timer: This marks the beginning of the recovery period.
  4. Wait a standard interval such as 30 or 45 minutes: This allows the burner or heating elements to reheat a portion of the tank.
  5. Test the hot water at the same faucet: Assess whether the water has returned to an acceptable temperature. A thermometer provides more precise measurement, but it is optional.
  6. Compare the result to typical expectations: Gas heaters usually regain significant temperature within thirty to sixty minutes. Electric heaters may require sixty to one hundred twenty minutes.

This simple test reveals whether the recovery time aligns with manufacturer performance or signals developing issues inside the tank.

How Do You Improve Water Heater Recovery Rate and Recovery Time?

Flushing the tank restores heat transfer and reduces recovery time by removing sediment that blocks heat movement. Improving fuel input, cleaning heating components, and adjusting system settings also help shorten recovery time and raise recovery rate.

Effective improvements include:

  • Flush the tank to remove sediment: Sediment buildup slows heat transfer and extends recovery time. A full tank flush lowers sediment level and restores efficient heating.
  • Inspect and replace worn heating elements or clean the gas burner: Electric elements lose output with age. Gas burners lose efficiency when ports collect debris. Restoring full fuel input improves recovery rate.
  • Check and adjust the thermostat setting safely: Incorrect thermostat settings increase recovery time. Verifying the temperature set point helps maintain consistent output.
  • Verify gas pressure or electrical supply: A gas valve with low pressure or an electrical circuit with limited power reduces heating capacity and extends recovery time.
  • Upgrade to a higher BTU gas model or larger tank: Higher BTU input increases recovery rate. A larger tank provides more initial hot water for high demand households.
  • Evaluate tankless or hybrid heat pump systems: Tankless models provide continuous hot water without waiting for recovery. Hybrid heat pump systems offer higher efficiency and faster reheating for large families.

These improvements address the key attributes that influence performance, including sediment level, fuel input, efficiency rating, and overall tank capacity.

When Should You Repair vs Replace a Slow Water Heater?

Repair makes sense when the slow recovery time results from a specific fixable component. Replacement becomes the better option when age, corrosion, or repeated recovery failures show the system has reached end of life.

Repair Friendly Conditions:

You usually repair the water heater when:

  • The unit is younger than about eight years: Younger systems typically have better structural integrity and available replacement parts.
  • A single heating element or gas burner is dirty or worn: Restoring one component often returns normal recovery performance.
  • There is no tank corrosion, rust, or leak: A healthy tank structure supports long term repair value.
  • Recovery time has increased recently but the unit worked normally before: Recent changes suggest a correctable issue such as sediment buildup or a failing thermostat.

Replacement Signals:

Replacement becomes the better option when:

  • The unit is ten to twelve years or older: Older tanks have declining efficiency and higher failure risk.
  • Tank rust, leaks, or discolored hot water appear: These symptoms indicate internal corrosion and loss of structural integrity.
  • Recovery problems continue after multiple repair attempts: Persistent slow recovery suggests deeper deterioration.
  • The tank size is too small for household demand: Low recovery performance often reflects inadequate capacity in multi bathroom homes.

These factors highlight the attributes that influence long term cost, including repair frequency, operating cost, efficiency loss, and structural condition of the tank.

What is a good water heater recovery rate?

A good recovery rate provides thirty to fifty gallons per hour for gas units and twenty to twenty five gallons per hour for electric models. A strong recovery rate supports consistent hot water during back to back showers and high demand use.

How long should hot water heater recovery time be?

Typical recovery time ranges from thirty to sixty minutes for gas systems and sixty to one hundred twenty minutes for electric systems. Recovery time increases when tank size is larger or fuel input is lower.

Why is my water heater recovery time getting longer?

Recovery time increases when sediment collects at the bottom of the tank or when heating elements or the burner lose output. Longer recovery time often indicates maintenance needs or early component failure.

Do gas water heaters have faster recovery rates than electric water heaters?

Gas water heaters recover faster because they deliver higher BTU input. Electric units reheat more slowly due to lower kilowatt output. This difference affects gallons per hour and total recovery time.

How does tank size affect hot water recovery rate?

A larger tank takes longer to reheat because the system must raise temperature across more stored water. Smaller tanks recover faster but may run out of hot water sooner during heavy use.

Does sediment buildup slow water heater recovery time?

Sediment buildup slows recovery time by blocking heat transfer at the bottom of the tank. Heavy sediment forces the burner or heating elements to run longer to reach a set temperature.

How should I flush my water heater to maintain recovery rate?

A water heater should be flushed once a year to remove sediment and maintain normal recovery rate. Homes with very hard water benefit from flushing twice a year to protect the tank.

Conclusion

Understanding recovery rate and recovery time helps you size and maintain your water heater correctly. Faster recovery supports consistent hot water for showers, laundry, and dishwashing. Slow recovery often signals sediment buildup, worn heating components, or a tank that no longer meets household demand.

A timely inspection prevents rising utility bills, repeated shortages, and early system failure. Anchor Plumbing Services provides professional diagnostics, recovery rate improvements, and full water heater replacement across San Antonio. Our licensed plumbers restore reliable hot water with precise testing and clear upfront pricing.

Water heater type comparison chart with cost, lifespan, and efficiency

How Much Does Water Heater Installation Cost?

Water heater installation typically costs between $1,000 and $5,000, depending on the unit type, size, and complexity of the setup. Most homeowners pay around $1,500 to $3,000 for a standard installation that includes both labor and materials. Costs vary based on whether you choose a tank, tankless, or hybrid system, as well as the existing plumbing and electrical connections. A licensed plumbing service ensures the installation meets local codes and includes safe setup, disposal of the old unit, and complete testing for leaks and temperature regulation.

Professional water heater installation provides long-term reliability, improves energy efficiency, and prevents safety risks associated with DIY setups. Investing in proper installation helps extend the life of your water heater while ensuring optimal performance for your home’s daily hot water needs.

What Factors Affect Water Heater Installation Cost?

The cost of water heater installation depends on several key factors that influence both labor and materials. Understanding these cost drivers helps homeowners make informed decisions before purchasing a new unit.

Key factors include:

  • Heater Type: Tank, tankless, or hybrid systems each have unique installation requirements.
  • Fuel Source: Gas units often need venting and gas line connections, while electric models may require upgraded wiring.
  • Heater Size and Capacity: Larger gallon tanks or higher flow rate units increase both material and labor costs.
  • Accessibility: Limited space or tight installations (such as attics or closets) take longer and require more labor.
  • Venting and Plumbing Adjustments: Replacing vent pipes, drain pans, or water lines adds to the total price.
  • Local Labor Rates: Installation costs can differ by city or region depending on permit fees and technician rates.

Technicians assess the home’s plumbing and electrical layout to estimate pricing accurately. Choosing the right unit for your space and water usage ensures long-term savings on energy and maintenance.

Tank Water Heater Installation Cost

Tank water heaters are the most common and cost-effective option for most homes. Installation costs typically range between $1,000 and $2,500, including labor, materials, and removal of the old unit. The total cost depends on tank size, power source, and energy efficiency rating.

Typical pricing examples:

  • 40-gallon electric heater: $1,000–$1,400 installed
  • 50-gallon gas heater: $1,300–$1,800 installed
  • 80-gallon high-efficiency unit: $1,800–$2,500 installed

Gas-powered tank heaters may cost slightly more to install due to venting and gas line work, while electric models usually have lower setup costs but higher energy use.

Tank units generally last 10 to 15 years and provide reliable, consistent hot water for families. Although they have a lower upfront price, tank models use more energy to keep water heated continuously. Professional installation ensures the tank is properly vented, pressure-tested, and compliant with plumbing codes for safe operation.

Tankless Water Heater Installation Cost

Tankless water heaters cost more to install because they require upgraded venting, electrical, and gas line connections. The total installation cost typically ranges from $2,500 to $5,000, depending on the unit’s capacity and the home’s plumbing configuration. Most projects take 6 to 10 hours to complete since technicians must retrofit the system to handle higher water pressure and temperature output.

Tankless, or on-demand systems, heat water only when needed, which significantly improves energy efficiency compared to traditional tanks. Although the upfront investment is higher, homeowners save on monthly energy bills and gain a longer system lifespan — usually 20 years or more.

High efficiency and space savings offset the initial expense. Tankless water heaters are compact and ideal for smaller homes or households with high hot water demand. Professional installation ensures proper venting and prevents gas leaks or electrical overloads that can occur with improper DIY setup.

Hybrid Heat Pump Water Heater Installation Cost

Hybrid water heaters cost more upfront but offer the best long-term savings through reduced energy consumption. Installation typically costs between $2,000 and $4,500, including both labor and materials. These systems combine a heat pump with electric heating elements to extract warmth from surrounding air and heat the water efficiently.

Proper ventilation and space are required for efficient operation since the heat pump draws ambient air to function. Installations in garages or utility areas with adequate airflow deliver the best performance. Many homeowners qualify for energy rebates or tax credits due to the high efficiency of these systems, which can reduce total cost by several hundred dollars.

Hybrid models have an energy factor two to three times higher than conventional electric units and can last up to 15 years with routine maintenance. The higher initial investment pays off through lower utility bills and eligibility for incentive programs.

How Much Does Labor Cost for Water Heater Installation?

Timeline chart showing water heater installation durations by type.

Most licensed plumbers charge between $50 and $150 per hour, depending on location, experience, and project complexity. Labor represents a significant portion of water heater installation cost.

Average installation times vary by unit type:

  • Tank water heaters: 2 to 4 hours
  • Tankless water heaters: 6 to 10 hours
  • Hybrid heat pump systems: 4 to 6 hours

Labor costs increase when technicians need to reroute plumbing, upgrade venting, or install new gas or electrical lines. Additional time may be required for permits, safety checks, and testing.

Hiring a licensed plumber ensures the system meets local codes and performs efficiently from the start. Professional installation protects your manufacturer warranty and minimizes long-term repair risks caused by improper setup or incorrect connections.

Need a New Water Heater Installed? We’re Ready to Help

Are There Additional Costs Homeowners Should Expect?

Some cities require plumbing permits that add to total installation cost. Homeowners should be aware that water heater installation can involve several additional expenses beyond the base equipment and labor charges. These variable costs depend on local regulations, home layout, and the condition of existing plumbing or electrical connections.

Common additional costs include:

  • Permit and inspection fees: Many municipalities require plumbing permits and post-installation inspections to ensure code compliance. These fees typically range from $50 to $250.
  • Disposal of the old unit: Removing and properly disposing of an existing water heater may add $50 to $150 to the total bill.
  • Gas or electrical line upgrades: If a tankless or hybrid unit requires upgraded wiring, breakers, or gas lines, the cost can increase by several hundred dollars.
  • Expansion tank or drip pan installation: These accessories are often required by modern codes to prevent pressure buildup and protect against leaks, adding $100 to $300 depending on materials.

Code compliance, permit requirements, and infrastructure upgrades all influence final pricing. A professional plumbing service includes these considerations in a detailed quote, ensuring there are no unexpected charges after installation.

How Much Does It Cost to Replace vs. Install a New Water Heater?

Replacing an existing water heater usually costs less than installing a brand-new system. When a plumber can use existing hookups for gas, water, or electrical connections, it reduces both labor time and material expenses.

Typical pricing comparison:

  • Replacement installation: $1,000 to $2,500
  • New installation (no prior hookups): $2,500 to $5,000

Replacement projects require disconnecting and removing the old unit, connecting the new heater to existing lines, and testing for leaks and temperature consistency. A new installation often involves retrofitting, such as adding new plumbing connections, venting systems, or electrical upgrades, which increases cost and installation time.

Homeowners benefit from professional assessments before installation to determine whether the current setup can support a modern, energy-efficient unit. Reusing compatible connections where possible helps minimize cost without sacrificing safety or performance.

How Can You Save Money on Water Heater Installation?

You can lower installation costs by comparing quotes, claiming rebates, and planning your project strategically. Smart budgeting and proper timing can reduce both upfront and long-term expenses without compromising quality or safety.

Practical ways to save include:

  • Compare multiple quotes: Request estimates from licensed plumbers to find transparent pricing and verify what each service includes.
  • Schedule during off-season: Installation rates are often lower in non-peak months when demand decreases.
  • Claim rebates for ENERGY STAR models: Many utility companies and state programs offer energy efficiency credits or cash-back incentives for certified models.
  • Bundle plumbing services: Combining installations or maintenance visits can qualify you for package discounts or reduced service fees.

Homeowners who invest in efficient systems such as ENERGY STAR-rated models can save up to 20% annually on water heating costs. Maintenance plans and loyalty programs from reputable plumbing companies may also include annual tune-ups or priority service, adding long-term value beyond the initial installation.

Should You Hire a Professional or Try DIY Installation?

DIY installation violates local building codes and voids manufacturer warranties. While installing a water heater yourself may seem cost-effective, it carries significant risks including gas leaks, electrical hazards, or poor system performance if not installed correctly.

Hiring a professional plumber ensures full code compliance, safety certification, and warranty protection. Licensed technicians verify gas pressure, electrical load, venting, and drainage before activating the unit. They also handle permits and perform post-installation safety inspections to confirm proper operation.

Professional installation minimizes liability and guarantees your system performs efficiently from day one. The added peace of mind, safety, and long-term reliability make professional installation the smarter investment for any homeowner replacing or upgrading their water heater.

Frequently Asked Questions About Water Heater Installation Costs

How much does a 40-gallon heater cost to install?
A 40-gallon water heater typically costs between $1,200 and $2,000 to install, depending on brand, labor rates, and whether new connections or permits are required.

What’s the cost difference between gas and electric?
Gas models cost slightly more to install due to venting and gas line requirements, but they often lower monthly energy bills compared to electric models.

How long does installation take?
Most water heater installations take 2 to 6 hours, depending on the type of unit and any upgrades needed for electrical or plumbing connections.

Does insurance cover replacement?
Homeowners insurance usually does not cover replacement unless the water heater failure results from a sudden, accidental event such as a burst tank or flood-related damage.

Conclusion: Is a New Water Heater Worth the Installation Cost?

Installing a new water heater is an investment in comfort, energy efficiency, and long-term reliability. The average installation cost ranges between $1,000 and $5,000, depending on the type of system, home configuration, and local labor rates.

Modern systems such as tankless and hybrid water heaters deliver better energy efficiency, faster heating, and lower utility bills, often paying for themselves over time. Replacing an outdated or inefficient unit also helps maintain consistent water temperature and reduces the risk of leaks or corrosion.

Professional installation ensures safe, efficient performance and compliance with building codes. Anchor Plumbing Services provides licensed water heater installation with transparent pricing and expert craftsmanship across San Antonio. Our team delivers lasting comfort and dependable hot water solutions backed by a satisfaction guarantee.

How Much Does Slab Leak Repair Cost?

How Much Does Slab Leak Repair Cost?

Slab leak repair typically costs between $1,500 and $4,500 for most homes, depending on leak severity, pipe material, and accessibility under the foundation. The total price can increase if advanced detection or full repiping is required to prevent future leaks.

Slab leaks are among the most complex plumbing issues because they occur beneath your home’s concrete foundation. Repair pricing reflects both the difficulty of locating the leak and the restoration work needed afterward. Professional detection tools, such as acoustic sensors and cameras, help pinpoint leaks without unnecessary damage, ensuring accurate repairs and long-term reliability.

What Is a Slab Leak and Why It Matters

A slab leak occurs when a pressurized water line beneath the concrete foundation begins to leak due to corrosion, high water pressure, or ground movement. These leaks are serious because water seeps through the slab, damaging flooring, walls, and the foundation itself.

Over time, slab leaks can lead to mold growth, structural weakening, and costly foundation repairs. The constant water flow also increases monthly utility bills and may create warm or damp spots on floors. Detecting and repairing a slab leak early helps maintain your home’s integrity and prevents secondary damage to your plumbing and electrical systems.

Slab leaks can develop from aging copper pipes, chemical reactions in the soil, or vibrations caused by shifting ground. Regular inspections and water pressure monitoring are essential to catch leaks before they reach critical levels.

How Much Does Slab Leak Repair Cost?

Slab leak repair typically costs $1,500 and $4,500 for most homes. Leak detection costs $150 to $600, while full repiping costs around $4,000 to $15,000 depending on the pipe condition and layout. The final price varies based on the detection method, accessibility, and the repair technique your plumber recommends.

Most homeowners pay between $1,500 and $4,500 when the leak is isolated and easy to access. Complete slab leak repair usually includes the diagnostic inspection, access through the concrete, the pipe repair itself, and basic slab patching once the work is finished. Prices increase when technicians must remove flooring, cut through thicker concrete, or repair multiple damaged lines.

Leak detection alone generally costs $150 to $600, using specialized tools such as acoustic listening devices, infrared imaging, or camera inspections. Once identified, the final repair cost varies depending on the chosen method and accessibility.

Repair Method Average Cost Description
Leak Detection Only $150–$600 Locating the leak using sensors or cameras
Spot Repair $1,500–$3,000 Opening the slab and replacing a single pipe section
Rerouting $2,000–$4,500 Installing new water lines through walls or ceilings to bypass damaged areas
Repiping $4,000–$10,000 Replacing all underground water lines for a permanent solution

Spot repairs are the least expensive but may not solve the problem if multiple leaks exist. Rerouting and repiping are more comprehensive options that eliminate recurring leaks and strengthen overall plumbing performance.

Technicians assess your home’s foundation type, water line material, and leak location to determine the best approach. Investing in a complete reroute or repipe may seem costlier upfront but can prevent thousands in future foundation and water damage repairs.

What Factors Affect Slab Leak Repair Cost

The cost of slab leak repair depends on how deep the leak is, what material the pipes are made of, and how easy it is to access the damaged area. Technicians assess the leak’s depth and location before estimating cost, ensuring accuracy in both detection and repair.

Several key factors influence the final price:

  • Pipe Material: Copper piping is more expensive to repair or replace than PEX or PVC because it requires soldering and specialized labor. Homes with aging copper systems often face higher material and labor costs.
  • Accessibility: Leaks beneath concrete slabs or inside tight crawl spaces take longer to reach and repair. Breaking through the foundation increases labor time and restoration costs compared to rerouting pipes through walls or ceilings.
  • Leak Location: Leaks under bathrooms, kitchens, or laundry rooms are harder to access due to plumbing density. These areas may require additional fixture disconnection or tile removal.
  • Home Size and Layout: Larger homes typically have more extensive water lines. The greater the distance between fixtures and the main supply line, the higher the repair complexity and labor time.
  • Detection Difficulty: Advanced diagnostic tools such as acoustic sensors, infrared cameras, or pressure testing equipment add to upfront costs but help pinpoint leaks accurately, minimizing unnecessary excavation.
  • Local Labor Rate: Pricing varies based on regional labor rates and the plumber’s experience level. In cities like San Antonio or Austin, professional slab leak specialists may charge more due to higher demand and licensing standards.

Common Repair Methods for Slab Leaks

Plumbers use different repair methods depending on leak severity, location, and long-term system condition. Each technique varies in cost, invasiveness, and effectiveness.

  • Spot Repair: Spot repair is a targeted fix where a technician breaks through the slab to access and replace the damaged pipe section. It is best for isolated leaks and costs less than full rerouting. However, it is not ideal for older plumbing systems prone to repeated failures.
  • Rerouting Water Lines: Rerouting creates new water lines through walls, attics, or ceilings to bypass the damaged section under the slab. Plumbers may choose rerouting when multiple leaks exist or when the foundation is difficult to access. This method prevents future slab intrusion and reduces structural disruption.
  • Trenchless Repair: Trenchless repair uses epoxy lining or pipe coating to seal small leaks internally without excavation. It is ideal for minor leaks in structurally sound pipes and minimizes disruption to flooring or concrete.
  • Repiping the Entire System: Repiping is the most comprehensive option for homes with widespread pipe corrosion or multiple slab leaks. It involves installing new water lines throughout the property, typically using PEX or copper piping for durability. Though more expensive upfront, it offers long-term reliability and eliminates recurring leak risks.

Each repair method is chosen after detailed leak detection using moisture meters, pipe scopes, and pressure testing. The right approach balances cost, durability, and the extent of existing pipe damage to restore system integrity efficiently.

How to Decide Between Spot Repair, Rerouting, and Repiping?

Choosing the right slab leak repair method depends on the age of your plumbing system, the extent of corrosion, and how many leaks have occurred over time. A clear decision framework helps you select the most cost effective and durable solution without over repairing or risking future slab damage.

Spot repair is cost effective when the plumbing system is under ten to fifteen years old and the leak is isolated to a single location. Spot repair works best when there is no widespread corrosion, no history of repeated leaks, and the damaged section is easy to access. This option addresses the immediate issue without unnecessary rerouting or pipe replacement.

Rerouting is often the best balance between cost and disruption when multiple slab leaks have occurred or when the concrete slab is difficult to open, such as in homes with post tension foundations. Rerouting is also ideal when you want to avoid future slab demolition because it bypasses the damaged section by running new PEX or copper lines through walls or ceilings. This method prevents future leaks beneath the foundation and reduces structural impact.

Repiping becomes the better investment when the system shows advanced corrosion, multiple branches have leaked over time, or the plumbing is more than fifteen to twenty years old. Full repiping provides long term protection and is the preferred solution when you plan to stay in the home for many years. It replaces all underground water lines, eliminating recurring slab leaks and reducing annual repair costs.

A structured approach based on system age, corrosion level, and leak history ensures that homeowners choose the repair method that delivers the strongest long term value and restores plumbing reliability efficiently.

Signs You May Have a Slab Leak

Checklist infographic showing signs of a slab leak

Unexplained water bills often indicate a hidden leak beneath your home’s foundation. Because slab leaks occur underground, early warning signs are subtle but reveal themselves through changes in your flooring, water usage, or pressure levels.

  • Warm or Damp Floors: Warm spots on floors can mean a hot water line is leaking beneath the slab. The escaping water heats the surrounding concrete and radiates through tile or wood surfaces.
  • Sudden Increase in Water Bill: A consistent rise in your water bill without increased usage is one of the clearest indicators of a slab leak. The leak causes continuous water flow, even when no fixtures are running.
  • Mold or Mildew Smell: Persistent dampness beneath the flooring promotes mold and mildew growth. A musty odor inside your home signals hidden moisture and potential water pooling under the foundation.
  • Low Water Pressure: Leaking pipes beneath the slab divert water away from fixtures, resulting in weak flow from faucets or showers. This drop in pressure often worsens over time as the leak expands.
  • Sounds of Running Water Under the Floor: Hearing water movement when all taps are closed suggests a continuous underground leak. This sound is often most noticeable at night when the house is quiet.
  • Foundation Cracks or Floor Discoloration: Prolonged water exposure weakens the soil supporting your foundation. This pressure can lead to cracks in the slab or discoloration on floors and walls, signaling long-term leakage and potential structural damage.

Identifying these signs early allows homeowners to act before small leaks cause major foundation or plumbing failures.

How Long Does Slab Leak Repair Take

Most slab leak repairs take between 1 to 4 days, depending on leak location, repair method, and accessibility beneath the foundation. Detection and rerouting may extend the project by a day or two for complete restoration.

  • Leak Detection:: Professional leak detection typically takes two to four hours, using tools such as moisture meters, infrared cameras, or acoustic sensors to trace the exact source.
  • Spot Repair:
    A localized repair that requires breaking through the slab and replacing a short pipe section usually takes one to two days, including drying and patching time.
  • Rerouting or Repiping: Comprehensive rerouting or repiping, where new water lines are installed through walls or ceilings, can take two to four days depending on home size and plumbing complexity.

Technicians may require additional drying time before restoring flooring or baseboards to prevent trapped moisture. Homes with multiple leaks or older plumbing systems often need extended timelines to ensure lasting results.

Does Homeowners Insurance Cover Slab Leak Repair

Home insurance may cover slab leaks if the damage results from a sudden or accidental event, such as a burst pipe or foundation shift. However, policies typically exclude costs for pipe replacement or gradual wear and tear from corrosion.

Coverage usually extends to water damage cleanup, floor restoration, and structural drying, but not to the actual plumbing work unless the leak caused secondary property damage.

Preventable wear, poor maintenance, or long-term corrosion are generally not covered. Insurers may also require proof of timely repair to approve future claims.

Before scheduling repairs, review your policy’s water damage coverage limits and deductible. A licensed plumber can document the source of the leak, helping you submit accurate information for insurance claims.

Understanding what your policy includes ensures you are financially prepared for both immediate repairs and potential restoration expenses.

How Can You Prevent Future Slab Leaks

You can prevent slab leaks by maintaining stable water pressure and scheduling regular plumbing inspections. Preventive care reduces the risk of corrosion, pipe fatigue, and foundation damage.

  • Maintain Proper Water Pressure: Keep your home’s water pressure below 80 psi using a pressure regulator. Excessive pressure stresses pipes under the foundation and accelerates wear, especially in copper or older systems.
  • Schedule Annual Plumbing Inspections: Regular professional inspections detect small leaks and early corrosion before they develop into major slab leaks. Licensed plumbers use tools such as pressure gauges and moisture meters to ensure your plumbing remains stable.
  • Install a Water Softener: Hard water contributes to mineral buildup and corrosion inside pipes. Installing a water softener helps extend the lifespan of your plumbing system and prevents scale-related deterioration.
  • Address Minor Leaks Immediately: Even a small, slow drip can become a serious foundation problem. Promptly repairing visible leaks or drops in water pressure prevents moisture from accumulating beneath the slab.

Routine maintenance and water quality management are the most effective ways to prevent future slab leaks and preserve your home’s structural integrity.

Frequently Asked Questions About Slab Leak Repair Costs

How much does it cost to find a slab leak?
Leak detection alone costs between $150 and $600, depending on the tools used and accessibility beneath the foundation.

Is it cheaper to reroute or break the slab?
Rerouting is often more cost-effective because it avoids breaking through concrete and reduces restoration costs after repair.

Can slab leaks cause foundation damage?
Yes. Prolonged leaks can weaken concrete, shift soil, and cause cracks that compromise your home’s foundation stability.

How long do repairs last?
Professional repairs typically last for decades, especially when using PEX repiping or epoxy lining to prevent corrosion and future leaks.

Conclusion: Protecting Your Home from Costly Slab Leaks

Slab leaks require fast, precise repairs to prevent long-term foundation and plumbing damage. Most homeowners spend between $1,500 and $4,500, depending on the repair method, leak location, and pipe material.

Professional slab leak repair ensures lasting protection by combining advanced detection tools with reliable restoration techniques. Timely intervention reduces water waste, prevents structural deterioration, and maintains your property’s value.

Anchor Plumbing Services delivers trusted slab leak repair and detection solutions with transparent pricing and expert workmanship across San Antonio. Our licensed plumbers diagnose, repair, and protect your home using state-of-the-art equipment to restore safety and comfort with long-lasting results.

What to Do When Water Is Leaking from Your Light Fixture

What to Do When Water Leaks from a Light Fixture

When water leaks from a light fixture, turn off the power at your circuit breaker immediately. Do not touch the light fixture or the surrounding water. Once power is off, shut off your home’s main water supply to stop the leak.

To stay safe:

  • Cut electricity to prevent shock or fire.
  • Shut off the main water supply.
  • Contain the water with a bucket or towel.
  • Call a licensed plumber first to stop the leak.
  • Have an electrician inspect the fixture and wiring before restoring power.

Common causes include burst or loose plumbing pipes, roof damage, or HVAC condensation lines dripping above the ceiling. Stains, bulging drywall, or dripping around the fixture often signal water pooling above your ceiling.

In this guide, you’ll learn what to do when water leaks from a light fixture, the common causes, immediate safety steps, how to locate the source, and when to call a plumber or electrician. It also covers professional repair methods and preventive tips to stop future leaks safely.

Why Is Water Leaking from a Light Fixture?

Leaks above ceiling fixtures are caused by plumbing failures, roof damage, condensation, or HVAC drainage issues. In multi-story homes, a plumbing leak from an upper-floor bathroom is the most common reason for water dripping through a light fixture.

Plumbing system leaks can develop in supply lines, fittings, or joints hidden above ceilings. Even a small pinhole leak in a pipe can release enough water to reach electrical housing below. Roof leaks are another frequent cause, especially after heavy rain when damaged flashing or missing shingles allow water to seep through attic insulation.

In warmer climates, air conditioning condensate lines can clog and overflow, sending moisture through ceiling vents or light openings. Condensation from poor attic ventilation may also collect around recessed fixtures during humid weather.

Plumbing and roofing systems can both contribute to ceiling leaks, so it’s important to have a professional identify the moisture source before any electrical or drywall repairs begin. Fixing only the visible damage without addressing the root cause often leads to recurring leaks and higher repair costs later.

What Are the Immediate Safety Steps to Take?

Turn off power supply before taking any action. Locate your home’s main electrical breaker panel and switch off the circuit supplying the affected light fixture. This step prevents electric shock and potential fire hazards.

Never touch a fixture that’s wet or sparking. Water conducts electricity, and even a few drops can energize nearby surfaces. Avoid standing on wet floors or using metal ladders until power is fully disconnected.

If the leak is ongoing, locate the main water shut-off valve and close it to stop additional flow. Place a bucket or towel beneath the fixture to collect dripping water and reduce ceiling damage.

Once immediate hazards are contained, contact a licensed plumber to locate and stop the leak at its source. After the plumbing issue is repaired, an electrician should inspect the light fixture, wiring, and surrounding drywall for moisture damage before restoring power.

These steps protect both personal safety and your home’s structural integrity while ensuring repairs are performed safely by qualified professionals.

How to Identify Where the Leak Is Coming From

You can locate the source by observing the pattern, color, and frequency of the leak — but do so safely, without removing fixtures or opening ceilings yourself. Stains and bulging drywall indicate that moisture has been collecting for some time, often far from where it first appears.

Start by inspecting the area directly above the affected light. In multi-story homes, check bathrooms, laundry rooms, or plumbing walls above the ceiling. Leaks near these areas often come from loose fittings, cracked supply lines, or leaking valves. In single-story homes with attics, use a flashlight to look for wet insulation, water trails, or corrosion on nearby pipes.

If the weather has been rainy, roof seepage or damaged flashing could be the cause. Water may travel along trusses or beams before dripping near the light. Condensation from HVAC systems can also lead to moisture around fixtures if the condensate drain line is clogged or disconnected.

It’s important to avoid touching any wet drywall or electrical wiring. Instead, document what you see, note whether the leak is steady or intermittent, and provide these details to your plumber or electrician. This helps professionals isolate the leak quickly while minimizing damage to your ceiling or lighting system.

Steps to Stop Water Leaking from a Ceiling Light Fixture

Water dripping from a ceiling light fixture is a dangerous emergency that combines two major household risks — water damage and electrical shock. The situation requires immediate action to prevent fire hazards and property damage.

Step 1: Turn Off the Power Immediately

Go to your home’s electrical panel and switch off the breaker for the affected area. If you are unsure which breaker controls it, turn off the main power to shut down all electricity safely. This prevents electrical current from flowing through the wet area.

Step 2: Do Not Touch the Light Fixture

Avoid touching the fixture, ceiling surface, or surrounding area. Even minimal contact can conduct electricity through moisture. Stay clear until a professional confirms it’s safe.

Step 3: Shut Off Your Home’s Water Supply

Find your main water shut-off valve — typically near the water meter or in your utility space — and close it. This stops further water flow that could worsen the leak and damage your ceiling structure.

Step 4: Contain the Water

Position a bucket beneath the dripping area to catch water and place towels around it to absorb excess moisture. This helps prevent ceiling collapse, stains, or floor damage.

Step 5: Locate the Source of the Leak

Inspect the area above the ceiling for visible plumbing lines, air-conditioning drain pipes, or roof access. Common sources include leaking bathroom fixtures, clogged condensation lines, or roof damage. Identifying the general location helps your plumber act faster.

Step 6: Call a Licensed Plumber

Contact Anchor Plumbing Services for a professional diagnosis. Our licensed technicians use camera inspection tools and moisture detection equipment to trace hidden leaks precisely and repair them safely without unnecessary demolition.

Common Causes of Water Leaking from Ceiling Light Fixtures

Plumbing Leaks from Upstairs Bathrooms

Water from a leaking shower valve, overflowing tub, or cracked drainpipe can travel down through the floor cavity. Over time, moisture collects around the ceiling and seeps through openings like light fixtures.

Roof Leaks

Damaged shingles, flashing, or roof vents can let rainwater enter the attic. Water naturally follows the path of least resistance, often moving along electrical conduits until it appears near ceiling lights.

Condensation or HVAC Leaks

Clogged A/C drain lines or poorly insulated ductwork can create condensation buildup. This trapped moisture may drip around light fixtures, especially during summer months when air conditioning runs continuously.

Burst or Cracked Water Pipes

Aging, corroded, or frozen pipes can split and release water inside ceilings. Even a small crack can leak steadily, saturating insulation and drywall before becoming visible.

Poor Attic Insulation or Ventilation

Insufficient attic ventilation allows moisture to accumulate and condense. This slow-forming moisture can lead to damp spots that eventually drip through ceiling fixtures.

Who Should You Call a Plumber or Electrician?

Contact a plumber first if the leak is active or you suspect a plumbing source such as a burst pipe, loose fitting, or condensation line blockage. A licensed plumber has the tools to trace hidden leaks using moisture meters or inspection cameras and can stop the flow of water before it causes additional damage.

An electrician should inspect after the plumbing issue has been repaired and the area is fully dry. They will check the fixture housing, wiring, and ceiling junction box for signs of moisture or corrosion. If the electrical system has been exposed to water, components such as switches, outlets, or lights may need replacement to prevent shock or fire hazards.

Both professionals often collaborate on these types of emergencies. The plumber resolves the water intrusion, and the electrician ensures your lighting and circuits are safe to operate again. Calling both experts ensures that your home is restored safely and complies with building and electrical safety standards.

How Professionals Fix Water Leaks Near Light Fixtures

Licensed technicians begin by locating the moisture source using tools such as leak detection cameras, thermal sensors, and moisture meters. These devices allow them to trace the water path behind walls or above ceilings without unnecessary demolition.

Once the leak is isolated, plumbers repair the faulty pipe, valve, or drain line causing the issue. If the source is a roof or HVAC condensate problem, they seal flashing, clear blocked lines, or reinforce insulation to prevent future moisture buildup.

After plumbing repairs, ceiling restoration begins. Damaged drywall, insulation, and fixture housing are removed and replaced to ensure no trapped moisture remains. Electricians then inspect and replace any corroded wiring or fixtures to restore full safety and functionality.

Ceiling and electrical repairs are completed after the area has dried and passed inspection. The final step involves moisture testing to confirm the leak has been fully resolved. This comprehensive process restores your ceiling, protects your electrical system, and prevents repeat leaks from hidden or secondary sources.

How to Prevent Future Leaks Above Light Fixtures

You can prevent ceiling leaks by maintaining your home’s plumbing, roofing, and HVAC systems through consistent inspections and timely maintenance. Most ceiling leaks originate from small, unnoticed issues that worsen over time. Preventive care significantly reduces the risk of water reaching electrical fixtures.

Schedule annual plumbing inspections to check for corrosion, pipe wear, or loose fittings in ceilings and upper-floor bathrooms. A licensed plumber can identify potential leaks before they become visible. Regular roof inspections—especially after storms—help detect cracked shingles, damaged flashing, or clogged gutters that allow rainwater intrusion.

Keep HVAC condensate lines sealed and clear of debris to avoid overflow into ceiling cavities. In humid climates, use vapor barriers in attics to prevent condensation buildup around light housings. Proper insulation and ventilation also protect against moisture accumulation.

Creating a simple maintenance checklist that includes these preventive steps ensures your home stays structurally sound, your ceiling fixtures remain dry, and your electrical system remains safe year-round.

Frequently Asked Questions

Is it safe to use a light after a leak?
No. Always wait until an electrician inspects and replaces the fixture. Water exposure can compromise wiring, increasing the risk of shock or fire if the power is restored too soon.

Can a ceiling leak cause a fire?
Yes. Water can short-circuit electrical wiring or overheat damaged connections, creating a fire hazard. Immediate power shutoff and professional inspection are essential to prevent electrical accidents.

Will homeowners insurance cover this repair?
Usually, yes—if the leak results from a sudden or accidental event, such as a burst pipe or storm damage. However, long-term leaks caused by poor maintenance may not be covered. Always review your policy for details.

Conclusion

Even small ceiling leaks pose serious safety and structural risks when water reaches electrical fixtures. Acting quickly to shut off power, stop water flow, and contact a professional can prevent costly repairs and potential hazards.

Proactive maintenance—through regular plumbing inspections, roof checks, and HVAC upkeep—helps protect your home from future leaks and moisture damage. Addressing warning signs early ensures long-term safety and peace of mind.

Water leaks near light fixtures require urgent attention. Anchor Plumbing Services provides emergency leak detection and ceiling leak repairs. Our licensed plumbers locate the source fast and keep your home safe with trusted, code-compliant solutions that restore comfort and prevent future risks.