A slow draining toilet is caused by a partial blockage or flow restriction in the drain system. The 6 most common causes are a partial clog in the trapway, mineral-blocked rim jets, low water level in the tank, a blocked plumbing vent, a sewer line obstruction, and a worn or undersized flapper releasing water too slowly. Each cause produces a different type of slow drain and requires a different fix.
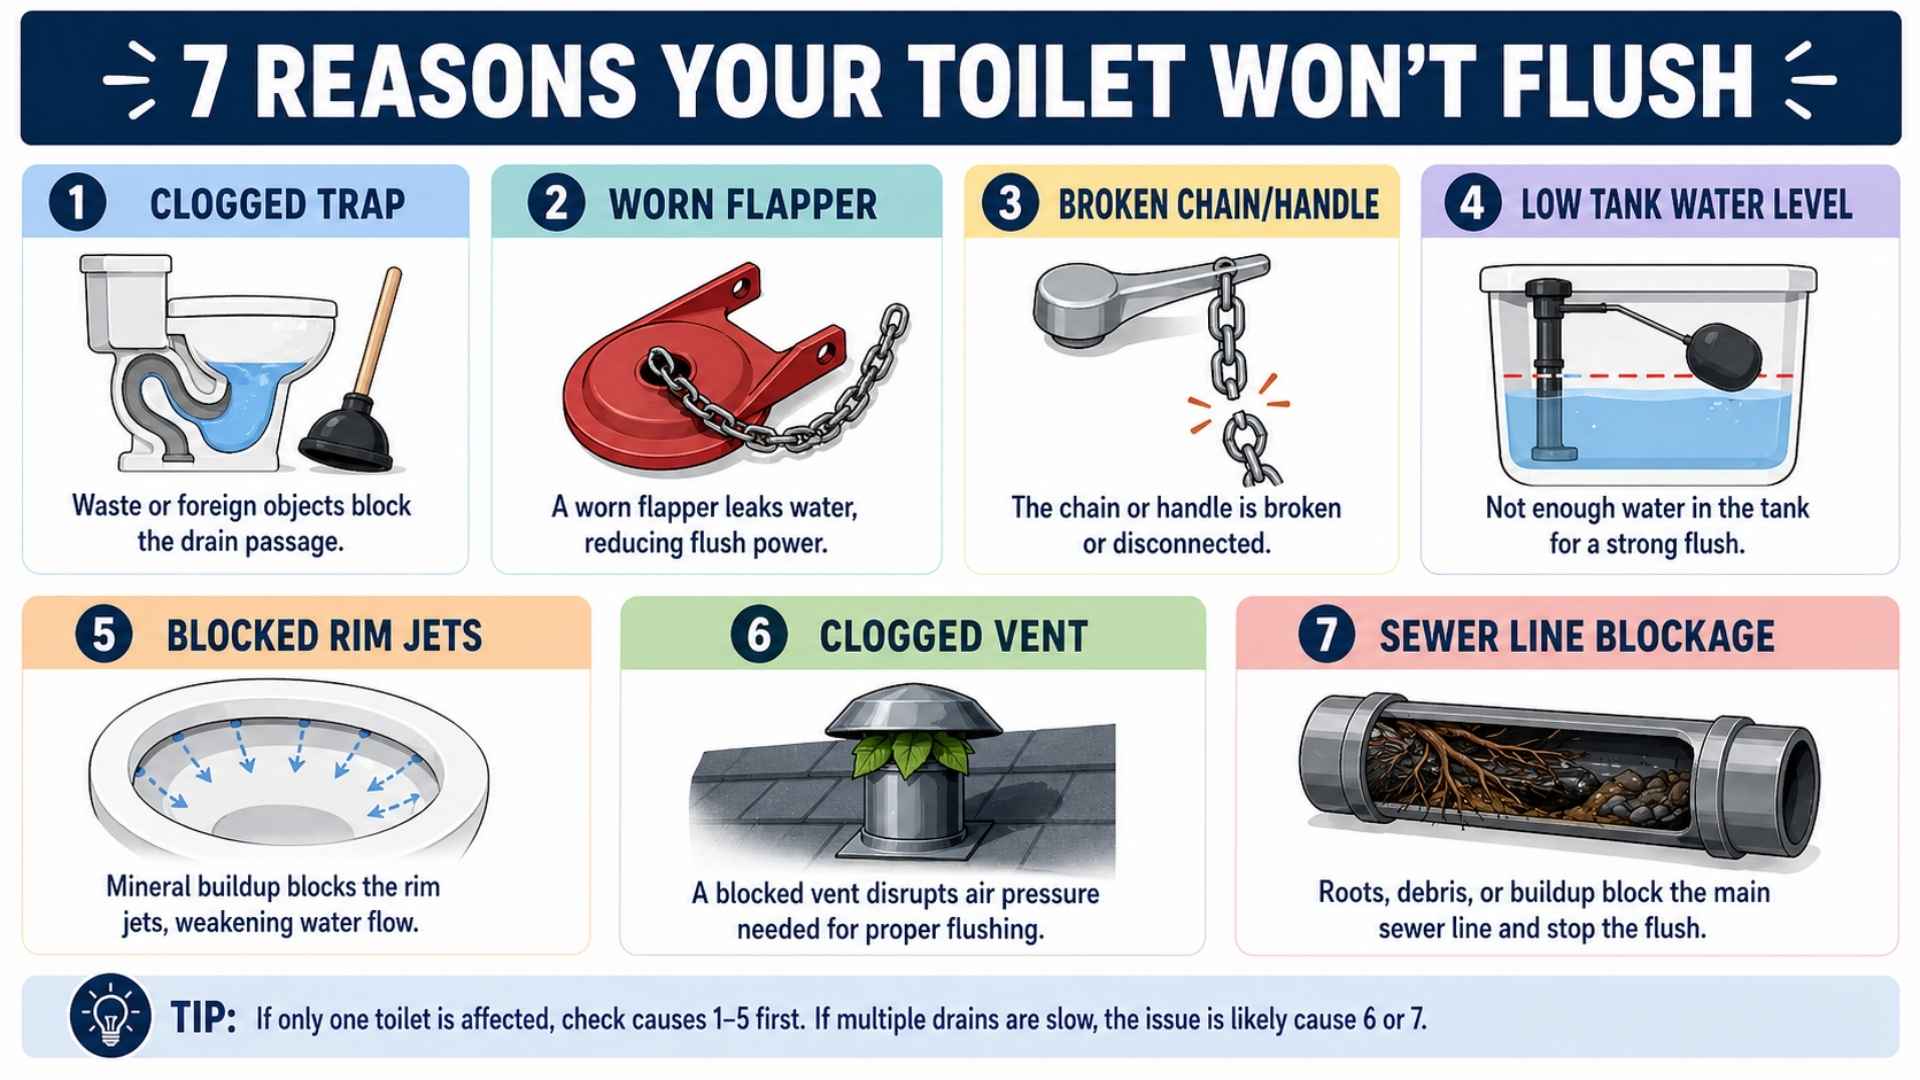
A slow draining toilet is not the same as a toilet that does not flush. A toilet that does not flush has a mechanical failure in the tank (broken chain, failed flapper, disconnected handle). A slow draining toilet flushes, but the water exits the bowl slowly, the waste does not clear completely, or the bowl takes 30 seconds or longer to return to normal water level. This guide covers the drain-side causes, the DIY fixes for each one, and the warning signs that indicate a professional plumber is needed.
Key Takeaways
|
Why Is My Toilet Draining Slow?
A toilet drains slowly when water cannot exit the bowl through the trapway and drain pipe at full speed. The drain path has 4 components: the rim jets and siphon jet that push water into the bowl during a flush, the trapway (S-shaped channel inside the toilet base), the closet bend (the curved pipe connecting the toilet to the floor drain), and the branch drain that connects to the main sewer line. A partial blockage or flow restriction at any of these 4 points slows the drain without stopping it completely.
A slow drain is the early stage of a developing full clog. Addressing a slow draining toilet early prevents a complete blockage that causes overflow, water damage, and a more expensive repair.
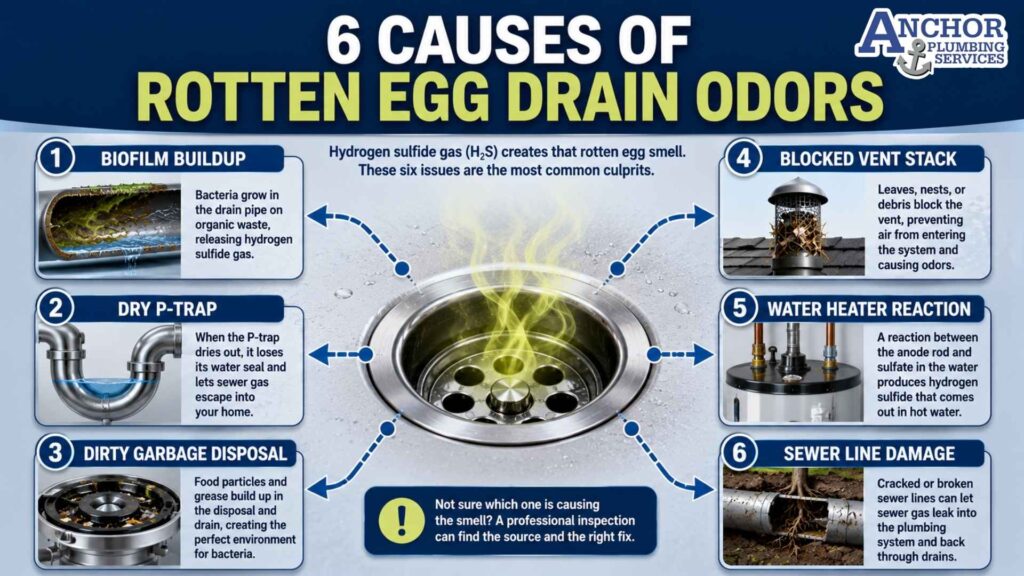
What Are 6 Causes of a Slow Draining Toilet?
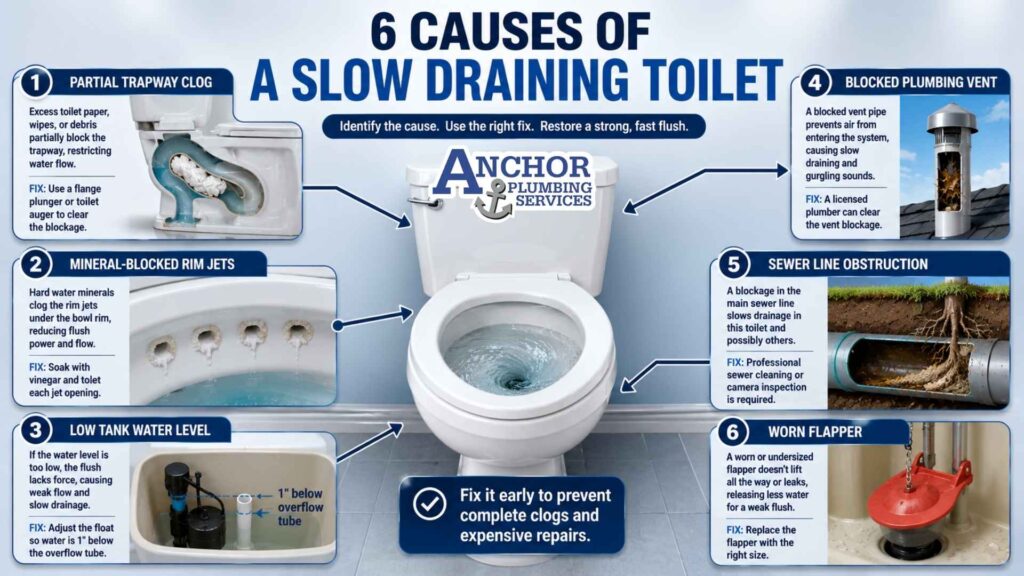
The 6 causes of a slow draining toilet are a partial clog in the trapway, mineral-blocked rim jets, low tank water level, a blocked plumbing vent, a sewer line obstruction, and a worn or undersized flapper. Here is each cause with symptoms and fix steps.
1. Is a Partial Clog in the Trapway Slowing the Drain?
A partial clog is the most common cause of a slow draining toilet. The trapway is the S-shaped channel molded into the porcelain base of the toilet. Excess toilet paper, wipes (including “flushable” wipes), hygiene products, or a foreign object lodged in the trapway restricts water flow without blocking it completely. Water passes around the obstruction but at a reduced rate.
Symptoms: Water rises higher than normal during a flush before slowly draining. The bowl takes 30 seconds or longer to return to normal water level. The toilet occasionally clogs fully after working slowly for several days.
How to fix it: Use a flange plunger (the type with a rubber extension below the cup) to create a seal over the drain opening. Push down gently to remove air, then plunge firmly 15 to 20 times. The pressure and suction dislodge the partial blockage. If the plunger does not improve drainage, use a toilet auger (closet auger) to reach obstructions 3 to 6 feet into the trapway and drain line. Never use chemical drain cleaners in a toilet. Chemical cleaners damage porcelain, rubber seals, and the wax ring. Time: 2 to 5 minutes. Cost: $0.
2. Are Mineral-Blocked Rim Jets Causing a Slow Flush?
Rim jets are small holes located under the rim of the toilet bowl. During a flush, water from the tank flows through these holes to create a swirling action that moves waste toward the trapway. Mineral deposits from hard water clog these openings over time, reducing the volume and force of water entering the bowl. This is the most common cause of a slow draining toilet not clogged.
San Antonio water from the Edwards Aquifer measures 15 to 20 grains per gallon of hardness. At this level, calcium and magnesium scale builds up inside rim jets within 1 to 2 years. The buildup is visible as white, green, or orange mineral deposits under the rim.
Symptoms: Toilet flushes slow but the trapway is clear. Water enters the bowl weakly or unevenly during the flush. Visible mineral deposits around the rim holes. The swirling action during the flush is noticeably weaker than when the toilet was new.
How to fix it: Heat 1 to 2 cups of white vinegar and pour it into the overflow tube inside the tank. Let it soak for at least 1 hour (overnight produces better results). Use a small wire, Allen wrench, or toothpick to carefully clear each rim jet opening. Flush several times to rinse loosened deposits. For heavy buildup, repeat the process. Homes with a water softener system experience slower rim jet buildup because the mineral content is reduced before reaching the toilet. Time: 15 minutes of active work plus soak time. Cost: $0.
3. Is Low Tank Water Level Weakening the Flush?
A toilet needs a full tank of water to generate enough pressure for a complete flush and a fast drain. If the water level in the tank sits more than 1 inch below the top of the overflow tube, the flush lacks force. The bowl receives less water, the siphon action is weaker, and the drain slows.
Symptoms: Toilet draining slow with a visibly low tank water level. The flush sounds quieter or shorter than normal. The bowl does not refill to the proper level after flushing.
How to fix it: Open the tank lid. The water level should sit about 1 inch below the top of the overflow tube. If the level is low, adjust the float upward using the adjustment screw or clip on the fill valve. If the fill valve is clogged with mineral deposits or failing, replace it. A fill valve costs $10 to $25 at hardware stores. Also check that the shutoff valve behind the toilet is fully open by turning it counterclockwise. Time: 5 to 10 minutes. Cost: $0 to $25.
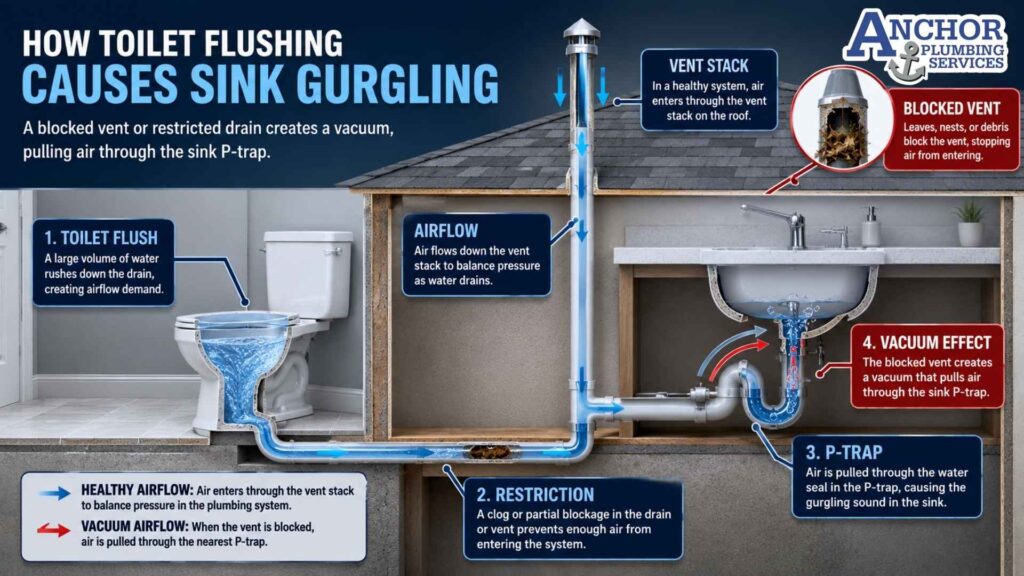
4. Is a Blocked Plumbing Vent Disrupting the Drain?
Every toilet connects to a vent pipe that extends through the roof. The vent allows air into the drain system so water flows freely through the pipes. A blocked vent creates negative air pressure that disrupts the siphon effect and slows drainage. The toilet may flush, but the water swirls slowly instead of draining quickly.
Symptoms: Toilet draining slow with gurgling sounds during or after the flush. Other fixtures in the same bathroom (sink, shower drain) also drain slowly. Sewer odor near the toilet. The toilet bowl water level fluctuates without flushing.
How to fix it: Vent clearing requires roof access. A licensed San Antonio plumber uses a plumbing snake fed through the roof vent to locate and clear the obstruction. Common vent blockages include leaves, bird nests, debris, and ice during rare San Antonio winter freezes. If your toilet gurgles when you flush and other bathroom fixtures drain slowly at the same time, the vent is the most likely cause.
5. Is a Sewer Line Obstruction Affecting the Toilet Drain?
A partial blockage in the main sewer line slows every drain connected to it, including the toilet. Sewer line obstructions develop from tree root intrusion, grease accumulation, pipe corrosion, or a collapsed pipe section. San Antonio homes built before the 1980s often have cast iron drain lines that corrode from the inside over decades.
Symptoms: Multiple fixtures drain slowly at the same time (toilet, tub, sinks). Water backs up in the bathtub or shower when the toilet is flushed. Gurgling from multiple drains throughout the house. Sewage odor in the yard or near cleanout access points.
How to fix it: A sewer line obstruction requires professional diagnosis. A plumber runs a sewer video camera inspection through the cleanout to locate the blockage. Options include hydro jetting to clear grease and debris, mechanical augering for root intrusion, or pipe repair for collapsed sections. Professional drain cleaning for sewer line blockages costs $200 to $500. This is not a DIY repair.
6. Is a Worn or Undersized Flapper Releasing Water Too Slowly?
The flapper is a rubber seal at the bottom of the tank that lifts to release water into the bowl during a flush. A worn flapper that closes too quickly releases less water than needed for a full flush. A flapper that has lost its flexibility due to age or mineral damage does not open wide enough, restricting the flow rate into the bowl. Both scenarios cause the toilet to flush slowly because the bowl receives insufficient water volume.
Symptoms: Toilet flushes slow and the flush duration is shorter than it used to be. The flapper drops back into the closed position before the tank empties fully. The flapper feels stiff, warped, or leaves residue on your fingers when touched.
How to fix it: Turn off the water supply valve behind the toilet. Flush to drain the tank. Unhook the old flapper from the overflow tube pegs and disconnect the chain. Take the old flapper to the hardware store to match the size and type. Install the new flapper, reattach the chain with slight slack, and turn the water back on. Parts cost: $5 to $15. Time: 10 minutes. If your toilet uses an older or proprietary flapper size, a toilet repair specialist can source the correct part.
Why Is My Toilet Draining Slow But Not Clogged?
A slow draining toilet that is not clogged has 3 likely causes: mineral-blocked rim jets reducing the volume of water entering the bowl (Cause 2), low tank water level weakening the flush force (Cause 3), or a partially blocked vent disrupting airflow in the drain system (Cause 4). In all 3 cases, the trapway is clear and a plunger does not improve drainage because there is no blockage to dislodge.
Start by checking the tank water level. If the level is correct (1 inch below the overflow tube), inspect the rim jets under the bowl rim for visible mineral deposits. If the jets are clean and the water level is correct, the cause is likely a vent issue or pipe-slope problem. A plumber with a drain camera can confirm.
What Does a Toilet Flushing Slow and Gurgling Mean?
A toilet flushing slow and gurgling simultaneously is a specific symptom that points to 1 of 2 causes: a blocked plumbing vent (Cause 4) or a partial sewer line obstruction (Cause 5). The gurgling sound is caused by air being pulled through the water in the P-trap or trapway because the vent cannot supply air normally. The trapped air creates bubbles that produce the gurgling noise.
If only the toilet gurgles, the vent serving that toilet may be partially blocked. If multiple fixtures gurgle (the sink or bathtub in the same bathroom), the vent stack or main drain line is the source. Both situations require a professional plumber.
When Does a Slow Draining Toilet Require a Professional Plumber?
Call a plumber in 5 situations:
- The slow drain returns within days after plunging: A recurring slow drain indicates the obstruction is deeper in the drain line than a plunger or household auger can reach.
- Multiple fixtures drain slowly at the same time: If the toilet, tub, and sink all slow together, the cause is a main sewer line blockage or vent issue.
- You hear gurgling from the drain during or after flushing: Gurgling confirms a vent blockage or downstream obstruction creating negative air pressure.
- Sewage odor comes from the toilet or bathroom: Persistent sewer smell despite a functioning P-trap indicates a cracked drain line, failed wax ring, or vent problem.
- Water backs up in other fixtures when the toilet flushes: Backflow between the toilet and tub or shower signals a shared drain line blockage.
How Much Does It Cost to Fix a Slow Draining Toilet?
Most slow draining toilets cost $0 to $25 to fix with DIY methods. Professional repairs cost $100 to $500 depending on the cause. Here is the breakdown:
| Fix Method | Typical Cost | When It Applies |
| Plunger (flange type) | $0 (if owned) | Partial clog in the trapway |
| Vinegar rim jet cleaning | $0 | Mineral-blocked rim jets |
| Float adjustment | $0 | Low tank water level |
| Fill valve replacement | $10 to $25 | Clogged or failed fill valve |
| Flapper replacement | $5 to $15 | Worn or stiff flapper closing too quickly |
| Toilet auger (closet auger) | $15 to $30 | Clog beyond plunger reach (3 to 6 feet) |
| Pro drain cleaning (snake) | $100 to $300 | Deep clog in the drain line |
| Pro drain cleaning (hydro jet) | $200 to $500 | Sewer line grease, roots, or mineral scale |
| Vent clearing | $150 to $400 | Blocked roof vent affecting airflow |
Cost data sourced from Angi, HomeGuide, and Fixr for 2026. San Antonio plumber rates for toilet and drain work average $75 to $150 per hour.
How Can San Antonio Homeowners Prevent Slow Toilet Drains?
5 maintenance habits prevent most slow draining toilet problems:
- Flush only toilet paper: Wipes (including “flushable” wipes), cotton swabs, paper towels, and hygiene products do not break down in water. They accumulate in the trapway and drain line.
- Clean rim jets every 6 months: Pour heated white vinegar into the overflow tube inside the tank and let it soak for 1 hour. Clear each rim jet with a small wire. This prevents hard water mineral buildup from reducing flush power.
- Check the tank water level quarterly: Open the tank lid. The water should sit 1 inch below the overflow tube. Adjust the float if the level has drifted lower.
- Inspect the flapper annually: Press the flapper with your finger. If it feels stiff, warped, or leaves black residue on your hand, replace it. A new flapper costs $5 to $15.
- Consider a water softener: San Antonio’s 15 to 20 GPG hard water clogs rim jets and accelerates mineral buildup inside drain pipes. A NOVO-certified water softener reduces mineral content and extends the lifespan of toilet components.
Frequently Asked Questions About a Slow Draining Toilet
Why is my toilet draining slow?
A toilet drains slowly because of a partial clog in the trapway, mineral-blocked rim jets, low tank water level, a blocked vent, a sewer line obstruction, or a worn flapper releasing water too slowly.
How do you fix a slow draining toilet?
Plunge with a flange plunger first. If the trapway is clear, check the tank water level and clean the rim jets with vinegar. If the problem persists, use a toilet auger or call a plumber for deeper issues.
Why is my toilet draining slow but not clogged?
A slow drain without a clog is caused by mineral-blocked rim jets, low tank water level, or a partially blocked vent. These causes restrict flow without creating a physical blockage in the trapway.
What does a toilet flushing slow and gurgling mean?
Slow flushing with gurgling indicates a blocked plumbing vent or a partial sewer line obstruction. The gurgling is caused by air being pulled through the water because the vent cannot supply air normally.
How much does it cost to fix a slow draining toilet?
DIY fixes cost $0 to $25. Professional drain cleaning costs $100 to $300. Hydro jetting for sewer line blockages costs $200 to $500. Vent clearing costs $150 to $400.
Can hard water cause a slow draining toilet?
Hard water deposits mineral scale inside rim jets, reducing the volume and force of water entering the bowl during a flush. San Antonio water at 15 to 20 GPG clogs rim jets within 1 to 2 years without regular cleaning.
What Does a Slow Draining Toilet Tell You About Your Plumbing?
A slow draining toilet tells you that something is restricting water flow either into the bowl or out of it. A partial clog and a worn flapper are the simplest causes, costing $0 to $15 to fix in under 10 minutes. Mineral-blocked rim jets are the most common cause in San Antonio homes due to the Edwards Aquifer’s 15 to 20 GPG hard water, and the fix (vinegar soak plus wire cleaning) costs nothing. If your toilet is not flushing at all rather than draining slowly, see our guide on toilet not flushing: 7 causes and how to fix each one for the mechanical causes.
The problem shifts to professional territory when the slow drain recurs after clearing, multiple fixtures are affected, or gurgling sounds indicate a vent or sewer line issue. A single slow toilet points to a local cause. Multiple slow fixtures point to a system-wide cause that requires camera inspection and professional drain cleaning equipment.
Anchor Plumbing Services provides same-day toilet repair and drain cleaning in San Antonio and surrounding Bexar County communities. Every repair is performed by Texas-licensed plumbing technicians under Master Plumber oversight. We provide flat-rate written quotes before any work begins, so the price you see is the price you pay. Our team carries a 4.9-star rating across 1,500+ verified reviews and backs every job with a satisfaction guarantee.