Hard water contains dissolved calcium and magnesium that accumulate inside plumbing systems. Over time, this mineral content forms scale buildup, reduces water pressure, damages appliances, and increases repair and energy costs. This guide explains how hard water affects San Antonio homes, the risks to pipes and water heaters, and when prevention becomes necessary.
What is hard water and how is water hardness measured?
Hard water contains elevated levels of dissolved calcium and magnesium, measured in grains per gallon or parts per million. These minerals enter the water supply as groundwater moves through limestone aquifers and absorbs mineral content before reaching residential plumbing systems.
Water hardness is classified by concentration level:
- Soft water measures 0 to 3 grains per gallon.
- Moderately hard water measures 3 to 7 grains per gallon.
- Hard water measures above 7 grains per gallon.
Parts per million provides a similar measurement scale, where higher values indicate greater mineral concentration.
San Antonio groundwater commonly flows through limestone aquifers, which increases calcium and magnesium levels before distribution. As mineral concentration rises, the likelihood of scale buildup inside pipes, fixtures, and water heaters increases.
Hardness measurement helps classify water quality and predict plumbing impact. Higher grains per gallon values correlate with faster scale formation, greater pressure restriction, and reduced appliance efficiency. Understanding the measurement scale provides the foundation for identifying risk and evaluating whether water treatment solutions are appropriate.
How does hard water damage plumbing pipes?
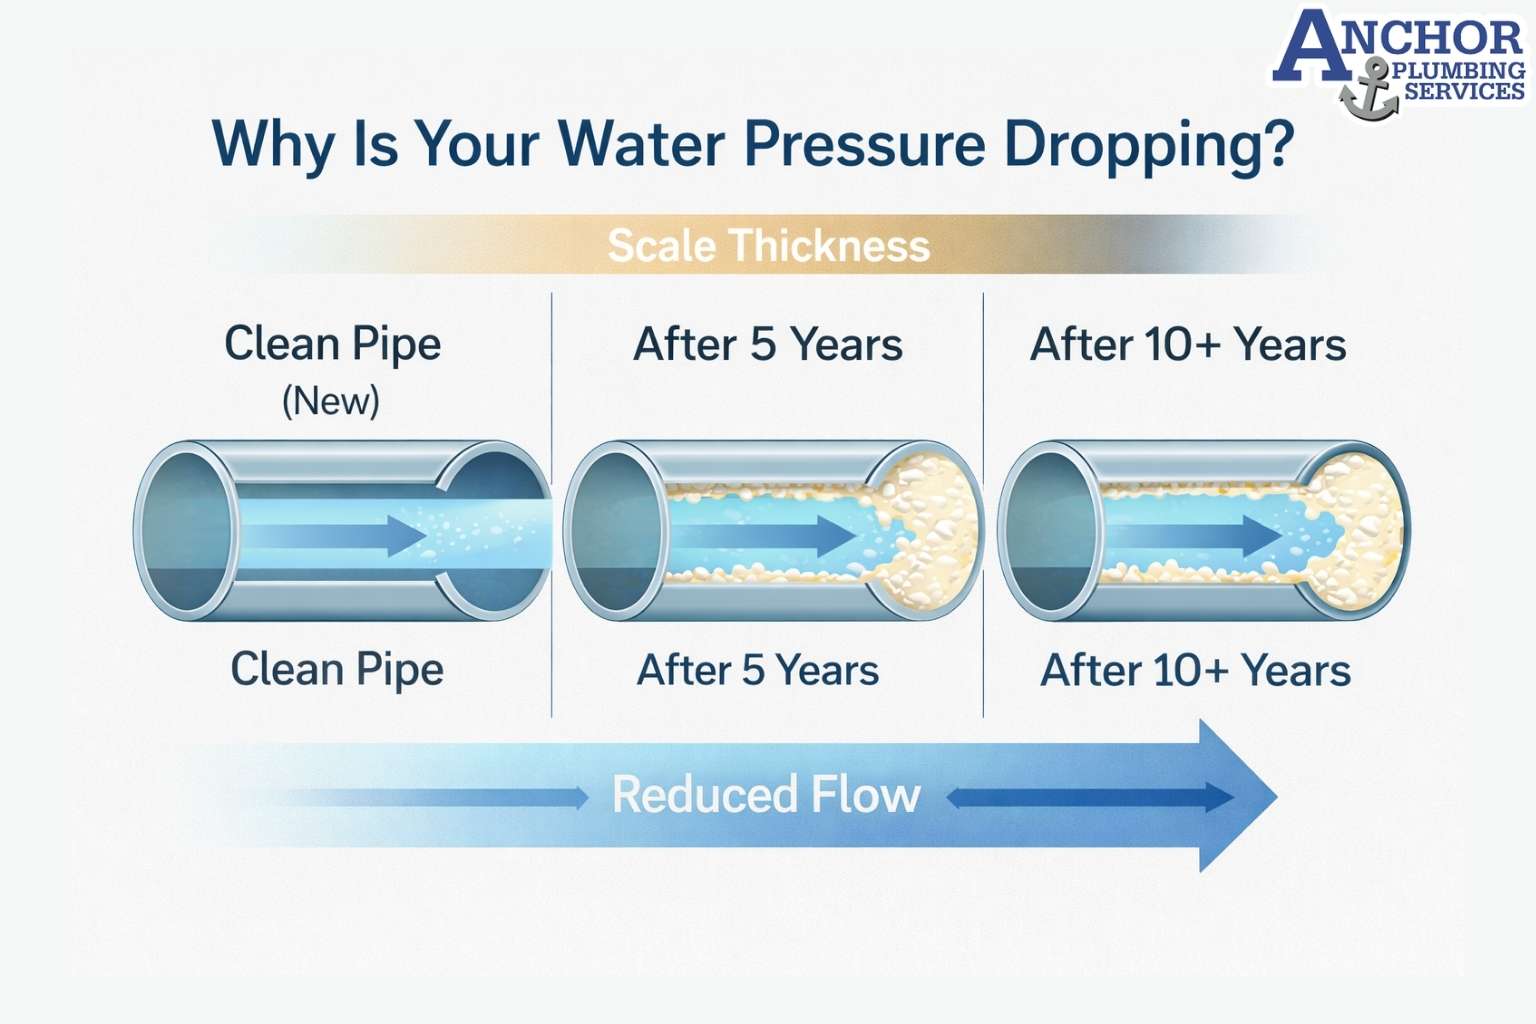
Hard water forms calcium carbonate scale inside pipes, reducing internal diameter and restricting water flow. When water containing dissolved calcium and magnesium heats or experiences pressure changes, minerals precipitate out of solution. This precipitation forms solid deposits known as limescale along pipe walls.
Over time, calcium carbonate accumulates in layers. Scale thickness gradually increases and narrows the internal pipe diameter. As the internal width decreases, flow resistance increases. Water must travel through a smaller opening, which raises internal friction and mechanical stress on the plumbing system.
In metal piping, scale buildup also traps moisture against pipe walls. This condition accelerates corrosion and weakens structural integrity. In older galvanized pipes, mineral accumulation and corrosion often occur simultaneously, compounding restriction and degradation.
The long term outcomes include reduced water pressure, increased clog risk, and more frequent plumbing repairs. Fixtures receive less consistent flow, appliances operate under strain, and pipes experience elevated internal pressure due to narrowed pathways. Hard water damage develops gradually, but the cumulative effect shortens pipe lifespan and increases maintenance costs across the plumbing system.
Can hard water reduce water pressure in your home?
Yes. Scale buildup restricts pipe openings and reduces effective water pressure, especially in older homes. As mineral deposits accumulate inside plumbing supply lines, the internal diameter shrinks. This restriction limits the volume of water that can pass through the pipe at a given time.
Water pressure, measured in pounds per square inch, reflects the force pushing water through the system. Normal residential pressure typically ranges between 50 and 70 PSI. When scale reduces pipe capacity, effective pressure at fixtures drops because water cannot move freely through narrowed passages.
Upper floors often experience pressure loss first. Elevation already reduces available pressure due to gravitational resistance. When buildup further restricts flow, upstairs showers and faucets show weaker performance before downstairs fixtures.
The relationship between buildup thickness and pressure reduction is cumulative. Small mineral deposits cause minor restriction. Advanced scaling significantly limits flow rate and amplifies perceived pressure loss. As restrictions increase, homeowners notice slower filling sinks, weaker showers, and longer appliance cycles.
How does hard water damage water heaters?
Hard water deposits form scale inside water heaters, reducing heat transfer efficiency and shortening appliance lifespan. When water is heated, dissolved calcium and magnesium precipitate and settle at the bottom of a tank water heater as sediment. This sediment layer acts as insulation between the burner or heating element and the water.
In electric tank water heaters, scale coats the heating element directly. The mineral layer insulates the element, forcing it to operate at higher temperatures to transfer heat. Overheating accelerates element failure and increases electrical consumption. In gas systems, sediment buildup creates hot spots at the tank base, stressing the metal and increasing the risk of tank damage.
Tankless heaters experience a different but similar issue. Scale forms inside the heat exchanger. Mineral accumulation narrows internal water passages and reduces heat exchange efficiency. Restricted flow and insulated surfaces force the unit to work harder to maintain set temperatures.
Hard water also accelerates anode rod degradation. As the anode rod corrodes more quickly, tank corrosion risk increases.
Cost impact becomes measurable over time. Energy consumption rises due to reduced heat transfer efficiency, sometimes by up to 30 percent in heavily scaled systems. Lifespan may decline from a typical 10 to 15 years to a significantly shorter service period. Repair costs increase, and premature replacement becomes more likely.
Does hard water increase energy bills?
Yes. Scale buildup forces appliances to work longer and consume more energy to achieve the same performance. When heating elements are coated with mineral deposits, heat transfer slows. Water heaters must run extended heating cycles to reach target temperatures, which increases gas or electricity consumption.
Washing machines also experience longer cycle durations. Hard water reduces detergent effectiveness, which leads to additional rinse cycles and increased water heating demands. The heating element inside the appliance operates longer to compensate for scale insulation.
Dishwashers can experience sensor interference and reduced spray efficiency when mineral deposits accumulate on internal components. As a result, cleaning cycles extend, and energy use increases.
Over time, these longer heating cycles and repeated appliance strain increase monthly utility bills. Hard water does not raise rates directly. It increases consumption by reducing mechanical efficiency and extending operational time across multiple household systems.
What are the signs of hard water damage in plumbing?
Signs of hard water damage include white scale buildup, low water pressure, appliance inefficiency, and frequent plumbing repairs. These symptoms indicate mineral accumulation inside pipes and fixtures.
White chalky residue, known as scale residue, often appears on faucets, showerheads, and around drain openings. This visible buildup signals calcium and magnesium deposits left behind after water evaporates. Over time, similar deposits accumulate inside supply lines.
Reduced shower pressure is another common sign. Mineral scale narrows internal pipe diameter and restricts flow. As restriction increases, water pressure declines, especially at upper fixtures.
Shortened water heater lifespan also signals hard water damage. Sediment accumulation inside the tank reduces efficiency and increases wear on internal components. Frequent flushing becomes necessary to manage buildup.
Frequent faucet or valve replacement may indicate mineral interference. Scale accumulation damages seals and internal valve components, increasing repair frequency. Soap scum accumulation on sinks and tubs further confirms high mineral content, as soap reacts with calcium to form residue.
When these signs appear together, they indicate ongoing mineral accumulation and progressive performance decline within the plumbing system.
Is hard water common in San Antonio homes?
Yes. San Antonio’s groundwater contains high mineral content due to limestone aquifers, making hard water common in residential plumbing systems.
Water in this region originates from mineral rich underground sources. As groundwater moves through limestone formations, it dissolves calcium and magnesium. This process increases mineral concentration before water reaches municipal supply systems.
San Antonio groundwater often measures above the 7 grains per gallon threshold that classifies water as hard. Elevated mineral concentration affects plumbing systems over time. Scale formation becomes more likely in pipes, fixtures, and water heaters.
Hard water also affects slab foundation homes, which are common in the area. Mineral buildup inside underground supply lines can increase pressure stress and contribute to long term pipe deterioration.
Because of these regional conditions, water softeners are common in San Antonio homes. Homeowners often install softening systems to reduce scale accumulation, protect appliances, and maintain consistent plumbing performance.
How does a water softener prevent hard water damage?
A water softener removes calcium and magnesium through ion exchange before the water enters your plumbing system.
The system contains ion exchange resin beads inside a mineral tank. These resin beads carry a sodium charge. As hard water flows through the tank, calcium and magnesium ions attach to the resin. Sodium ions are released into the water in exchange. This ion exchange process reduces mineral concentration before water reaches pipes and fixtures.
Over time, the resin beads become saturated with minerals. The regeneration cycle restores their effectiveness. During regeneration, a brine solution flushes the resin, removing accumulated calcium and magnesium and recharging the beads with sodium. The system then returns to normal operation.
By removing hardness minerals at the point of entry, the softener prevents scale buildup inside pipes, water heaters, and appliances. Mineral removal efficiency improves overall water flow and protects internal plumbing surfaces. Whole home protection reduces maintenance frequency, extends appliance lifespan, and improves water efficiency by preserving heat transfer performance and flow capacity.
When should you consider installing a water softener?
You should consider installing a water softener when mineral buildup affects pressure, appliance lifespan, or cleaning performance.
Water hardness above 7 grains per gallon qualifies as hard water and increases the likelihood of scale formation. A water hardness test provides measurable data that indicates mineral concentration and helps determine severity.
Frequent scale cleaning around faucets, showerheads, and fixtures indicates ongoing mineral deposition. Repeated water heater issues, such as sediment accumulation or reduced efficiency, justify evaluating mineral control solutions. High maintenance costs for valves, appliances, and plumbing repairs further signal systemic hardness impact.
When plumbing inspections reveal internal scaling or recurring performance decline, installing a softener becomes a preventative strategy. Severity and frequency of buildup determine urgency. Addressing hardness early protects pipes, stabilizes water pressure, reduces long term repair expenses, and improves overall plumbing reliability in mineral heavy regions.
How Anchor Plumbing Services helps San Antonio homeowners manage hard water?
Anchor Plumbing Services helps San Antonio homeowners manage hard water through professional testing, certified water softener installation, and long term system maintenance.
Our team tests water hardness levels using calibrated methods that measure grains per gallon and overall mineral concentration. Accurate testing identifies whether hardness exceeds the 7 plus GPG threshold common in the region. Results guide proper system sizing and configuration.
We install high performance water softener systems, including NOVO certified systems designed for whole home mineral removal. NOVO certification confirms efficiency, durability, and reliable ion exchange performance. Proper installation ensures balanced flow, optimized regeneration cycles, and full plumbing system protection.
Master Plumber oversight ensures every installation meets Texas plumbing standards and local code requirements. Our technicians protect plumbing systems by preventing scale buildup, pressure loss, and appliance damage before costly repairs occur.
We also provide ongoing maintenance services, including system inspection, salt level evaluation, and regeneration performance checks. Flat rate pricing delivers clear cost transparency without surprises.
Service areas include San Antonio, Helotes, Stone Oak, New Braunfels, and surrounding communities. Anchor Plumbing Services tests, installs, protects, and maintains water softener systems to preserve plumbing performance and reduce long term repair costs.