Whole House Repiping Cost

How Much Does It Cost to Repipe a House?

Repiping a house typically costs between $4,000 to $15,000, with most homeowners paying around $2 to $6 per linear foot of piping. The total cost depends on your home’s size, plumbing layout, accessibility, and the material chosen for the new pipes.

Repiping means replacing your home’s entire water supply system—the network of pipes that carries clean water to every faucet, shower, and appliance. The process involves opening walls, replacing lines, and restoring finishes. Labor often reaches 50%+ of total cost. Larger homes or those with difficult pipe access (such as slab foundations or multi-story layouts) will fall on the higher end of the range.

Choosing the right pipe material is one of the biggest cost drivers. PEX piping is the most affordable and flexible option, while copper offers greater longevity and durability at a higher price point. Homeowners often combine both materials—PEX for interior distribution lines and copper for main connections—to balance performance and budget.

By understanding these variables, you can accurately estimate what a full home repipe will cost and plan for a long-term plumbing upgrade that improves both efficiency and reliability.

What Does Repiping a House Mean?

Repiping replaces your home’s entire water supply piping with new material to restore pressure and stop leaks. It focuses on the clean water distribution system, not the drains or sewer lines.

A full repipe typically includes:

  • Manifolds and main lines, which direct water from the meter or well into the home.
  • Shut-off valves, allowing isolation of specific fixtures or zones.
  • Hot and cold supply lines, running through walls, ceilings, and crawl spaces.
  • Connection fittings and adapters, ensuring leak-free transitions between new and existing components.

Drains, sewer lines, and fixtures such as sinks or toilets are not part of the repipe, although they may be temporarily removed for access.

The most common materials used in modern repiping are PEX, copper, and CPVC, chosen for their reliability and corrosion resistance. A professional plumber begins by assessing the current plumbing layout, identifying deteriorated sections, and mapping out efficient pipe routes for replacement.

Ultimately, repiping renews your home’s internal water infrastructure—reducing mineral buildup, stabilizing pressure, and ensuring safe, clean water delivery throughout the property.

What’s the Average Cost of Repiping a House?

Most whole-home repipes cost $4,000 to $15,000. Price depends on material, home size, and access. On average, costs range from $2 to $6 per linear foot, including both materials and labor.

Repiping prices tend to stay near the national average because of the region’s moderate labor rates and widespread use of PEX piping. Smaller single-story homes with simple layouts may cost closer to $4,000, while large two-story or slab-foundation homes can exceed $12,000 due to extra wall or floor access work.

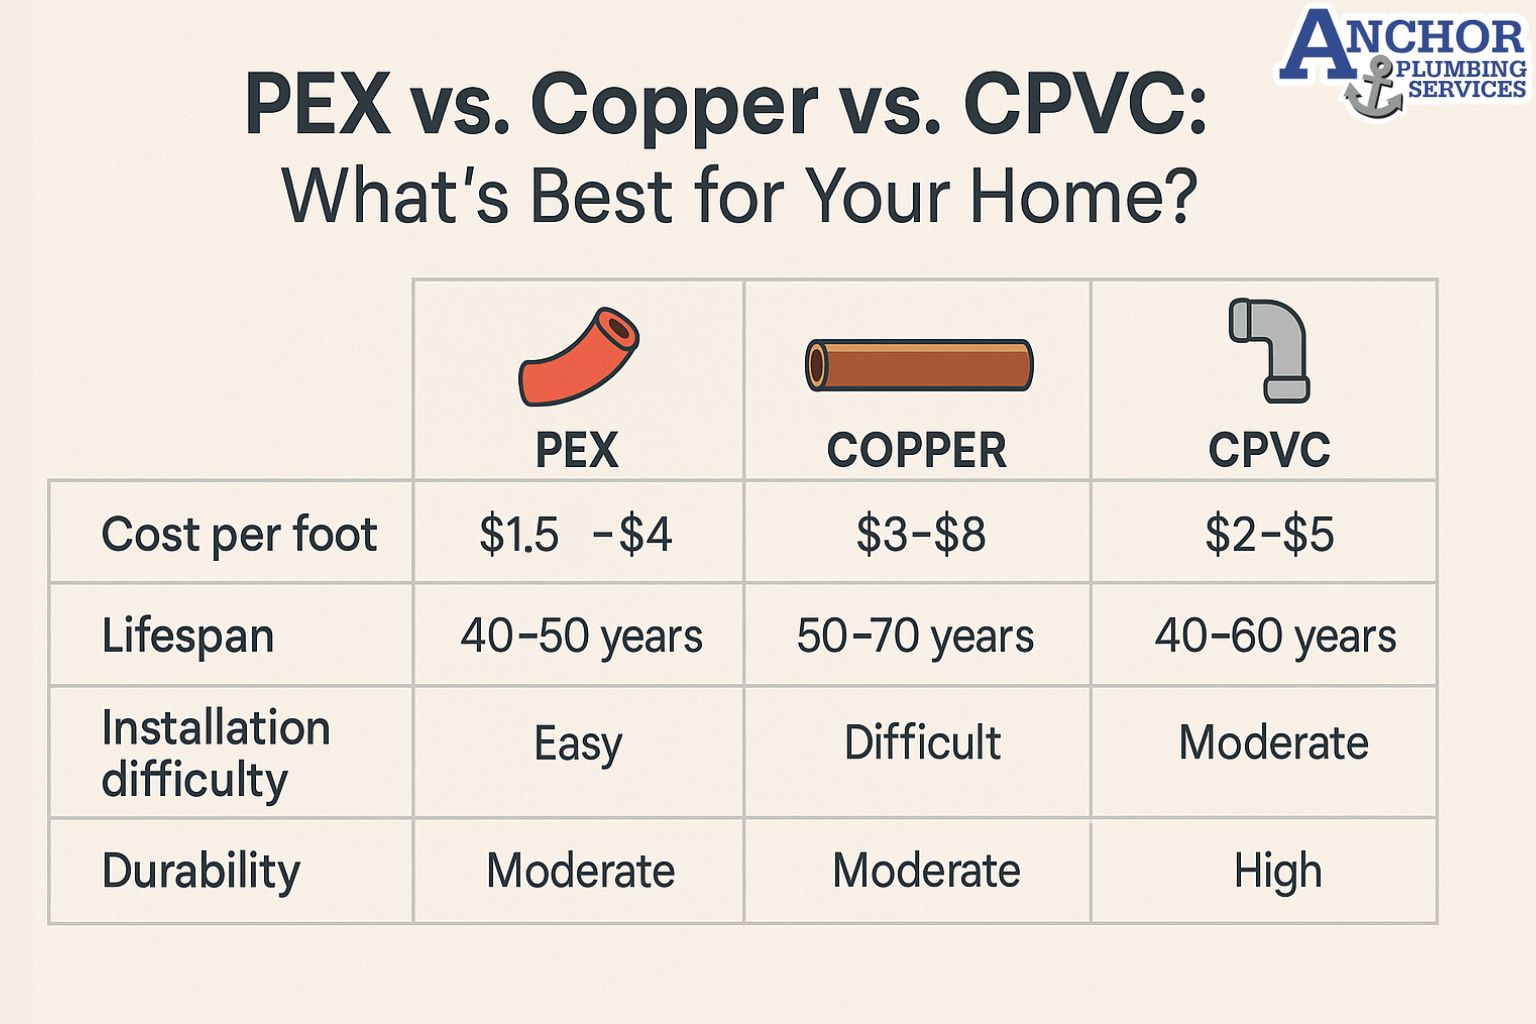
Material choice remains the single biggest cost variable. Copper is the most durable but labor-intensive material, while PEX offers flexibility and lower installation time. CPVC sits in the middle—more rigid than PEX but less costly than copper.

Material Avg. Cost per Linear Foot Lifespan Notes
PEX $1.50–$4 40–50 years Flexible, affordable, easy to install
Copper $3–$8 50–70 years Durable, resists corrosion, higher labor cost
CPVC $2–$5 40–60 years Moderate cost, rigid, can become brittle over time

Copper repiping costs more due to both material expense and installation complexity, especially when working in finished walls or tight spaces. PEX, however, allows faster installation with fewer fittings, helping homeowners save on labor.

What Factors Affect the Cost of Repiping?

Hidden Repiping cost

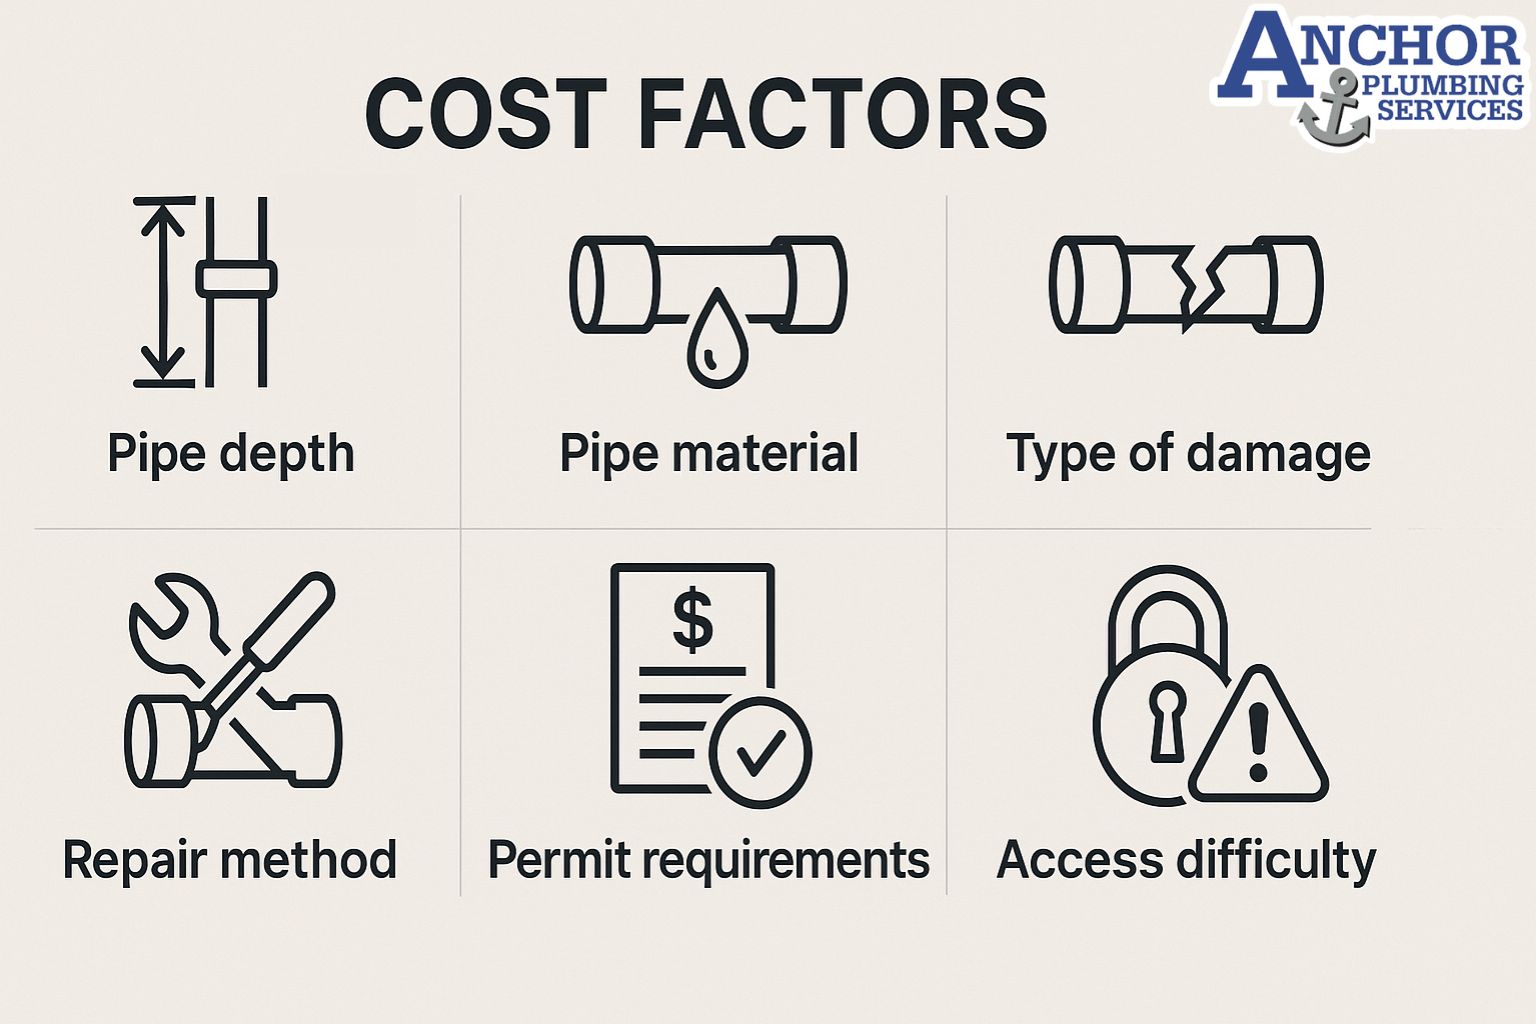
The cost of repiping varies based on several measurable factors that plumbers assess during inspection. These factors influence both material and labor costs.

Key cost drivers include:

  • Pipe material – PEX is the most cost-effective; copper increases both material and labor costs.
  • Home size and layout – Larger homes or multi-story layouts require more pipe and longer installation time.
  • Accessibility – Pipes behind finished walls, ceilings, or under slabs take more time and effort to replace.
  • Fixture count – Every additional sink, shower, or appliance adds to material and connection costs.
  • Local labor rates – Rates vary by region; licensed plumbers in major cities may charge more per hour.
  • Permits and inspections – Most municipalities require a plumbing permit and inspection.

Technicians assess the home’s layout, story count, and access walls to create an accurate estimate. Understanding these variables helps homeowners budget realistically and compare quotes fairly.

How Much Does It Cost to Repipe Different Types of Homes?

Single-story homes cost less to repipe because plumbing lines are easier to access through walls and crawlspaces. On average, these projects range from $4,000 to $8,000, depending on the total number of fixtures.

Two-story homes often require additional pipe runs through floors and ceilings, increasing both labor time and materials. Costs for these projects typically range from $7,000 to $15,000, depending on the number of bathrooms and the home’s age.

Homes with slab foundations present higher costs because pipes are buried beneath concrete, requiring more invasive work or rerouting lines overhead. This can raise total costs by 20–30%.

Historic homes may also be more expensive to repipe due to tight crawlspaces, outdated materials, or fragile structures that demand careful handling.

Home Type Typical Cost Range Access Difficulty Notes
Single-story (crawlspace) $4,000–$8,000 Easy Direct pipe access, minimal restoration
Two-story home $7,000–$15,000 Moderate More fixtures and vertical pipe runs
Slab foundation $8,000–$16,000 High Requires rerouting or jackhammering
Historic property $10,000+ High Extra care and specialized restoration

Slab foundations increase cost due to limited access and concrete removal, while crawlspaces offer easier entry and lower labor time. Understanding your home type helps estimate realistic pricing and timeline expectations.

Are There Additional Costs Homeowners Should Expect?

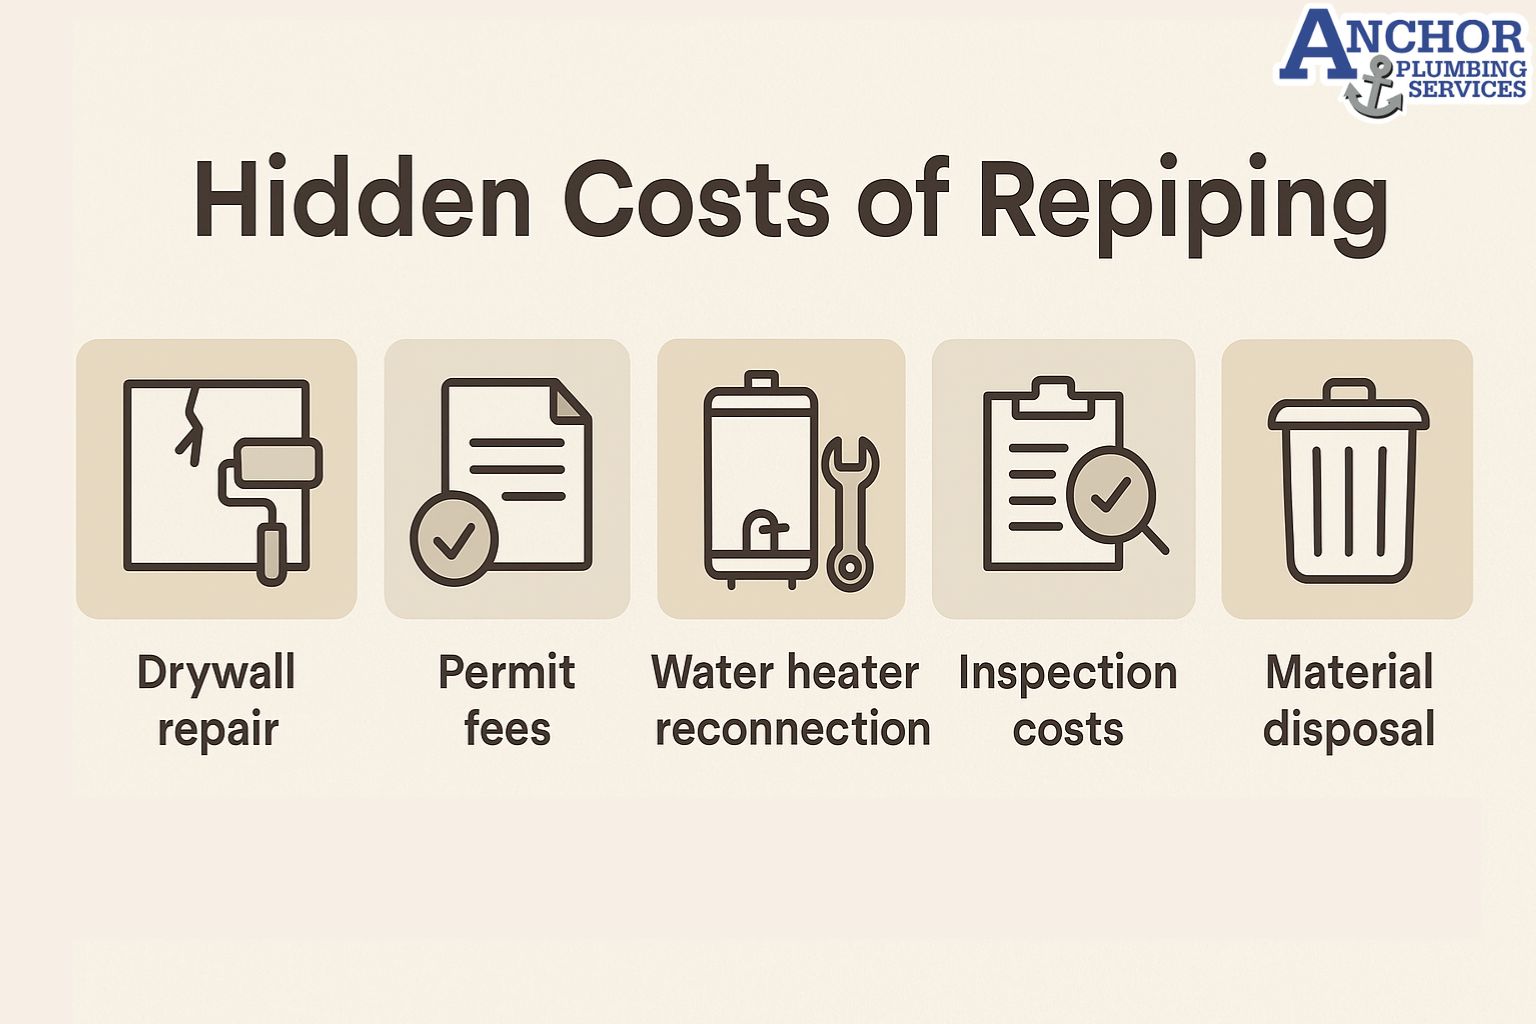
Some additional costs may include drywall repair, plumbing permits, inspection fees, and water heater flex connection that follow the main repiping project. These charges depend on local code requirements and the complexity of your plumbing layout.

City permits and drywall restoration can add to the final bill. Most municipalities require a plumbing permit, which typically costs $75–$300 depending on your location. Once the repiping work is complete, you’ll also need a city inspection to confirm the installation meets code standards—this fee is often bundled into your plumber’s estimate.

After pipes are replaced, sections of drywall must be repaired and repainted where walls were opened to access plumbing lines. Drywall restoration usually adds $400–$1,000 to the total cost, depending on how many walls or ceilings were affected.

Other variable costs include:

  • Water heater reconnections, which may cost $150–$300.
  • Fixture replacements, if outdated faucets or valves are incompatible with new piping.
  • Old material disposal, usually a small charge (around $50–$100) for copper or galvanized pipe removal.

Although these costs vary, professional plumbers clearly outline them in a written estimate. Understanding these potential add-ons ensures you budget realistically and avoid unexpected expenses once the project begins.

How Long Does a Whole-Home Repipe Take?

A full repipe usually takes 2 to 5 days for an average home. The timeline depends on the property size, accessibility, and the number of fixtures that need replacement. Multi-story or slab-foundation homes may require up to a week due to added wall or floor access work.

Technicians complete most projects within a structured process that includes:

  1. Inspection and planning (½ day) – The plumber maps the existing system, checks water pressure, and identifies key access points.
  2. Preparation and material setup (½–1 day) – Furniture and flooring are protected, and shut-off valves are installed.
  3. Pipe replacement (1–3 days) – Old supply lines are removed and replaced with new piping through walls, ceilings, and crawlspaces.
  4. Testing and inspection (½ day) – The new system is pressure-tested to ensure no leaks or irregularities.
  5. Wall repair and cleanup (1 day) – Drywall sections are patched, surfaces cleaned, and water supply fully restored.

In most homes, water is only shut off for several hours during installation each day, so families can continue using plumbing fixtures after work hours.

By understanding each project phase, homeowners can prepare their schedule and property accordingly, minimizing disruption during the repiping process.

How to Choose the Right Pipe Material for Your Home

Pipe Material comparison

Choosing the right pipe material helps balance durability, performance, and cost. The best option depends on your home’s age, water quality, and local climate.

Material Durability Temperature Tolerance Installation Difficulty Maintenance Needs
PEX 40–50 years Handles hot and cold water Easy (flexible and quick to install) Low – resists scale buildup
Copper 50–70 years Excellent – tolerates heat and pressure Moderate to difficult Low – naturally corrosion resistant
CPVC 40–60 years Moderate – can become brittle in extreme heat Moderate Moderate – may require replacements over time

PEX is preferred for affordability and flexibility, making it ideal for modern home retrofits or slab foundations. Copper remains the most durable and time-tested option, valued for its longevity and natural corrosion resistance. CPVC offers a middle ground, but it’s more rigid and can degrade under high heat or direct sunlight.

When selecting a material, consider local water chemistry, water pressure, and budget. A licensed plumber can test your system and recommend which material ensures long-term reliability with minimal maintenance.

How to Get an Accurate Repipe Estimate

Request a detailed estimate that includes per-foot pricing, material selection, labor costs, and warranty terms. Accurate quotes depend on a full in-home inspection that evaluates your plumbing layout, accessibility, and pipe condition.

To prepare for the most precise estimate, homeowners should schedule a camera inspection or pressure test before requesting quotes. These diagnostic steps reveal hidden corrosion, leaks, or blockages that could impact labor time and total project cost.

A professional plumber’s estimate should clearly outline:

  • Material choice (PEX, copper, or CPVC) and cost per linear foot.
  • Labor rate and estimated project duration.
  • Permits and inspections included in the total.
  • Warranty coverage, typically 5–10 years for workmanship and up to 50 years for materials.

Accurate repipe quotes depend on transparency. Always compare estimates from multiple licensed contractors and ask for a written breakdown before approving work. This ensures you understand exactly what’s covered—and prevents hidden charges after the project begins.

Frequently Asked Questions About Repiping Costs

How much does it cost to repipe a 2,000-sq-ft home?
Between $6,000 and $12,000, depending on the pipe material, layout, and accessibility.

Is repiping worth it for older homes?
Yes. It improves water pressure, reliability, and property value while eliminating leaks and corrosion.

Does insurance cover repiping?
Usually not, unless damage occurs from a sudden and covered event such as a burst pipe.

How long do repiped systems last?
PEX and copper systems last 40–70 years with proper installation and maintenance.

Conclusion

Repiping a house is one of the most valuable long-term plumbing investments. The average project cost of $4,000 to $15,000 pays off through improved water pressure, leak prevention, and reduced repair expenses over time.

While the total price depends on material type, home size, and accessibility, the benefits extend far beyond immediate convenience. A new plumbing system increases efficiency, enhances water quality, and protects your home’s structure from water damage.

Professional repiping services ensure long-term reliability and peace of mind. Repiping may seem like a big investment, but it safeguards your home against corrosion and costly future leaks.

Anchor Plumbing Services provides licensed whole-home repiping with transparent pricing, premium materials, and workmanship warranties throughout San Antonio and surrounding areas. Our Master Plumber–led team delivers lasting solutions you can trust for years to come.

Sewer line repair cost range infographic showing spot repair, trenchless, and full replacement options.

How Much Does Sewer Line Repair Cost in San Antonio?

Sewer line repair typically costs between $2,500 and $8,000 for residential properties. The total expense depends on several factors, including the repair method used, the depth and location of the pipe, and local permit requirements. Trenchless methods generally cost more per linear foot but create less surface disruption compared to traditional excavation.

The cost of sewer line repair increases when pipes are buried beneath slabs or located under landscaping or driveways.

This guide explains how different repair types affect the total price, which local conditions influence sewer repair in San Antonio, and how to get an accurate estimate before starting any work.


What Is Sewer Line Repair?

Sewer line repair refers to the restoration or replacement of the underground pipe, which known as the sewer lateral, which carries wastewater from a home to the municipal sewer system. This process involves repairing damaged sections of the pipe or replacing the entire line when needed.

Unlike drain cleaning, which removes temporary clogs, sewer line repair addresses structural problems such as pipe collapse, root intrusion, or advanced corrosion. Repairs may involve a small section of the line, known as a spot repair, or a full replacement of the drain line from the cleanout to the city connection.

Sewer line repair often begins with a camera inspection to assess pipe condition and determine the repair scope.

Why Is Sewer Line Repair Important?

Unrepaired sewer line damage can result in wastewater backups, interior flooding, and structural damage to the home. When a pipe rupture occurs beneath a foundation slab, it can lead to slab shifting, flooring cracks, and long-term moisture buildup.

Raw sewage escaping into the ground may contaminate the water table, especially in older neighborhoods with cracked cast iron lines. If a floor drain backs up repeatedly, bacteria and gases can enter the living space.

Delaying sewer repair increases the risk of property loss, environmental impact, and potential exposure to pathogens from leaking wastewater.

Homes in San Antonio are particularly vulnerable due to expansive clay soil, which shifts with seasonal moisture and places stress on underground pipes.

What’s the Average Cost of Sewer Line Repair in San Antonio?

In San Antonio, the cost of sewer line repair typically ranges from $2,500 to $8,000 depending on the repair method, location of the pipe, and project complexity.

Cost ranges by repair type:

  • Spot repairs: $1,000 to $3,000 for localized damage
  • Full line replacement: $4,000 to $10,000 for extensive or collapsed lines
  • Trenchless repair: $3,000 to $9,000 for pipe bursting or lining methods

Local pricing aligns with national averages but varies based on soil conditions and access limitations. though local soil and infrastructure affect final pricing.

Several variables affect where your project falls within that range. Deeper pipes, difficult access, or older materials like cast iron typically raise the price. Projects beneath foundations or driveways often require extra labor and restoration.

What Factors Influence Sewer Repair Cost?

Illustration of six key factors affecting sewer repair cost

The cost of sewer repair depends on a combination of structural conditions, site access, and method selection. Each factor impacts labor time, equipment needs, and restoration work.

  1. Pipe depth and location: Shallow yard lines cost less to access. Pipes beneath foundation slabs or driveways increase digging time and restoration.
  2. Pipe material: PVC is easier and cheaper to replace than cast iron or HDPE, which are heavier and more labor-intensive to cut and extract.
  3. Repair method: Trenchless repairs generally cost more per foot but reduce landscape disruption. Traditional excavation may require surface restoration like concrete or sod replacement.
  4. Permits and city inspections: In San Antonio, plumbing permits and SAWS inspections are often required for sewer work. These can add $200 to $500 depending on the project scope.
  5. Pipe condition and damage type: Lines affected by root intrusion, pipe belly, or corrosion may require more extensive work, especially if multiple sections are compromised.

The overall price increases when multiple cost factors overlap, such as deep cast iron lines under a slab using trenchless technology.

Trenchless Sewer Repair vs Traditional Excavation Cost Comparison

There are two primary methods for sewer line repair: trenchless technology and traditional open trench excavation. Each method varies in cost, time, disruption, and long-term performance.

Trenchless methods include:

  • Pipe bursting, where a new pipe is pulled through the old one and the existing line is fractured outward
  • Cured-in-place pipe (CIPP), which involves inserting a resin-coated liner into the existing pipe and curing it with heat or UV light

Traditional excavation involves digging out the damaged pipe and replacing it section by section.

Trenchless repairs reduce surface disruption but may require a higher upfront cost than excavation.

Cost and Performance Comparison Table

Attribute Trenchless Repair Traditional Excavation
Average cost per foot $150–$250 $50–$200
Project duration 1 to 2 days 2 to 5 days
Surface disruption Minimal (yard or floor only) High (digging, concrete removal)
Pipe lifespan 50+ years 50+ years
Restoration included? Usually not Often included in project

Trenchless is ideal for inaccessible areas, while traditional methods may be preferred for shallow or heavily damaged lines.

San Antonio-Specific Cost Considerations

Sewer line repair in San Antonio is influenced by several local conditions that impact both pricing and project scope.

  1. Expansive clay soil: San Antonio’s clay-rich soil expands and contracts with seasonal moisture. This movement increases pipe shifting, joint stress, and excavation difficulty.
  2. Permit requirements: The San Antonio Water System (SAWS) requires permits and inspections for many types of sewer line work. Fees and wait times may add to total cost.
  3. Older plumbing systems: Homes built before 1980 often contain cast iron pipes, which are more expensive to cut, extract, and replace than modern materials like PVC or HDPE.
  4. Historic district access: In central neighborhoods or historic zones, equipment access is limited and may require special restoration protocols or extra labor.
  5. Groundwater and water table issues: High water tables in some areas complicate trenching and increase the need for protective backfill or pipe lining.

San Antonio’s unique infrastructure often adds $500 to $1,500 in costs compared to regions with looser soil or simpler permitting processes.

How to Get an Accurate Sewer Repair Estimate

An accurate estimate for sewer repair starts with a camera inspection. This identifies the exact location and extent of the damage before any digging or lining begins.

Key steps to request a proper quote:

  • Ask for cost per linear foot
  • Request details on the repair method recommended
  • Confirm whether permits and restoration are included
  • Ask how access conditions may affect price

A video inspection report or real-time footage helps contractors price the job based on visible conditions, not assumptions.

Frequently Asked Questions

Does homeowner insurance cover sewer repair?

Most policies do not cover sewer line damage unless you add a water or sewer backup rider. Coverage limits and exclusions vary by policy type and cause of damage.

Can you repair a section of pipe only?

Yes. Partial replacement is possible for localized damage, but it depends on pipe condition, access, and material compatibility with existing infrastructure.

How long does trenchless repair last?

Trenchless sewer repair methods like pipe lining or bursting typically last 50 years or more, depending on the material rating and quality of installation.

Conclusion

Sewer line repair in San Antonio typically ranges from $2,500 to $8,000, depending on pipe depth, repair method, and site access. Factors such as local soil conditions, material type, and permit requirements directly influence total cost.

If you’re experiencing repeated backups, foul odors, or slow drainage, early diagnosis and proper repair can help avoid major property damage. Anchor Plumbing Services delivers licensed, reliable sewer line repair services in San Antonio, using modern inspection methods and long-lasting materials backed by residential plumbing expertise.

Infographic comparing residential and commercial hydro jetting costs and optional service add-ons.

Hydro Jetting Cost: Prices, Factors, and When It’s Worth It

Hydro jetting typically costs $300–$800 for residential plumbing and around $1,000 for many commercial jobs. That price covers inspection, equipment setup, high-pressure cleaning, and a post-cleaning flow check. Your final quote depends on pipe length, clog severity, and how easily the technician can access a cleanout.

Hydro jetting is a powerful drain cleaning method that uses high-pressure water streams to remove grease, scale, tree roots, and debris from inside your pipes. The service usually includes a preliminary inspection, setup of hydro jetting equipment, and post-cleaning water flow tests to ensure full clearance.

Most homeowners pay on the lower end of the spectrum when the blockage is localized and easy to access. Costs rise when technicians work through multiple cleanouts or remove thick grease buildup. Flushing long sewer laterals to the city main also increases time. The price can increase if a video camera inspection or a return visit is needed.

What Factors Affect the Cost of Hydro Jetting?

Grid of icons showing factors that affect hydro jetting pricing.

Price changes based on site conditions and system design. Expect higher quotes when the pipe is long, the blockage is heavy, or access is poor.

1. Pipe Length and Diameter

Longer pipe runs and wider diameters require more time and water pressure to clean effectively. Jetting a 10-foot kitchen line costs less than flushing a 100-foot sewer main.

2. Pipe Material and Condition

Older pipes made of cast iron or clay may require gentler pressure settings and careful handling. Fragile materials may increase the service duration and risk, affecting overall labor costs.

3. Severity and Type of Blockage

Grease buildup, mineral scaling, or tree root intrusion takes longer to clear than basic food waste or soap residue. Clogs that block full pipe flow are more labor-intensive and raise technician service time.

4. Property Type: Residential vs Commercial

Residential hydro jetting is typically faster due to simpler layouts and smaller plumbing systems. Commercial jobs often require larger jetting units and more labor, especially when working on restaurants or multi-unit drain systems.

5. Accessibility to Cleanouts

If the technician has easy access to a ground-level cleanout, the service proceeds efficiently. However, when cleanouts are buried, damaged, or located in crawlspaces, extra labor time and digging may be required.

During the site check, the technician selects the pressure range, nozzle type (e.g., penetrator or rotary), and equipment best suited to your line. Understanding these pricing drivers helps property owners make informed decisions before authorizing the service.

Are There Additional Costs Homeowners Should Expect?

Some providers charge $100–$400 extra for diagnostic inspections, sewer camera inspection, or additional jetting passes. These costs are not included in base hydro jetting quotes and can raise the total service amount by $100 to $400 depending on the job complexity.

A common add-on is a video camera inspection, which helps plumbers visually confirm the location and condition of the clog. Camera inspections are billed separately and typically cost between $150 and $300.

In some jurisdictions, permit fees may be required for extensive sewer line work, especially if the line connects to the municipal system or crosses property boundaries. These costs vary depending on city regulations.

Follow-up repairs, such as fixing broken pipes revealed during jetting, are not included in the initial price. When hydro jetting exposes cracked joints or corroded segments, the plumber provides a separate repair quote.

Other upsells include pipe relining, grease trap cleaning, or scheduled maintenance plans. While optional, these services can help prevent future blockages and reduce the need for frequent jetting.

By understanding what’s included and what counts as an extra charge, homeowners can better evaluate quotes and avoid unexpected fees.

How Can You Save Money on Hydro Jetting Services?

You can reduce hydro jetting costs by scheduling regular maintenance, bundling services, and avoiding emergency after-hours calls. Proactive planning often eliminates the need for urgent cleanings caused by neglected buildup or recurring clogs.

One of the most effective ways to control cost is to bundle hydro jetting with other plumbing services, such as camera inspections or annual pipe evaluations. Plumbing companies often offer package pricing for preventative maintenance.

Routine maintenance prevents debris accumulation and keeps high-traffic drain lines, such as kitchen pipes or sewer mains, functioning efficiently. When performed regularly, hydro jetting sessions are shorter and less labor-intensive, lowering the technician’s service time and overall labor charge.

Homeowners can save by scheduling hydro jetting services during normal business hours and avoiding overtime or weekend rates. In commercial settings, coordinating jetting during planned maintenance windows can reduce downtime and help property managers avoid surprise backups.

How Much Does Residential Hydro Jetting Cost?

For residential properties, hydro jetting costs usually range from $300 to $800 depending on the location and complexity of the clog. Most homes require a single technician and a basic hydro jetting rig for common drain lines like kitchen sinks, tubs, or main sewer pipes.

The final price depends on the square footage of the home, clog location, and how accessible the cleanout is. Homes with exterior access points for drain cleaning typically require less time and labor, making them more affordable to service.

Typical inclusions in residential hydro jetting include:

  • Setup of high-pressure water equipment
  • Flushing of one to two main drain lines
  • Post-cleaning flow test
  • Optional camera inspection (often billed separately)

Severe blockages, such as tree roots or heavy grease buildup, may increase cost due to the need for specialized nozzles or multiple cleaning passes.

Jetting is often recommended for homes experiencing slow drainage, recurring toilet backups, or after years without professional pipe cleaning.

What’s the Cost of Hydro Jetting for Commercial Properties?

Commercial hydro jetting services may cost more due to higher system complexity, grease trap maintenance, and increased labor time. Prices typically range between $500 and $1,000, depending on the facility size and plumbing layout.

Businesses often require larger equipment and multiple technicians to clear grease interceptors, long lateral lines, or multi-unit sewer connections. Restaurants, hotels, and commercial kitchens experience faster buildup of food waste, fats, and soap scum, making more frequent or intensive cleanings necessary.

Key pricing variables in commercial hydro jetting include:

  • Number of drain lines or branches involved
  • Volume and type of debris
  • Pipe access during business hours or off-hours
  • Whether grease traps are being cleaned simultaneously

For retail and hospitality properties, preventive jetting is often scheduled quarterly to reduce downtime and maintain health compliance.

Property managers can negotiate flat-rate service contracts to save on recurring cleanings and avoid reactive costs due to emergency blockages.

What Are the Alternatives to Hydro Jetting and How Do They Compare?

Hydro jetting is more effective than snaking when dealing with grease buildup, scale deposits, or recurring clogs. However, there are alternative methods to consider based on clog severity and budget.

1. Mechanical Snaking

Snaking uses a flexible cable to break apart and retrieve clogs. It’s best suited for localized, soft blockages, such as hair or paper products. While cheaper than hydro jetting (typically $100–$300), it may not remove all residue from pipe walls, which can cause frequent re-clogging.

2. Chemical Drain Cleaners

These store-bought solutions offer short-term relief but can damage older pipe materials. They are generally ineffective for deep or hardened clogs and should be avoided for routine use.

3. Enzymatic Drain Treatments

Enzyme-based cleaners break down organic waste over time and are safe for monthly maintenance. They do not clear active blockages but help prevent buildup in kitchen lines and bathroom drains. Enzymatic products are best used as a supplement to jetting, not a replacement.

For a minor clog, snaking or an enzymatic treatment may be enough. But for complete pipe restoration and long-term prevention, hydro jetting remains the most thorough and effective method.

Frequently Asked Questions About Hydro Jetting

How much does hydro jetting cost?

Hydro jetting costs typically range from $300 to $800, depending on pipe length, clog severity, and service location. Commercial jobs exceed $1,000 due to larger systems and higher labor requirements.

Is hydro jetting worth the price?

Yes, hydro jetting is worth the price for homes and businesses with recurring clogs or stubborn blockages. It offers long-term value by restoring full pipe flow and reducing future plumbing issues.

What affects the cost of hydro jetting?

Factors like pipe material, blockage type, accessibility to cleanouts, and whether camera inspections or permits are needed can significantly affect the total cost.

How often should I get hydro jetting done?

Most homeowners benefit from hydro jetting every 18 to 24 months, especially if they have older plumbing systems or experience frequent slow drains or backups.

Is hydro jetting safe for old pipes?

Hydro jetting is generally safe, but older or brittle pipes should be inspected first. A plumber may recommend a lower pressure or alternate method if there’s risk of damage.

Can I DIY hydro jetting or should I hire a professional?

DIY hydro jetting is not recommended. Professional equipment generates the high water pressure required to clean pipes safely and effectively without causing damage.

How does hydro jetting compare to snaking?

Hydro jetting removes full pipe buildup, while snaking only breaks through the blockage point. Jetting is more thorough and ideal for greasy or large-scale obstructions.

Is hydro jetting covered by insurance?

Most home insurance policies do not cover hydro jetting unless damage is caused by a sudden or covered event. Always check your policy or ask your provider for clarification.

What’s included in a hydro jetting service?

A standard hydro jetting service includes equipment setup, line flushing, and a post-cleaning inspection. Camera diagnostics or additional repairs may be billed separately.

Conclusion

Hydro jetting is a powerful investment in your plumbing health, offering both immediate relief from tough clogs and long-term protection against future backups. While the upfront cost varies between $300 and $800, the value of a clean, fully restored plumbing system often outweighs the expense—especially when compared to recurring snaking visits or water damage repairs.

Understanding your pricing options helps prevent surprise repairs and allows you to choose the right service for your property. For residential systems, hydro jetting keeps drains flowing and prevents buildup in kitchen and bathroom lines. For commercial properties, it ensures business continuity by keeping sewer lines, grease traps, and high-traffic drains clear.

Whether you schedule jetting as a preventative measure or need it to resolve an urgent clog, choosing a qualified professional ensures your plumbing receives the right treatment at the right pressure. Hydro jetting is not just a cost—it’s a strategy to extend the life of your entire plumbing system.

Split image showing DIY plunging vs. professional plumber using equipment to fix a clogged toilet.

How to Tell If Your Sewer Line Is Broken or Collapsed

A broken or collapsed sewer line occurs when the main pipe carrying wastewater from the home to the municipal system becomes cracked, disjointed, or structurally compromised. Breaks often develop gradually due to aging pipe material, shifting soil, or tree root intrusion. In severe cases, the line can collapse entirely, blocking all flow and requiring full replacement.

A broken sewer line may result in recurring drain backups, soil saturation, or foundation stress.

Collapsed pipes often lead to wastewater pooling beneath the yard or seeping through slab cracks, creating property damage and health hazards. Many homeowners mistake the symptoms for ordinary clogs, but deep structural failure is usually the underlying cause.

This article explains how to recognize the early warning signs of sewer line damage, what causes it, and how to confirm whether a break or collapse has occurred.

What Causes a Sewer Line to Break or Collapse?

Sewer pipes collapse due to long-term structural stress or sudden disruption in soil stability. In most cases, failure is the result of one or more of the following:

  • Aging materials: Older pipes made of cast iron or clay degrade over time. Cast iron has a lifespan of 40 to 70 years, and clay pipes often fail earlier due to brittleness.

  • Soil shifting and expansion: Soil expansion may result in joint displacement or pipe slope failure. This is common in areas with expansive clay soil.

  • Tree root intrusion: Roots enter through small cracks and grow aggressively, pushing joints apart and causing flow restriction or fractures.

  • Pipe bellies: A belly occurs when a section of pipe sags due to poor bedding or erosion. Wastewater pools in these low spots, weakening pipe walls and increasing clog risk.

  • Poor installation: Pipes with improper slope, unsealed joints, or low-grade materials are more likely to collapse under normal soil pressure or ground load.

Older pipes are more likely to fail when exposed to root pressure, poor backfill, or years of sediment buildup.

Warning Signs of a Broken or Collapsed Sewer Line

Early symptoms of a damaged or collapsed sewer line often resemble routine plumbing issues. However, if multiple symptoms occur at once, it usually signals deeper structural failure.

  • Multiple slow drains throughout the home: While a single clog affects one fixture, multiple slow drains across the home suggest a deeper issue.

  • Gurgling sounds from toilets or drains: Gurgling often indicates trapped air caused by improper venting or backed-up wastewater.

  • Foul sewer gas odors indoors or outside: Foul odors suggest gas leakage from a cracked or collapsed pipe, often due to methane escaping into the air.

  • Soft, wet spots in the yard or foundation slab: Wet soil may point to pipe failure underground. It often occurs near lateral joints or collapsed sections.

  • Backed-up floor drains or basement flooding: When wastewater reverses through lower drains, it often means the pipe is blocked or structurally compromised.

Recognizing these symptoms early helps prevent interior flooding and major property damage.

How Professionals Confirm a Broken Sewer Line

Visual signs are not enough to confirm a sewer line break. Licensed plumbers use diagnostic tools to inspect the pipe’s interior and identify failure points.

  • Sewer camera inspection: This process reveals internal damage, blockages, joint separation, or root intrusion. A high-definition camera is inserted through the cleanout and records the entire length of the pipe.

  • Hydrostatic pressure testing: Pressure tests are used to identify leaks in sections that may not show visible cracks. The system is filled with water and monitored for pressure loss.

  • Smoke testing: Smoke testing helps detect leaks by pushing non-toxic smoke into the line. Escaping smoke shows where cracks, gaps, or disconnections exist.

These tests provide exact location data and determine whether a full or partial repair is required.

What Happens If You Ignore a Broken Sewer Line?

Untreated sewer line damage can lead to severe structural and health-related consequences. What begins as a minor leak or blockage may quickly escalate into full system failure.

  • Interior and foundation damage: When wastewater seeps beneath a slab or into flooring, it weakens building materials and contributes to long-term structural damage.

  • Health hazards from sewage exposure: Blackwater exposure increases risk of bacterial infection and cross-contamination. Prolonged exposure may cause respiratory illness due to mold spores or airborne toxins.

  • Unpleasant odors and environmental risk: Broken pipes release methane and allow pathogens to enter living areas or outdoor soil, posing a public health risk.

  • Increased repair costs over time: Ignoring symptoms increases repair cost. Full line replacements are more expensive than early spot repairs or trenchless solutions.

Acting early can prevent thousands in restoration costs and protect household health.

San Antonio Conditions That Increase Sewer Line Risk

San Antonio homes are prone to sewer line issues due to a combination of environmental and infrastructure-related factors.

  • Expansive clay soil: The region’s clay-rich soil expands with moisture and contracts during dry spells. Expansive soil may lead to pipe joint separation, slope disruption, or full collapse.

  • Tree-lined residential neighborhoods: Older areas with mature trees often experience root intrusion, especially where sewer lines are shallow or unlined.

  • Older cast iron systems: Many homes in central San Antonio were built before 1980 and use cast iron pipes, which degrade internally after 40 to 70 years. Older pipes in the area often fail due to corrosion or joint fatigue.

  • Slab-on-grade foundations: Sewer lines beneath slabs are harder to access and more vulnerable to movement from shifting soil and ground pressure.

  • Permit and inspection oversight: The San Antonio Water System (SAWS) regulates sewer tie-ins and repairs. Permit compliance may affect both timeline and cost of sewer work.

Local soil conditions and aging infrastructure increase the likelihood of sewer failure in San Antonio homes.

What to Do If You Suspect Sewer Line Damage

If you notice these signs—multiple slow drains, gurgling toilets, or sewage odors—take immediate action. Do not run water until the system has been assessed. Continued use can worsen existing damage or cause interior flooding.

Homeowners should contact a licensed plumber to perform a sewer camera inspection through the main cleanout. The inspection identifies internal pipe conditions, blockage points, and signs of collapse.

Document any visible symptoms, such as wet yard spots, sewage backups, or fluctuating toilet water levels. Sharing these observations with the technician helps guide the repair process.

Early diagnosis helps prevent widespread damage, costly excavation, and future contamination risks.

Frequently Asked Questions

Can a sewer line collapse suddenly?

A sewer line can collapse when shifting soil or advanced corrosion causes structural failure, especially in aging or brittle pipe systems.

Does insurance cover broken sewer lines?

Most insurance policies cover sewer line damage only if a specific rider is included. Coverage depends on the cause of failure and policy type.

What’s the difference between a clog and a collapse?

A clog usually affects only one drain or fixture. A collapse blocks the entire line and often causes widespread backups across the home.

Conclusion

A broken or collapsed sewer line can cause serious damage if not addressed early. Gurgling drains, sewage odors, and recurring backups often indicate structural failure—not just a typical clog. Timely inspection using camera diagnostics ensures that the problem is identified before it escalates.

Early detection saves time and cost. Licensed technicians can identify the exact source of failure and recommend the most effective solution.

Anchor Plumbing Services provides expert sewer line diagnostics and repair in San Antonio, using advanced inspection tools and long-lasting repair methods trusted by local homeowners.

Illustration of underground sewer line with damage causes including roots and soil shifting.

What Causes Sewer Line Damage? 7 Common Problems in Residential Plumbing

Sewer line damage is a growing issue in residential plumbing systems. It occurs when underground pipes that carry wastewater from the home to the municipal sewer system fail due to environmental conditions, structural defects, or poor usage practices. These failures often remain hidden until surface symptoms emerge—such as slow drains, recurring backups, or visible sinkholes in the yard.

Each problem originates from different factors: soil movement, pipe material corrosion, tree root intrusion, and household waste buildup. These damage types develop over time, leading to cracks, blockages, or even full pipe collapse beneath foundations or lawns.

This article explains seven of the most common causes of sewer line failure, helping homeowners identify risk factors early and reduce repair costs.

What is Sewer Line Damage in Residential Plumbing?

Sewer line damage refers to the physical breakdown or functional failure of the underground pipe—typically the private lateral—that carries wastewater from your home to the municipal sewer system. Most residential lines are buried beneath the yard or foundation and remain unseen until a problem disrupts flow.

Common symptoms of sewer line damage include:

  • Slow-draining sinks and tubs
  • Gurgling sounds from toilets or drains
  • Sewage odors around fixtures or in the yard
  • Water pooling near foundation or lawn depressions

Damage can result from cracks, joint separation, pipe collapse, or tree root invasion. Older systems using clay or cast-iron pipes are more vulnerable to failure due to corrosion or soil pressure.

“When sewer lines crack or collapse, wastewater cannot exit properly. This results in sewer backups and surface water seepage near the failure point.”

In most cases, identifying sewer damage requires a video camera inspection, especially if symptoms appear in multiple drains simultaneously. While municipal lines handle city-wide flow, the private lateral is the homeowner’s responsibility from the house to the main connection.

Infographic showing icons for 8 causes of sewer line damage.

1. Tree Root Intrusion

Tree roots are a leading cause of residential sewer line damage. They grow toward underground pipes in search of moisture and nutrients, especially when small leaks or condensation are present. Over time, roots enter tiny gaps in pipe joints or cracks in clay and cast iron sewer lines.

As the root diameter expands, it exerts pressure on the pipe wall. This leads to joint separation, increased leakage, and partial or complete blockages in the sewer lateral.

Older pipes with unsealed joints—typically pre-1970 clay or cast iron—are most vulnerable. Once inside the pipe, roots continue growing and trap solid waste, worsening the clog.

“Root intrusion causes both internal blockage and external soil displacement, resulting in sewer line and landscape damage.”

In severe cases, root clusters fracture the pipe entirely or force wastewater to surface near foundations or yards.

2. Soil Shifting and Ground Movement

Shifting soil is a structural cause of underground sewer damage, especially in regions like San Antonio, where clay-heavy soils expand during wet seasons and contract in dry ones. These seasonal changes cause the ground to push and pull against sewer lines buried beneath yards or foundations.

As soil expansion rates vary by depth and moisture retention, pipes without proper bedding or slope support may misalign. This often results in cracked joints, reverse slope (back-pitch), or total collapse of segments beneath the foundation slab.

“Seasonal soil movement alters the slope of a sewer line, reducing flow efficiency and increasing stress at pipe joints.”

Newer homes may include flexible couplings or improved bedding materials, but older pipes with rigid connections face higher risk. Structural misalignment from ground movement can also lead to visible foundation damage over time.

3. Aging or Corroded Pipe Materials

Sewer lines degrade over time depending on their material type and exposure to internal and external conditions. Most homes built before the 1980s used cast iron or clay pipes, both of which deteriorate structurally over decades.

Cast iron corrodes from the inside due to hydrogen sulfide gas, a byproduct of sewage. This corrosion eats away the pipe wall, forming rough surfaces and eventual holes. Clay pipes, though resistant to rot, are brittle and prone to cracking under pressure or joint separation.

“Corroded or aged sewer pipes lose structural integrity and are more likely to collapse or leak under normal flow pressure.”

In contrast, PVC and HDPE pipes offer improved corrosion resistance and flexibility, but even these can warp or separate when installed improperly.

Pipe lifespan varies by material:

  • Clay: 50–60 years
  • Cast iron: 40–70 years
  • PVC: 75–100 years (with proper installation)

Older systems nearing the end of their material life are more susceptible to breakage, especially when combined with root intrusion or soil pressure.

4. Clogs from Grease, Wipes, and Waste Build-up

Improper waste disposal is a frequent cause of internal pipe blockages. Items like grease, flushable wipes, and excess toilet paper do not break down easily and accumulate at low-flow points inside the sewer line.

Fats, oils, and grease (FOG) cool and harden inside pipes, forming a sticky film that traps other debris. Over time, this leads to thick biofilm buildup and narrowed pipe diameter. Wipes labeled as “flushable” often remain intact for days and can bind with grease to form compact clogs.

“Excessive accumulation of high-viscosity waste materials increases internal pressure and leads to joint cracks or full sewerage damage.”

Weakened or aging joints are most vulnerable, especially where slope is insufficient. Repeated blockages from dense waste can also cause wastewater to back up into household fixtures.

5. Pipe Bellies and Sagging

A pipe belly is a low or sagging section of a sewer line where water and debris collect due to improper slope or soil settlement. These bellies develop when backfill under the pipe shifts or was not compacted correctly during installation.

As water settles in the sagging segment, solids accumulate, increasing the risk of clogs and frequent backups. Bellies are especially problematic in long lateral runs where slope is critical to maintain flow velocity.

“Sewer line sag reduces hydraulic flow, creating stagnant water zones that stress the pipe over time.”

Camera inspection is the best way to diagnose a pipe belly. Technicians identify sag depth, the length of the affected section, and flow grade deviation. Long-term pooling may weaken pipe walls and promote root intrusion in vulnerable joints.

6. Poor Installation or Bad Repairs

Sewer line failure often begins with improper installation or unpermitted repairs. Pipes set with insufficient slope percentage, misaligned joints, or weak couplings are more likely to shift or separate under pressure.

Unlicensed work may skip key steps like soil compaction, joint sealing, or use of code-compliant glue types. This results in structural weak points where leakage, intrusion, or collapse can start.

“Poor installation practices reduce joint integrity and violate plumbing code requirements, increasing the likelihood of early system failure.”

Over time, even small slope deviations or joint gaps lead to recurring backups and hidden leaks. All repairs must follow local plumbing code and often require city inspection permits to ensure compliance and durability.

7. External Pressure from Construction or Driveways

Heavy surface loads from construction equipment, residential driveways, or parked vehicles can lead to underground sewer pipe failure. Pipes buried at shallow depths—typically less than 18 inches—lack the soil buffer required to distribute ground pressure safely.

Excavators, dumpsters, or even SUVs parked repeatedly over compacted soil above a sewer line can exert ground loads exceeding pipe capacity. This compresses the pipe, leading to cracks, collapse, or joint separation.

“Shallow sewer pipes beneath driveways are at higher risk of damage from vertical load stress.”

Pipes installed without reinforced bedding or warning tape may also be punctured during renovation work. Damage from external load often appears as sudden backups or visible lawn depressions.

Signs You May Have Sewer Line Damage

Most sewer line problems develop below the surface but produce early warning signs. Common indicators include:

  • Multiple slow-draining fixtures (especially on lower floors)
  • Gurgling sounds from toilets or sinks during drainage
  • Persistent sewage or methane odor near drains or outdoors
  • Water pooling near foundation or lawn indentations
  • Frequent clogging of floor drains or basement backups

“Recurring clogs and foul odors typically signal partial obstruction or pipe collapse in the lateral line.”

If these symptoms occur across multiple fixtures or recur after snaking, schedule a camera inspection to assess pipe alignment, damage, or blockage. Ignoring these signs can lead to complete system failure or interior flooding.

Frequently Asked Questions

Can tree roots really break a sewer line?

Yes. Tree roots can enter small cracks or joints in sewer pipes. As they grow, they expand and apply pressure, causing fractures, joint separation, or complete pipe collapse—especially in older clay or cast-iron systems.

What’s the average life span of a sewer pipe?

Sewer pipe lifespan varies by material:

  • Clay: 50–60 years
  • Cast iron: 40–70 years
  • PVC: 75–100 years

Material condition, soil movement, and usage habits all influence how long pipes last underground.

How do you inspect a sewer line for damage?

A sewer camera inspection uses a waterproof video scope inserted through the cleanout. It reveals pipe cracks, joint misalignment, clogs, and sagging sections in real time without excavation.

Conclusion

Sewer line damage in residential plumbing is caused by structural, environmental, and usage-related issues. The most common factors include tree root intrusion, soil shifting, aging materials, internal waste buildup, sagging pipe sections, poor installations, and surface load pressure.

Each of these problems can develop silently beneath your yard or foundation. Detecting early signs—such as recurring clogs, foul odors, or water pooling—helps prevent larger failures and costly repairs.

Spot gurgling drains, foul odors, or soggy patches? Anchor Plumbing Services delivers fast, safe sewer line repair—from camera inspection to trenchless fixes. Book your inspection now and keep sewage where it belongs. Explore our Sewer Line Repair page to get started.

Cutaway home with underground sewer camera inspection in progress and visible pipe damage.

Sewer Camera Inspection: What It Reveals and When You Need One

Sewer camera inspections are non-invasive diagnostic procedures used to visually assess the condition of underground residential sewer lines. This process involves inserting a high-resolution camera scope into the pipe system, allowing plumbers to identify hidden issues such as cracks, clogs, root intrusions, and pipe misalignment without digging.

As residential plumbing systems age, problems like corrosion, debris buildup, and structural shifts become more frequent. Homeowners often notice warning signs—slow drains, foul odors, or recurring backups—before any visible damage appears. Sewer camera inspections provide a way to pinpoint the cause quickly and accurately.

This inspection method is commonly used during real estate transactions, major remodeling projects, or prior to scheduling trenchless repairs. It ensures a clear view of pipe condition and flow performance before committing to repair or replacement.

This article covers how sewer camera inspections work, what issues they reveal, and when to schedule residential plumbing services.

What Is a Sewer Camera Inspection and How Does It Work?

A sewer camera inspection is a video-based diagnostic procedure used to examine the internal condition of your wastewater drainage system. The process begins by inserting a waterproof camera head through a cleanout port—an access point that connects directly to your home’s main sewer line.

Once inside, the flexible cable carries the camera through pipe bends, joints, and long segments. The live video feed displays on an external inspection monitor, allowing technicians to identify visible issues in real time.

Modern sewer scopes feature LED lighting, pan-and-tilt lenses, and distance-tracking capabilities. These tools help locate obstructions, cracks, and structural shifts with precision—often within inches of the problem spot.

The typical inspection lasts 30 to 60 minutes and can cover up to 100 feet of pipe using high-definition footage.

When the inspection is complete, many plumbing professionals provide either a saved video file or a written report detailing any faults found.

What Problems Can a Sewer Camera Detect?

Infographic showing problems detected by a sewer camera with icons and labels.

A sewer camera inspection reveals a wide range of structural and flow-related problems inside residential sewer pipes. The camera transmits high-resolution footage that allows plumbers to pinpoint the exact location and severity of internal damage.

Common issues include:

  • Tree root intrusion: Roots enter through small cracks or joints and expand, disrupting flow and damaging pipe walls.
  • Pipe cracks: Fractures often form in older clay or cast iron pipes due to soil pressure or corrosion.
  • Offset joints: Shifting soil can displace pipe segments, causing misaligned connections that trap debris.
  • Pipe bellies: Sagging sections in the line where water and solids collect, often from poor slope or soil compaction.
  • Corrosion: Especially in cast iron pipes, where internal rust reduces diameter and weakens pipe strength.
  • Blockages: Accumulated grease, wipes, or debris can form full or partial clogs that restrict flow.

Sewer camera inspection tools measure blockage length, damage severity, and exact depth, helping diagnose problems without excavation.

When Should You Schedule a Sewer Camera Inspection?

Homeowners should consider a sewer camera inspection when early warning signs appear. These include:

  • Recurring drain clogs, especially across multiple fixtures
  • Gurgling toilets or slow-draining tubs
  • Foul odors near drains, often caused by trapped gas or sewage buildup
  • Water backing up into floor drains
  • Before buying or remodeling a home to avoid surprise repair costs

“A camera inspection is most effective either before or after a professional drain cleaning, depending on whether blockage or structural damage is suspected.”

Attributes such as drainage speed, frequency of clogs, and home age help determine whether inspection is necessary. In older neighborhoods, yearly inspections can prevent unexpected failures.

Can a Sewer Camera Inspection Be Used for Repairs?

Yes. Sewer camera inspections are a vital planning tool for repair strategies like trenchless relining, hydro jetting, or targeted excavation.

The camera shows:

  • Exact location of damage or obstruction
  • Depth of the pipe from ground level
  • Length of damaged segment
  • Type of failure (crack, root, sag, joint separation)

“Locator beacons attached to the camera allow plumbers to mark the problem area above ground with high accuracy.”

This data reduces the need for full trenching, enabling minimally invasive repairs with lower cost and shorter downtime. It also verifies pipe condition before applying pipe lining or structural patching.

What Does a Sewer Camera Inspection Not Detect?

While sewer camera inspections are effective for visual diagnostics, they have specific limitations. The camera can only detect issues visible from inside the pipe lumen.

It cannot detect:

  • Leaks outside the pipe (e.g., from loose fittings or groundwater intrusion)
  • Water quality problems like bacterial contamination or mineral content
  • Ventilation issues in vertical plumbing vents that don’t carry wastewater
  • Structural issues above or around the pipe (e.g., settling soil or slab cracks)

Camera inspections are line-of-sight tools — they cannot sense moisture behind walls or identify pipe bursts that occur outside the main sewer route.

Technicians may recommend additional tools like smoke tests, hydrostatic testing, or leak detection sensors for comprehensive diagnostics.

How Much Does a Sewer Camera Inspection Cost?

A sewer line camera inspection typically costs between $150 and $500 depending on location, pipe length, and whether the inspection is bundled with other services.

In most cases, the inspection includes:

  • A live video feed during the procedure
  • A digital recording of the inspection (USB, cloud link, or DVD)
  • A written report or verbal summary highlighting defects, blockage points, and recommendations

In San Antonio, most residential sewer inspections range from $200 to $350, with higher costs for longer pipe runs or post-clog verification.

Some plumbers offer inspections as part of a diagnostic package when combined with hydro jetting or repair estimates.

Is Sewer Camera Inspection Common in San Antonio?

Yes. Sewer camera inspections are increasingly common in San Antonio due to aging infrastructure, expansive clay soil, and dense tree-lined neighborhoods where root intrusion and pipe shifting are frequent.

Key factors increasing inspection demand:

  • Homes built before 1980 with cast iron or clay pipes
  • Foundation shifts due to dry–wet soil cycles in Central Texas
  • High tree density increasing root-related blockage risk
  • SAWS inspection compliance for certain sewer connections and remodels

“San Antonio Water System (SAWS) encourages homeowners to maintain private sewer laterals to prevent infiltration and overflow,” according to local guidelines.

Permits are not usually required for non-invasive inspections, but repair work identified through inspections must follow city code and permitting rules.

Frequently Asked Questions

Is a sewer camera inspection worth it?

Yes. A sewer camera inspection provides accurate visual diagnostics of hidden pipe issues, helping prevent costly repairs and misdiagnosed problems.

Does sewer camera inspection show leaks?

No. It detects visual damage inside the pipe, but it cannot detect external or subsurface leaks outside the pipe walls.

Can I rent a sewer camera and do it myself?

Yes, but professional inspections offer better results. DIY cameras may lack locator beacons, video clarity, or sufficient cable length.

Conclusion

Sewer camera inspections offer a non-invasive, accurate way to diagnose underground plumbing problems such as blockages, cracks, root intrusion, and pipe sagging. They help homeowners understand the internal condition of their sewer lines before costly damage occurs.

If you suspect recurring clogs, foul odors, or slow drainage, a video inspection can guide next steps. Anchor Plumbing Services offers licensed sewer line repair backed by years of residential expertise in San Antonio.

Split image showing DIY plunging vs. professional plumber using equipment to fix a clogged toilet.

How to Unclog a Toilet and When to Call a Plumber

Clogged toilets are one of the most common plumbing issues homeowners face, and they often happen when you least expect them. A simple blockage can quickly turn into a frustrating situation, especially when it disrupts your daily routine. In many cases, you can clear the clog yourself with a few effective DIY methods that do not require specialized tools. However, some blockages are too stubborn or signal deeper problems within your plumbing system.

This guide explains proven DIY methods for unclogging your toilet and helps you understand when it is time to call a licensed plumber. By the end, you will know how to handle minor issues on your own and when to rely on professional help to avoid costly damage.

How to Unclog a Toilet?

Unclog a toilet by plunging with a flange plunger to create pressure and release the blockage. If that fails, add ½ cup of dish soap and 1 gallon of hot water, then wait 15–20 minutes. Use a toilet auger to break up deep clogs if the bowl remains backed up.

Start by placing the plunger firmly over the hole to create a tight seal. Apply a gentle initial push to expel air, then use forceful up-and-down motions to generate suction. Repeat for 15 to 20 seconds, then check if the water drains. If it does not, try again or escalate to other methods.

If plunging fails, pour hot water and dish soap into the bowl. Let it sit for 10 to 15 minutes to soften buildup before trying the plunger again. Baking soda and vinegar can also help create a mild reaction that may loosen organic clogs.

For deeper or stubborn blockages, use a toilet auger to reach further down the drain line. Insert the flexible cable slowly, rotate to break through the clog, and pull it back carefully. Always avoid flushing repeatedly while the toilet is still clogged, as this can cause overflow.

What Causes Toilet Clogs?

Icons showing common causes of toilet clogs including wipes, roots, and old toilets.

Toilet clogs are caused by flushing non-flushable items, using excessive toilet paper, low-flow toilets with weak pressure, or blocked plumbing vents. Tree roots, hard water buildup, and pipe misalignment can also contribute. Prevent clogs by flushing only waste and toilet paper and scheduling regular inspections.

Excessive Toilet Paper Buildup:

Using more toilet paper than necessary can quickly block the toilet trap and restrict water flow. Even tissue labeled as “flushable” can clump together and cause clogs over time.

Flushing Non-Flushable Items:

Common items like wipes, paper towels, feminine hygiene products, or small toys can easily create obstructions. These materials do not break down like toilet paper, which causes them to get stuck in the drain or sewer line.

Sewer Line Obstructions:

Sometimes the problem extends beyond the toilet itself. Roots from nearby trees, debris buildup, or damaged pipes in your sewer line can cause recurring clogs and slower drainage.

Hard Water Mineral Buildup:

In homes with hard water, mineral deposits accumulate inside pipes over time. This reduces the pipe’s diameter, making it easier for blockages to form even with normal toilet use.

Low-Flow Toilet Inefficiency:

Older low-flow toilet models often lack the flushing power needed to clear waste effectively. As a result, clogs occur more frequently in these systems, especially when combined with other factors like paper buildup or sewer restrictions.

Toilet clogs often happen when flushing habits, plumbing issues, and water conditions combine. Older toilets are more prone to frequent blockages, while modern high-efficiency models can handle waste better but still fail if misused.

DIY Methods to Unclog a Toilet

Infographic showing four DIY toilet unclogging methods in order.

Unclogging a toilet can often be handled at home with a few simple techniques before calling a plumber. Start with basic methods and progress to more advanced tools if the blockage persists. Each method below explains what to do, why it works, and when to move to the next step.

Use a Plunger (Standard Fix)

You can clear most clogs using a high-quality flange plunger. Place the plunger over the drain opening, ensuring a tight seal. Start with a gentle first push to avoid splashing contaminated water, then create a firm up-and-down motion to generate suction. After several pushes, remove the plunger to see if the water drains properly. Repeat if needed.

Hot Water + Dish Soap Method

If plunging fails, try loosening the blockage naturally. Pour half a cup of dish soap into the toilet bowl, followed by one gallon of hot (not boiling) water. Allow the mixture to sit for 15 to 20 minutes. The soap lubricates the pipes while the hot water helps break down buildup, making it easier for the clog to pass.

Baking Soda and Vinegar Reaction

For minor blockages, this method uses a safe chemical reaction to dislodge buildup. Pour one cup of baking soda into the bowl, followed by one cup of vinegar. Let the mixture fizz for about 30 minutes before flushing with hot water. Avoid using this method if you have already used chemical drain cleaners, as combining products may release harmful fumes.

Toilet Auger (Plumbing Snake)

When deeper clogs remain, a toilet auger can reach beyond the trap to break up or hook debris. Insert the auger tip into the bowl and slowly rotate the handle, extending it into the drain. Once resistance is felt, crank gently to dislodge the blockage. Be cautious to avoid scratching the porcelain surface. This tool works best when standard plunging and household solutions fail.

Warning Signs You Should Call a Plumber

While DIY fixes can handle many clogs, some situations require professional intervention. Watch for these signs to avoid worsening the problem:

  • Frequent clogs: May indicate a partial sewer line blockage that DIY methods cannot resolve.
  • Water backing up into other drains: Suggests a deeper obstruction affecting multiple fixtures.
  • Unpleasant odors: Could mean a hidden leak or trapped sewer gas requiring inspection.
  • Repeated toilet overflows: Signals a stubborn or severe blockage that needs professional tools.
  • Gurgling sounds in sinks or showers: Often linked to a main sewer line issue.

Persistent clogs may indicate a bigger problem within the plumbing system. Backflow from other drains often signals an obstruction beyond the toilet, which a licensed plumber can diagnose and repair safely.

How Plumbers Professionally Fix Stubborn Toilet Clogs

Licensed plumbers use advanced tools and techniques to resolve toilet clogs that DIY methods cannot handle. These solutions target deeper blockages, restore proper flow, and prevent long-term damage.

Hydro-Jetting for Severe Blockages:

Hydro-jetting uses high-pressure water streams to clear buildup, grease, and obstructions from inside the pipes. This method is highly effective for stubborn clogs and is safer for the plumbing system compared to harsh chemicals.

Camera Inspection for Accurate Diagnosis:

Plumbers often use pipe scope cameras to pinpoint the exact cause and location of the clog. This allows for targeted repairs while avoiding unnecessary digging or dismantling.

Power Augers and Professional Sewer Snakes

For deep clogs beyond the toilet trap, plumbers use motorized augers designed to break through dense blockages. These tools reach much farther than standard DIY snakes and minimize the risk of pipe damage.

Same-Day Removal for Emergency Backups

Professional plumbers can provide same-day solutions for severe or recurring clogs. With specialized equipment, they quickly diagnose and resolve complex blockages to restore normal toilet function.

Preventing Future Toilet Clogs

You can reduce future clogs by adopting simple habits and regular maintenance practices. Preventive steps help protect your plumbing system and avoid costly repairs.

  • Be Mindful of What You Flush: Avoid flushing wipes, hygiene products, grease, and other non-flushable items, even if they are labeled “septic-safe.” Stick to toilet paper only to reduce the risk of blockages.
  • Use Less Toilet Paper: Excessive toilet paper is one of the most common causes of clogs. Using smaller amounts and flushing more frequently can keep the trap and drain line clear.
  • Upgrade to a High-Pressure Flush Toilet: Older low-flow toilets often fail to push waste effectively, leading to frequent blockages. Installing a modern high-efficiency model can reduce recurring issues.
  • Schedule Routine Drain Maintenance: Professional drain cleaning once or twice a year can help remove buildup before it turns into a clog. Regular maintenance ensures the toilet and sewer lines remain in top condition.

Frequently Asked Questions

Can I use Drano in my toilet?

It’s not recommended because chemical drain cleaners like Drano can damage your toilet’s pipes, rubber seals, and internal components. Instead, use safer DIY methods or call a professional for persistent clogs.

How long should I plunge before calling a plumber?

If plunging does not clear the blockage within 10 to 15 minutes, it may indicate a deeper clog in the drain or sewer line. At this point, it is best to contact a licensed plumber.

Why does my toilet clog repeatedly?

Frequent toilet clogs often suggest a more serious issue, such as buildup inside the sewer line, improper flushing habits, or underlying plumbing problems. A professional inspection can help identify and resolve the root cause.

Conclusion

Clogged toilets are frustrating, but the right approach can save you time, stress, and unnecessary repairs. While DIY fixes like plunging, dish soap, or a toilet auger can handle minor clogs, persistent or recurring issues require professional attention to avoid further damage.

If your toilet clogs won’t budge or you notice frequent backups, Anchor Plumbing Services is here to help. Our licensed technicians use advanced tools, including camera inspections and powerful Hydro Jetting Services to clear even the toughest blockages—restoring your plumbing quickly and reliably.

house

Stay Safe From Gas Leaks

How to Identify and Respond to Dangerous Gas Line Leaks

While you may consider your home the safest place, hazards may still lurk. A gas line leak is one of them. A gas leak inside the home can result in fires, explosions, and other problems that can put family members at risk. 

To prevent these problems and stay safe, homeowners must be able to spot the signs of a gas line leak as soon as possible and know how to respond. In this blog post, Helotes, TX, plumbers explain the risks gas leaks can cause, common symptoms of leaks, and the steps households should take if they occur. 

Gas Leak Dangers

dizzy Natural gas leaks can pose serious risks to your household’s health and safety. Here are some of the most common dangers associated with gas leaks inside the home: 
  • Carbon monoxide poisoning: Carbon monoxide is a colorless, odorless gas that can be fatal.
  • Explosions: Gas leaks can lead to explosions if a spark or flame ignites the gas.
  • Property damage: Gas leaks can damage homes and belongings.

These dangers damage property and harm the health and safety of the household. If homeowners suspect a gas leak at their house or on their property, they should evacuate immediately and contact their local gas company or emergency services.

Signs of a Gas Leak

bad smell There are numerous symptoms of gas leaks that homeowners should be aware of. The sooner property owners can identify gas pipe leaks, the faster they can schedule professional services to repair the leak and restore safety to their house.

If you smell a strong odor like rotten eggs, hear a hissing sound, or notice dead grass or dying plants near your home, there could be a gas leak on your property. Additionally, if most family members experience headaches, dizziness, or nausea, it could be a sign of carbon monoxide poisoning, which is often caused by gas leaks.

Homeowners must take these signs seriously and immediately contact emergency services if they suspect a gas leak in their property. Waiting until the next day to call the local gas company can worsen the situation, and it could be too late to save your property. 

How to Respond to a Gas Leak

Homeowners who suspect a gas leak must follow key steps to protect their household and stay safe. Plumbers recommend that property owners should follow this process:

  • Evacuate your home: Leave the area immediately and avoid using any electronic devices, including their phones.
  • Call the gas company: Contact the local gas company or emergency services to report the leak.
  • Do not attempt gas leak repairs: Property owners should not try to repair the leak themselves. It is a dangerous job that should be left to professionals.
  • Stay away: Do not re-enter the home until the gas company has declared it safe.

Homeowners must remember that gas leaks can be dangerous and even deadly. They should take these steps seriously and immediately call their trusted local professionals. 

About Anchor Plumbing Services

The experts at Anchor Plumbing are the plumbing pros San Antonio homeowners can count on to repair their plumbing systems. They provide flat-rate pricing, same-day services, and guarantee satisfaction. Call them today for gas line leaks in Helotes, TX.

What is a Water Softener?

By [company_name]

A water softening system is a small, yet effective, system. It reduces the mineral count in water to prevent scale buildup which, over time, damages plumbing and appliances.

But, what is a water softener? How does it work? And is it really worth the investment? When you consider it will work hard to protect major investments – like your dishwasher and washing machine – we think it pays for itself in huge dividends.

Let’s explore the ins and outs of these systems, their benefits, and proper maintenance.

What is a Water Softener?

A water softener system treats what’s known as “hard water.” Hard water has high mineral content that, over time, causes scaling and damage to pipes and appliances.

Some of those minerals include calcium and magnesium. You might’ve seen this type of buildup before. It has a chalky, white consistency that’s difficult to remove from glassware, utensils, pots, pans, faucets, and sinks.

The best water softener will easily remove buildup by exchanging mineral ions for sodium ions. It breaks up some of those damaging minerals and prevents the buildup of scale.

There are three main parts to a water softening system.

1. Resin Tank

This is a tall tank where the softening takes place. At the base, there’s a bed of microbeads, resin, and sodium ions. The sodium ions work hard to break up some of the harmful minerals.

2. Head Valve

Next, there’s an ahead (or control) valve that sits atop the resin tank. These is considered the “brains” of the operation. It controls the water flow direction and rate, putting the system through various cycles.

3. Brine Tank

As you shop for the right system, you’ll also notice a shorter tank. This is the brine tank; it’s where the salt is stored. Some tanks can hold up to 300 pounds of salt or more.

There are other important components, like the valve motor, flow meter, riser tube, and fill tube. But, these three are the heavy hitters in any given system.

Benefits of Water Softeners

A water softener system can have positive benefits on your hair, skin, clothes, and dishes. That’s a lot of territories for one small system to cover.

Also, remember that water with a lot of buildup or sediment from too many minerals can clog pipes and ruin appliances over time. Let’s explore each of these benefits.

1. Hair and Skin

A water softener will allow you to see tangible differences in your hair and skin post-shower. It won’t feel so dry because, with the water softener salt, the water won’t strip away all the natural oils in your hair and skin.

Beyond dryness, hard water can also cause skin irritations and rashes for some people.

2. Clothes

Likewise, your clothes will come out of the wash a little softer. You’ll feel all the materials in your shirts, t-shirts, jeans, and other articles of clothing are now much softer to the touch.

3. Dishes

With those hard minerals removed before the water even sprays your dishes, you’re also going to enjoy cleaner, streak-free dishes.

4. Pipes and Drains

We’ve said this before, but it’s worth reiterating. A water softener will save your pipes because it prevents some of that harmful build-up.

Over time, too much residue can cause major damage to your plumbing. It can also reduce the efficacy of your favorite showerhead.

5. Appliances

Of course, if all that hard water isn’t making its way through the pipes and into your appliances, then water softeners will also work to save your dishwashers and washing machines.

Hard water affects the performance of these machines and drastically reduces their lifespan. Dishwashers and washing machines are costly to replace and, without question, two of our most valuable appliances in the house.

How to Choose the Right Water Softener

The size and type of your water softener depend on how many people are in your household. Monitor your water levels for a few days because what you’ll want to do is multiply the number of people in your house by the number of gallons your household uses every day.

On average, people use about 80 gallons of water per day. So, if you have a family of five, then you’re looking at 400 gallons of water per day.

You’ll multiply that number by the grains of hardness in your water. Let’s say the hardness of your water is 10 grams per gallon. Then, 400 x 10 = 4,000 grains. This tells you how many grains need to be removed on a daily basis.

As you begin to research water softeners, you’ll see manufacturers mostly post units of 24,000, 32,000, 48,000, and 64,000 grains.

With the example above, your daily water requirements are 4,000. So, you will need a water softening system with a capacity for 28,000 grains because 4,000 x 7 = 28.000. To be safe, you’d opt for a system with 32,000 grains.

Maintaining Your Water Softener

Water softening systems are wonderfully low-maintenance. When you first have one, you’ll have to enter your water hardness level and regenerate timing parameters.

After that, the main requirement is refilling the salt. But, aside from these small tasks, they mostly just hum along quietly and do their job.

As you conduct your research, you’ll see there are three different types of water softener salt: evaporated, rock, and solar. We like evaporated salt because it’s the purest form of salt at 99.99% sodium chloride.

But, solar salt is also quite soluble. Rock salt tends to be the least soluble of all. It’s known to leave a lot of residue in the tank. But, it’s also the most affordable option.

Improve Your Water Today

Water softeners are a wonderfully simplistic system that carries out some deeply scientific machinations.

What you’re left with is protected appliances, softer skin, and softer clothing. If you live in the greater San Antonio, Boerne, or New Braunfels area, we can get you set up with your own water softening system.

We’ll help you answer all those questions about grain levels and salts. Feel free to schedule your service today and we’ll look forward to meeting you!

Plumber’s Mother on a Plumber’s Journey

So, it’s been three years since my son Paul started [company_name]. Tons has happened and I retired last year from 41 years of civil service to help him full time. I’ve learned so much that I could write every day now. It was hard to decide where to start but I’ll start by telling you what it takes to be a plumber in the State of Texas.

These guys are awesome – because they have to be. You let them into your homes, and you trust them with the health and safety of your family.

In Texas, plumbing is regulated by the Texas State Board of Plumbing Examiners (TSBPE). These folks set the standards by which a person becomes a licensed plumber and that means some aspiring plumbers don’t make the grade.

First, a person must apply to the TSPBE to get an Apprentice License. While this is the easiest license to obtain, there are still very strict rules about any serious criminal activity which could result in not getting a license. At [company_name] we take your safety seriously and make sure our plumbers meet this standard.

With an Apprentice License, they work under the supervision of a Master Plumber learning their trade. It will take 4000 hours of on-the-job work and specific training courses approved by the TSPBE before they can apply to take a test for a Tradesman License. When an apprentice is ready, the TSPBE will schedule them for a written and hands-on test in Austin. As evident by our staff returning from taking the tests with short nails, the test is a real nail biter! Once an apprentice passes the test, they become a licensed Plumber in the State of Texas and must be renewed each year.

We just went through this with my grandson Dakota. It was worse than studying for the SATs and even Dakota’s Tradesman License Celebration attended an extra prep class. On top of the pressures of preparing for the test, he had the added pressure of trying not to disappoint his Dad even though we told him “no pressure” or “just do your best”—it is just the way he works, always trying his best. His father and I were online with TSBPE refreshing the screen every 30 seconds to see if he passed his test. We go through this again next summer with the other grandson! Oh yeah, he passed – the video taken of that moment is awesome–you can laugh out loud for real as I did! This is better than that baby-in-the-bathtub picture parents keep for teenage bribery.

Tradesman Plumbers continue their progression to the next level by working another 4000 hours on the job before they can apply for their Journeyman license. It’s a “rinse and repeat” of the above scenario. Take the required courses, apply, test in Austin, and pray it all goes well.

A Journeyman must hold that license for 4 years before applying for a Master Plumber License. The tests get progressively harder and fewer and fewer folks make it to the next level, but once you become a Master Plumber, you have reached the pinnacle of your trade that from now on is further honed only through work experience and high work ethic.

A Master Plumber can also start their own business which requires yet another specialized course to get a Responsible Master Plumber License.

With each level up it is cause for a great celebration with coworkers and within the greater plumbing community because they all know how hard it was to achieve those dreams.

As a homeowner or customer, you can ask to see their plumber’s license. You can also go online to TSBPE and find your plumber’s license.

The sitcoms have not been kind to this honorable trade and many a joke has been made at a plumber’s expense. Mike Rowe, a strong advocate for the trades and host of “Dirty Jobs” laments that “If you see a plumber on TV, he’s going to be 300 pounds with a giant butt crack”. We laugh all the same, but the day you realize you need a plumber it’s no longer a joke and we all experienced that relief when we heard those words that “we’re on our way to you” from the plumber you just called for that huge leak. In any event, I just thought you should know that these guys didn’t just learn how to turn a wrench but worked and studied hard to be the best they can be at what they do. They are trained professionals.

As I was sharing with Paul what I had written here, he told me that more and more, they have to “break down a wall” of distrust with new customers caused by past experiences with disreputable companies that resulted in a bad impression of plumbers and the trades in general. Clearly, licensing and training are not the only element that makes a plumber successful, but also fully standing behind any work done and making sure a customer is always satisfied are steps in the right direction.

Rest assured that the State of Texas and the awesome team at [company_name] has your back with trained and licensed plumbers you can trust and depend on to fix any plumbing problem.

The Plumber’s Mother

Yvette

“We have this hope as an Anchor for the soul” Hebrews 6:19